Categories
All About Guns Fieldcraft Gun Info for Rookies

How to fight Pistol Flinch!

Read more: https://www.ammoland.com/2018/05/pistol-shooting-drill-how-to-get-rid-of-your-flinch-video/#ixzz5FxQ5kVIB
Under Creative Commons License: Attribution
Follow us: @Ammoland on Twitter | Ammoland on Facebook

Pistol Shooting Drill – How To Get Rid Of Your Flinch [VIDEO]

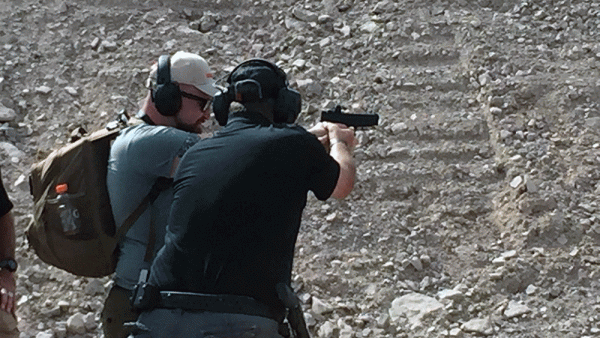
Rob Leatham helps a student by pulling the trigger for him.

U.S.A. –-(Ammoland.com)- Do you want to get rid of your flinch? You know, that one that makes you shoot low and left (if you are right-handed) consistently? Who wouldn’t?
I reached out to two of my good friends who are excellent pistol shooters and top-rated trainers, Steve “Yeti” Fisher of Sentinal Concepts and Chuck Pressburg of Presscheck Consulting. They both told me that I sucked and then gave me some great advice, shoot ball and dummy. A lot.
Disclaimer: There are a TON of types of flinches, not just one. This drill focuses on you noticing the flinch, not diagnosing what kind of flinch you are displaying.
As much as shooters poke fun at other shooters for having a flinch, many time it isn’t because the gun scared us, but instead has a lot to do with bad habits formed after thousands and thousands of rounds shot over several years without formal instruction. Maybe you are trying to mitigate the recoil of the pistol beforethe shot breaks like I was.
Before we go any further, you will need a couple of things to make this drill a ton easier on you:
Dummy rounds – I prefer the Glock brand ones since they are really cheap and I tend to lose one or two each time I do this drill. You can find them on Brownells for about $37 per 50 with an included box but they can go for about $15 cheaper if you happen to catch them on sale.
3″ Bullseyes or Target Pasters – I normally get mine from Amazon where a 25 sheet package with 9 targets per sheet will set you back $14.99 for the 3″ bulls or you can opt for the 1″ paper dots that run $10.00 for 1,000 little brown dots.
Cardboard Targets – You can also use scrap cardboard if you like but I prefer using IPSC/USPSA targets since I have several hundred of the Action Target brand ones tucked in the garage.
Something that I have struggled with for years as a handgun shooter is flinching just prior to the shot breaking. It wasn’t until Rob Letham showed me exactly what I was doing in a pretty unconventional way. He told me to take aim at the target and then proceeded to pull the trigger for me. The result? A nice tight group that I couldn’t have replicated if my life depended on it at that time in shooting career.
Now there are a ton of really old targets out there that will “diagnose” your flinch, but they are really centered around old style bullseye shooting.
When I asked Steve Fisher about the “diagnosis target” he simply replied with “Junk.” When I pressed him for more info he explained it in more detail saying “It’s a carryover from one-handed pistol shooting taught by the military around the same time that bullseye shooting was popular and has little bearing on the modern defensive and ‘gaming’ techniques taught today”

The Drill:

So I already told you that ball and dummy is the name of the drill. As you might guess it involves some ball ammunition and some dummy rounds. The idea is to have someone load your magazines with dummy rounds loaded randomly so that you have no idea where in the magazine they are.
The goal is to have no idea if the round you are pulling the trigger on is live or a dummy. Now if you are by yourself at the range like I often am, just take a ton of magazines and load them all at once randomly and mix them up so you have no idea what is in each mag.
Once you get all loaded up, head to the 3-yard line and start shooting at the 3″ bull or paster. As you come across a dummy round and you flinch, clear the gun and perform 10 dry fires, then reload the gun and continue. Make sure that every time you flinch on a dummy that you take that 10 dry fire penalty.

That is about all there is to the drill. It isn’t super hard but the benefits that I saw with my shooting was incredible after two full range days and 1,000 rounds of 9mm.

A few hundred bucks is well worth taking your shooting skill to a new level.

I want to thank Chuck and Steve for letting me bug them for advice. I strongly encourage you to look into both trainers and see if there is a class in your area, you won’t regret it.


About Patrick R.Patrick Roberts
Patrick is a firearms enthusiast that values the quest for not only the best possible gear setup, but also pragmatic ways to improve his shooting skills across a wide range of disciplines. He values truthful, honest information above all else and had committed to cutting through marketing fluff to deliver the truth. You can find the rest of his work on FirearmRack.com as well as on the YouTube channel Firearm Rack or Instagram at @thepatrickroberts.

Categories
All About Guns Born again Cynic! Fieldcraft Gun Info for Rookies Hard Nosed Folks Both Good & Bad Related Topics

Hunting, Butchering and Cooking Wild Boar – Gordon Ramsay (Yeah he killed it with his vile mouth in real life!)

https://youtu.be/6p5x0nxtqVsImage result for Gordon Ramsay memes

or Gordon as a baby!Related image

say I have some issues with this guy? Grumpy

Categories
All About Guns Fieldcraft

PRACTICAL CARBINE ACCURACY: OFF THE BENCH AND IN THE FIELD Posted by NC Scout

Practical Carbine Accuracy: Off the Bench and In the Field
img_0233

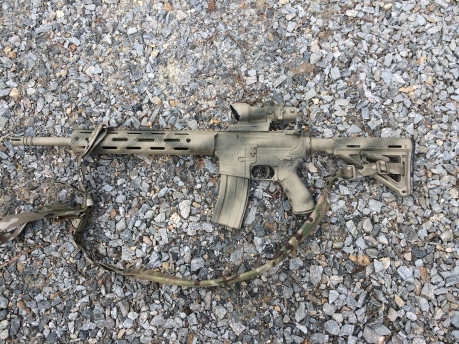
The Practical Combat Carbine- Simple, Light, Effective.

There’s a lot of confusion even among longtime shooters between what a rifle is capable of doing off the bench on a nice controlled square range and what’s actually practical for a serviceable combat weapon. The two really aren’t the same. While tight groups are definitely a plus and a goal to be attained, having a precision weapon in the general purpose role is not always completely necessary to make one combat effective. There’s a happy medium to be found, and getting there is not always hard or expensive. Above all else, it’s the fundamentals of the shooter that make a weapon deadly, no matter what.
One of the really neat things about the past couple decades, firearms-wise, is the real renaissance we’ve seen in weapons development and maximization of potential. Most visibly is this phenomena with the proliferation of the AR-15 platform, but really among all classes of weapons. One can pick up even a lower-tier carbine and have a decent action capable of making solid hits at further distances than many shoot on average. That is, if the shooter is capable. Some of this has to do with the plethora of modern ammo choices out there, some with the advent and precision of CNC machines, and some with the proliferation of free-floated handguards. While the Colt M4A1 series has a mil-spec tolerance of 4 MOA, or a ~4 inch group at 100 meters, and usually easily exceeding this your common off the shelf AR-15 can expect much better than that on average. It begins, however, with the skill of the man behind the trigger.
The same can be said for the huge boom in the Long Range hobby. Lots of people are getting into it and it can be a ton of fun putting steel on target from 500m or more. The ability to squeeze every last fraction of capability is definitely nice. And usually the underlying goal, whether plinking, running 3 gun or Long Range type stuff, is ultimately protection of hearth and home. But the question that comes to my mind is do you really need all of that to make an effective rifleman? The answer is largely determined by the rifleman’s purpose. For a combat weapon, even a designated marksman’s role, it doesn’t necessarily have to be a .5 MOA rifle or even one that really impresses at the range. Gasping for air, I know. Practical accuracy is a different animal from mechanical accuracy. But let’s look at some reasons why.
1. What is the median distance you plan to engage?
For my operating environment, I live in mostly dense forest with rolling hills. The long distance stretches are either pastures, power lines, or highways. From a light fighter’s standpoint, these three amount to the cardinal rule of never walking in the open or crossing a linear danger area with no overwatch. Overwatch, by the way, is not some fancy buzzword to sell you junk but actually is someone on your team hidden watching for muzzle flashes in case you get shot…while you’re crossing in the open or across linear danger areas. They watch over you. That said, my average engagement distance here is under 100m. Are you accurate enough to be lethal within 100m? How about 200m? How about 300m? Do you really need to shoot further than that? Maybe, maybe not. What are the intermediate barriers, i.e. potential cover (rocks, deadfall, etc) between you and where an adversary may fire from? Are you capable of shooting over those same open areas that they may cross?

0904161645a

Average backwoods of NC.

A good way to put this into context is to think of the average shot a deer hunter will make in a given area. Around here, between thick Carolina conifer and hardwood stands, shotguns do just fine for 99% of putting meat in the freezer. Rifles are nice for shooting across cutovers or fire breaks- those open areas requiring a little more range I just warned you about. And how accurate is that Remington 770 or 742 with meat ammo versus a heavyweight barreled Remington 700 5R and precision handloads? Mechanically it wouldn’t make much difference in the woods over relatively short distances. But the weight sure as heck will, regardless of whether you’re a twenty something stud out shootin’ n’ lootin’ or a mid 50s patriarch looking to protect his home. Doesn’t mean that any of these are my personal choice for anything other than hunting game, but the concept is basically the same. Which bring my next point.
2. What is your Weight Threshold?
I knew a guy a while back who had a uber-high end semi-auto AR-10, decked out to the nines, with every cool guy gimmick you can imagine and a giant NightForce 56mm celestial telescope on top. Beautiful rifle, crisp glass. Weighed 18lbs empty and carried like a 4×4 post in the hands. And there’s nothing wrong with that, if you want a high end benchrest-type gun. But that’s a ridiculous and unnecessary amount of weight for a general purpose weapon. For him, making tiny groups at a given distance was a lot of fun. But when it came time to carry it, you’d see him ditch that for his handy WASR-10 that weighs half as much loaded and accomplishes the same task within 100m.
The point is that what feels heavy but tolerable in your hands at the gunstore becomes a boat anchor after carrying it over distances with supporting equipment. Common knowledge usually dictates weight equates superior accuracy, but too much becomes self-defeating. That lightweight AR-15 with a pencil barrel can get heavy too. After a four day cave clearing mission in Afghanistan my M4 felt like a cinderblock. And aside from a PEQ-15, it wasn’t too far removed from the AR-type carbine pictured above. Granted, I was carrying a lot of other equipment including a SMAW-D and several days worth of 5590 batteries (which is like toting around bricks), but the point is that a carbine I intend to fight with needs to remain lightweight to keep me unencumbered. Because you have to keep in mind its purpose- it’s a carbine, after all. On that note, there’s a reason the broad shouldered bubbas get picked to hump the M-240B; it’s big and heavy, and the small guys can’t handle and effectively employ it over long distances. Even the meat eaters get tired though, and shaving a few ounces here and there makes a world of difference when you’re gassed.
3. Remaining Combat Effective- Remember BRAS
The reality of fighting in armed groups is that it is nothing like sitting at a range plinking targets. That’s nice for basic rifle marksmanship, and it’s really important to work on fundamentals. It’s purpose is to confirm zero & dope (Data Of Previous Engagement- a record of ballistic data for that weapon and specific ammo load) and make sure you can hit a target at a given specific distance, hence why most square ranges are referred to as Known-Distance or KD ranges. Square range time is critical, and should be at least a monthly training event for you and your group. But understand it is not the end-all-be-all; its just a foundation for Basic Rifle Marksmanship consisting of BRAS- Breathe, Relax, Aim, Squeeze. For creating and maintaining proficiency this is the proper cadence for trigger control. It’s easy to get right when relaxed and very easy to get wrong any other time. Only training on a 100m square range is a dangerously false sense of security. Only shooting from a bench and calling it good is preparing you for nothing except shooting off a bench. Getting out and humping that safe queen through the woods for a bit is critically more important than making tiny groups from the bench or even shooting fast at stationary targets in the 3-gun stall. You learn the ins and outs of that weapon on a patrol and get to make it better.
You may very well learn that what you can do with a 12lb rifle you can also do with an 8lb rifle, and that 4lb weight saving could make a big difference. If I’m running a .5MOA rifle but it’s a beast to carry with that 20in bull barrel, I may end up being so exhausted after a movement or a quick react to contact that I can’t hit anything with it because I can’t settle down behind the gun. Under duress this will happen to you. If you’re out of shape this will be you. And at that point the rifle’s accuracy is irrelevant. Shooting a half inch at 100m now becomes not even being able to acquire a target in that 14x zoom lens, because you’re spent and can’t think through your situation. Believe me, it will happen to you.
4. “If you can’t do it with irons, don’t bother with optics”
I was talking recently with an old-hand Sniper Instructor who made this comment. It may come as a shock to some of you but I agree wholeheartedly for making new riflemen. The optics themselves make life easy, especially today in the world of precision machining and glass manufacturing that makes even lesser-expensive options fairly high quality. And it can produce decent marksmen in a shorter amount of time because the process of sight-aquire-fire now becomes streamlined. But- and this is a big objection- without the fundamentals of proper marksmanship, an optic of any type does you little good and in some cases might make you worse. If I’m running way more glass than necessary, such as putting a 16×50 on an M4 because it helps me shoot tiny groups off a bench or in the prone, I’m not effective anywhere but in that one scenario. I may very well lose my target on the glass if something throws me off kilter as usually happens in a dynamic environment and I may also have trouble returning to target with any amount of speed. If I back the zoom off but have a second focal plane scope, now my reticle is worthless for any sort of bullet drop or ranging measurements.
His logic is that if I can do it with iron sights, then I have zero problem with optics. The fundamentals are there, along with my confidence. The foundation is laid. Optics of any type are a tool to enhance one’s capability, not a shortcut in training. If Joe knows he can ring steel with irons on his weapon at an average engagement distance, then an optic of any type enhances his capability. He now has confidence in himself and his weapon. And confidence is the difference maker above any piece of kit. So with that said, anyone getting started in rifle marksmanship should begin with iron sights and graduate to implementing optics down the road. Simplicity equals success. Keep in mind this is for basic training purposes; a standard for those new or inexperienced. Additionally, for those simply thinking optics always equate accuracy, buying airsoft-grade trash or even decent glass but a skimpy or improper mounting solution is a recipe for problems in the long run. If it’s worth doing, it’s worth doing right. If you genuinely don’t know, swallow that pride and get some instruction- I promise, it will be worth it.
Mechanical vs. Practical
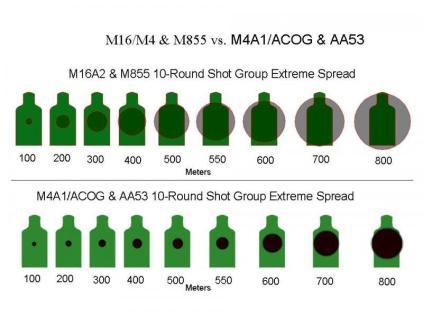
M4A1-accuracy-vs-M16A2.jpgMechanical accuracy definitely plays a large role in practical accuracy, but if your fundamentals are trash nothing is going to make you a good shooter. While you’ve read up until now that pinpoint accuracy is not a central requirement in a primary fighting carbine or rifle, good mechanical accuracy is definitely a desirable asset. If my weapon shoots 2 MOA, or a 2 inch group at 100 yards, that means on an average man-sized target at any given distance I have some margin of error to still make solid hits, all things being equal. Anything up to 4 MOA for a general purpose carbine then becomes perfectly acceptable. Even out to 600m this gives us, in theory at least, 24 inches of spread but still perfectly capable of a solid hit if you do your part. But you have to know how to do your part, and that only comes from solid training. But will you need to shoot that far? Probably not in most cases- and only your own situation can determine this. Most often our expectations should be half that distance at the most, but if everyone in your group can make those kinds of shots, then they’ll have no problems engaging closer than that.
Practical accuracy comes from the individual rifleman; riflemen are only produced and maintained through quality training. The tactics of the Team of Riflemen are the real difference maker. You should be seeking out training outside the square range on a regular basis. My friend JC Dodge has an upcoming class which will go beyond the typical comfort zone of most, pushing both the student and his equipment. In addition, I’m available for those seeking private instruction on both making the shot and proper field techniques, along with other small units skills such as Off-Grid Communications, Recon & Surveillance, Basic Survival and Combat Casualty Care. We’re not the only ones who can teach this stuff; there’s many others. But I highly implore the reader to get that training along with all the other skills to give you the tactical edge in setting up a secure retreat, even if you think you’re the ‘expert’. And with that, I’ll leave you with a quote from the late, great Peter Kokalis:

To train others in the art of war, you must both know war from the trenches and undergo constant training from others, both to keep the sharp edge and be exposed to the ever-evolving tactical concepts of combat at the down and dirty level. Several have asked why an “expert” (God how I loathe that word) like me would need to participate in training at a firearms school. The answer is simple: for the same reason tennis and golf pros constantly train under other tennis and golf pros. You cannot observe yourself while shooting, but the professional firearms instructors under whom I train can constantly detect slight nuances of incorrect movement that need to be reprogrammed.

Categories
Fieldcraft

What to Do If You’re Being Followed

man being followed on the street illustration

You arrive at your favorite coffee shop in the ‘burbs and notice a guy in a green baseball cap standing behind you. You give him a friendly nod and go back to looking at the menu.
While you’re taking a bite from your Arby’s roast beef sandwich during your lunch break downtown, you notice that same guy in the green ball cap at a table outside. “Huh. Small world. What a coincidence,” you think to yourself.
Work is over, and you roll up to the gym to get your sweat on. While you’re walking to the entrance, you glance over and see Mr. Green Baseball Hat sitting in a car in the parking lot.
You get the sinking feeling that this third spotting isn’t a coincidence and that maybe this guy is following you.
What do you do?

Why Would Someone Follow You?

Unless you’re a criminal or suspect in some crime, you probably think you don’t have to worry about being followed.
But even if you’re a law-abiding citizen, there’s a chance you could be followed at some point in your life by people who’d like to do you harm: an angry employee that you had to fire; a crazy ex; friends and family of said crazy ex; an unstable person you unintentionally offended at church; a weirdo you met once at a party who is now obsessed with you; the guy you accidentally cut off in traffic three miles back; a thief who’s decided you’re a good mark. The list goes on.
There’s also a chance you might be followed by a private investigator due to a divorce, custody battle, or other litigation you’re involved in. If that’s the case, you want to provide as little information to the PI as possible to avoid inadvertently giving your legal opponent fodder that somehow helps their case.
The chances of these kinds of people following you are slim. But if you do find yourself in this situation, it’s good to have a plan on what to do.

An Ounce of Prevention Is Worth a Pound of Cure: How to Be Less Followable

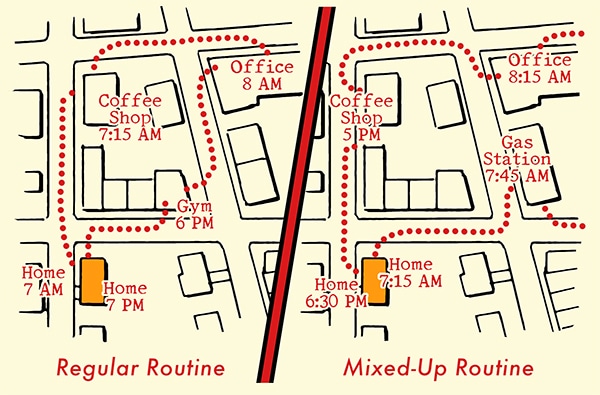
If you don’t want someone following you, the best thing to do is to make yourself less “followable” in the first place. Stalkers, PIs, or people who want to do you harm count on the fact that you have a set routine that they can easily follow along with. You subtract that advantage, and make yourself less of an easy target, by making your schedule less predictable. If you can, mix up how you get to work throughout the week. Don’t go to the same places on the same days and at the same times.
Also, don’t broadcast your whereabouts on social media. Turn off location services that indicate where you’re posting from. Would-be stalkers will check this info so they can pinpoint your movements.

How Do You Know If Someone is Following You?

You’d be surprised how easy it is to tail someone without them knowing, as most people aren’t paying attention to their surroundings. So the first step to figuring out if you’re being followed is to start keying in on what’s going on around you. Maintain situational awareness while you’re out and about and establish baselines. What’s normal for the situation or environment you’re in?
Once you’ve established baselines, pay attention to possible anomalies. Is someone looking at you more than is normal and making an unusual amount of eye contact? Does a car you don’t recognize keep driving by your house? Has someone been showing up to your favorite coffee shop who doesn’t fit the typical crowd? These are anomalies and should put you on the alert that someone might be following you.
One anomaly to register is seeing the same person, in three different places. Ex-CIA officer Jason Hanson gives this rule of thumb used in the intelligence community:
One time=an accident
Two times=a coincidence
Three times=enemy action
In addition to noting anomalies, pay attention to your gut feelings. You’ll often intuitively know when something is wrong.
Then, if you experience those uncomfortable feelings, try to confirm them. How you do so will differ as to whether you’re in a car or on foot.

In a Car

If you suspect someone is tailing you in a car, you can confirm it by doing the following:
how to tell if you're being followed illustration
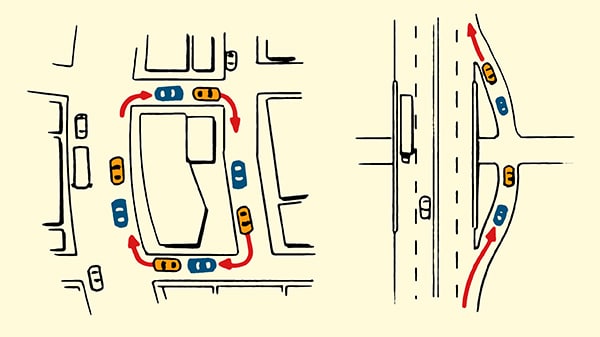
1. If you’re on city streets, make four right turns. If the car is still behind you after the fourth turn, they’re probably following you. Most people don’t travel in circles around city blocks.
2. If you’re on the freeway, get off and then immediately get back on. If you can still see the car in your review mirror, you’re probably being followed. Just as most people don’t travel in circles on city streets, most people don’t get off and then right back on a freeway.
You can also get over to the right lane of the highway, and slow down to 15 miles or so below the speed limit. All the cars behind you will soon pass by. If the one you’ve had your eye on doesn’t, it’s almost assuredly following you.

On Foot

evade being followed illustration
1. Mix up your routine.
 If you’ve got a daily routine, you likely see the same people at the same time at the same places. For example, if you go to the gym every day at 6 PM, you’re probably going to see the same people there. Thus, it’s hard to tell if someone you always see some place is following you, or just has a similar routine to yours.
So if you suspect someone has been following you, you can further confirm it by mixing up your routine. Instead of going to the coffee shop at 7 AM like you usually do, go to a convenience store. If you see your potential pursuant at the convenience store too, there’s a good chance they’re following you. You can increase your certainty of being followed by going to different places at different times. If you see the same person no matter the time and no matter the place, you can be pretty sure they’re following you.
2. Mix up your walking pace. If someone is tracking you, he’ll likely match your walking pace. If you speed up, he’ll speed up. If you slow down, he’ll slow down. If you pause, he’ll pause. So mix up your pace and observe how your suspected stalker responds. If he matches your pace, there’s a good chance he’s following you.
3. Pause and turn. Hanson suggests this effective tactic for determining if someone is following you:

“While you are walking, simply pause, turn around, and pretend to do something — like check your phone, tie a shoe, or turn around as if you were looking for someone. Then look directly at the person you think is following you. Your typical amateur who is following you is going to get flustered and give herself away. She’s likely to freeze or act unnatural because you have caught her by surprise. In other words, someone who is following you will not exhibit the same natural behavior as someone who is simply walking down the street.”

4. Change direction. As you’re walking, stop and turn around 180 degrees and start walking towards the person you suspect is following you (only do this in a public and crowded space). If your suspected stalker also flips around and starts walking behind you again, you can confirm that you’re being tailed.

What to Do If Someone Is Following You

So you’ve confirmed that you’re being followed. Now what? If possible, you want to avoid a confrontation, which all self-defense experts agree is better than needlessly getting into a violent encounter.
To do this, follow these two general rules, as well as guidelines that pertain specifically to whether you’re driving or on foot.
Rule #1: Don’t go home. Whether you’re walking or driving, don’t go to your house. It’s natural to want to get home and lock the doors, but if your tail doesn’t know where you live, you don’t want to reveal that information by taking him there.
Rule #2: Stay in public, well-lit, and well-populated areas. Don’t go anywhere that will put you by yourself with your pursuant. If you’re in your car, stay on main roads that are well-lit and don’t go down country roads or secluded streets. If you’re on foot, stay in public areas where there are lots of people. You don’t want to go down isolated alleyways where you can be cornered. If someone seems to be following you in a store, you also don’t want to go out to your car; the stalker could ambush you in the parking lot or follow you home.

In a Car

Gather info. If you’ve confirmed you’re being followed in your car, start getting information on the tailing vehicle to potentially look into yourself or pass along to the police. Get the vehicle’s make and model. And if you can score the license plate number, even better.
Call the police. If you feel threatened, call the police to let them know what’s going on. Or simply drive to your local police precinct, and tell them you believe you’re being followed. Give an officer the information on the car that’s following you and let them take it from there.
evasive driving illustration
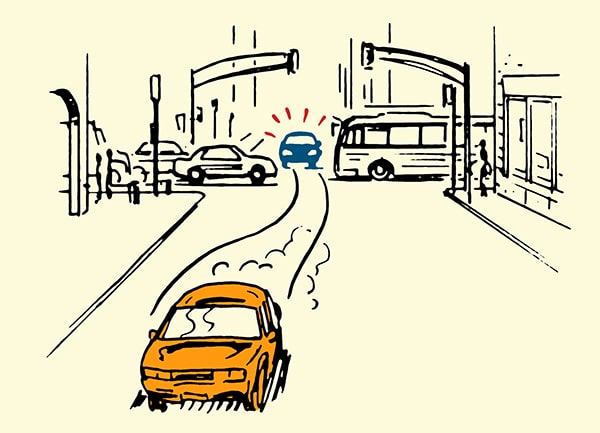
Use well-trafficked roads with lots of stoplights and stop signs. Your pursuant might get stuck at a light or behind more traffic, giving you the chance to shake him off.
Be ready for evasive maneuvering. While on the roads and at stoplights, maintain enough distance between you and the car in front of you that you can make an escape maneuver if needed. If you can see the tires of the car in front of you, you’re good.
Only return home once you feel sure you’re no longer being followed by your tail.

On Foot

Call the police. If you believe you’re being followed on foot by someone with ill intentions, call the police and give them a description of your pursuant. Keep the police on the phone for as long as possible. If your pursuant is nearby, talk loudly so he or she can hear what you’re saying. If there’s a police precinct nearby, go to it.
man escaping being followed onto subway illustration
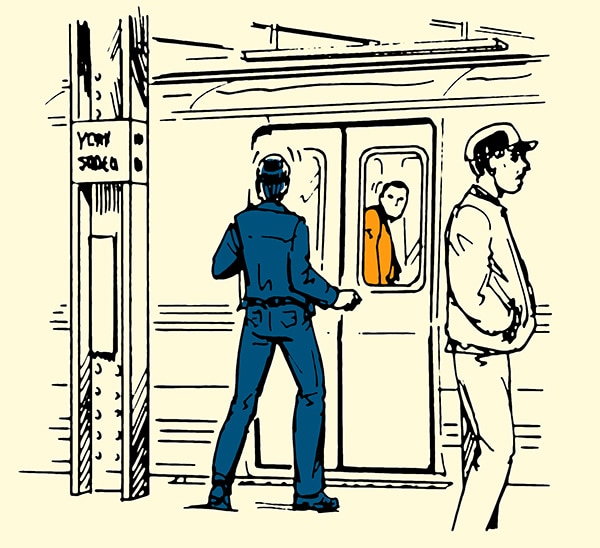
Use public transportation to shake your tail. If you know the public transportation departure times, you can hop on a bus or subway at the very last minute to lose whoever’s following you.
Acknowledge your follower. One tactic Hanson recommends using in public areas is to simply let your follower know that you know they’re following you. Turn around and look right at them. If you’re feeling brave, ask “Can I help you?” Or “What do you want?”
Most bad guys are criminals of opportunity. They’ll only go after you if they think you’re a “soft target” — that they have some sort of tactical advantage over you. Following you without you knowing is one such advantage. By acknowledging their presence, you take it away. Once they realize you’re alert to their tail and they’ve been spotted, they’ll often get flustered and immediately disengage. You’d be surprised how often a show of assertiveness will cause a would-be criminal to back down (at least if their behavior is of the social aggression rather than asocial type; if the latter, you should be prepared to fight back).
Again, you generally only want to use this tactic if you’re in a well-lit and well-populated area, in case the stalker advances instead of retreats. You want witnesses.

But What If I’m On the Lam, Jason Bourne Style?

If for some reason you find yourself in an international, high-stakes espionage manhunt like Jason Bourne, the tactics above aren’t going to work. In fact, you’re pretty much hosed. First, it’s going to be very difficult to even determine that you’re being followed. Highly skilled, professional trackers will use teams of people to co-ordinate surveillance on you. Instead of a single person following you everywhere you go, they’ll throw you off by having one person follow you in one area and another person follow you when you arrive somewhere else. They can even swap those people out to avoid you getting suspicious.
Even if you do figure out you’re being followed, because professional investigators work as a team, it’s hard to shake them. You might be able to delay their finding you, but they’ll almost assuredly get you in the end.
Long story short: try not to get into a Jason Bourne-style manhunt.
But if you’re being pursued by a more garden-variety stalker, the tips above will help.

Last updated: October 9, 2017

Categories
Dear Grumpy Advice on Teaching in Today's Classroom Fieldcraft

How to Find Water in the Wild

man in woods looking for water illustration

In any survival scenario, water is by far your most important resource. You can easily go a day without food, and usually don’t need shelter right away, unless you’re in freezing conditions. Not having any water for 24 hours, however, while survivable, depletes both your physical and mental strength, making it more difficult to perform the tasks necessary to making it out the other side. And after just three days without hydration, your body will shut down, and it’ll be lights out for you.
With about two liters per day your body will be able circulate blood, process food, regulate body temperature (which prevents hypo- and hyperthermia), think clearly, and successfully carry out a host of other internal processes.
You can see how crucial water is to your survival. Luckily, with just a little bit of know-how, water can be found relatively easy in almost any environment on the planet. In today’s article, we’ll walk you through several methods for finding water that will work for temperate climates and a variety of others, as well as methods that are particularly suited for tropical, freezing, and desert regions.

A Note Before Starting: Always Filter

Any survival expert will tell you that no matter where you find water in the wild — be it from streams, lakes, condensation on plants, etc. — it should always be filtered or purified before drinking. Now, in many cases this isn’t possible, as you may not have the right supplies on you. Just know that any water you ingest without purifying could carry harmful bacteria, and is a risk on your part. If your choice is life or death, that’s a risk you’re most definitely going to take. Some water collection methods are safer for straight drinking than others; we’ll outline those below.

General Methods and Tips for Finding Water in the Wild

The following tips work especially well in temperate and tropical areas, but many also apply to other climates too.

Start With the Obvious: Streams, Rivers, Lakes

These are your most obvious sources of water in the wild. Clear, flowing water is your best option, as the movement doesn’t allow bacteria to fester. This means that small streams should be what you look for first. Rivers are acceptable, but larger ones often have a lot of pollution from upstream. Lakes and ponds are okay, but they’re stagnant, meaning there’s an increased chance for bacteria.
Now then, how do you go about finding these bodies of water? First, use your senses. If you stand perfectly still and listen intently, you may be able to hear running water, even if it’s a great distance away.

man watching bird flight path in forest illustration
Next you’ll use your eyes to try and find animal tracks, which could lead to water. Insect swarms, while annoying, are another sign of water close by. And in the mornings and evenings especially, following the flight path of birds may lead you to your much-needed H2O. Watching animal behavior is especially important in the desert. Animal tracks will be easier to spot in the sand, and they’ll almost always eventually lead to water. Birds will also especially flock towards water in dry areas.
Also just scout the environment you’re in. Water runs downhill, so follow valleys, ditches, gullies, etc. Find your way to low ground, and you’ll often run into water.

Collect Rainwater

Collecting and drinking rainwater is one of the safest ways to get hydrated without the risk of bacterial infection. This is especially true in wild, rural areas (in urban centers, the rain first travels through pollution, emissions, etc.).
There are two primary methods of collecting rainwater. The first is to use any and all containers you might have on you. The second is to tie the corners of a poncho or tarp around trees a few feet off the ground, place a small rock in the center to create a depression, and let the water collect.
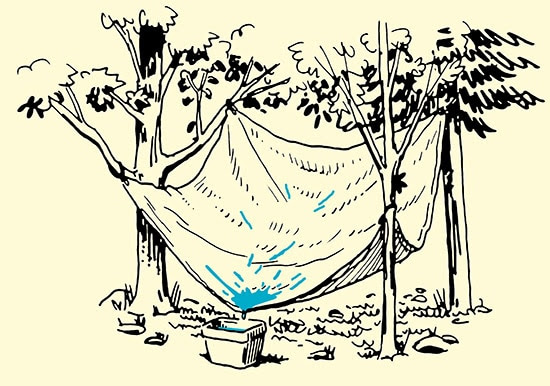
tarp collecting water into container forest illustration
You can combine these methods and make your containers more effective by tying the poncho or tarp to funnel into your bottle or pot or whatever you have (as long as it doesn’t overflow and waste water!).

Collect Heavy Morning Dew

Looking for a way to collect up to a liter of water per hour? Tie some absorbent clothes/cloths or tufts of fine grass around your ankles, and take a pre-sunrise walk through tall grass, meadows, etc. Wring out the water when the cloths are saturated, and repeat. Just be sure you aren’t collecting dew from any poisonous plants.

Fruits/Vegetation

Fruits, vegetables, cacti, fleshy/pulpy plants, even roots contain a lot of water. With any of these, you can simply collect the plants, place them into some kind of container, and smash them into a pulp with a rock to collect their liquid. It won’t be much, but in desperate situations, every little bit helps.
This method is especially helpful in tropical environments where fruits and vegetation are abundant. Coconuts can be an excellent source of hydration. Unripe, green coconuts are actually better, though, as the milk of ripe coconuts acts as a laxative, which will just further dehydrate you.

Collect Plant Transpiration
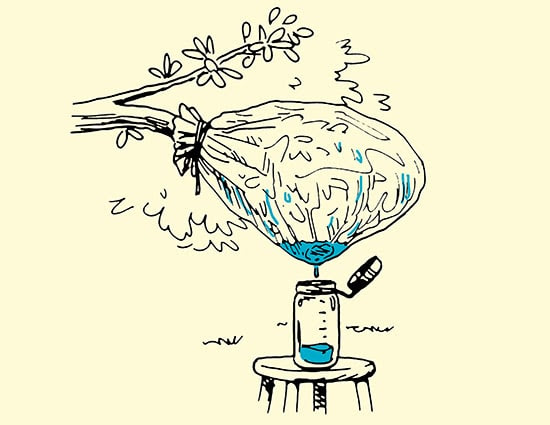
collecting water from plant transpiration illustration
Another easy option for water collection is taking advantage of plant transpiration. This is the process in which moisture is carried from a plant’s roots, to the underside of its leaves. From there, it vaporizes into the atmosphere; but, you’re going to catch the water before it does that.
First thing in the morning, tie a bag (or something you can make into a bag; the larger the better) around a leafy green tree branch or shrub. Place a rock in the bag to weigh it down a little bit so the water has a place to collect. Over the course of the day, the plant transpires, and produces moisture. Rather than vaporizing into the atmosphere, though, it collects at the bottom of your bag. Never do this with a poisonous plant.

Tree Crotches/Rock Crevices

Like with fruits/vegetation, this is another source that won’t provide all that much water, but again, it’s definitely something when the straits are dire – particularly when you’re stranded in a desert. The crotches of tree limbs, or the crevices of rocks can be small collecting places for water. In an arid area, bird droppings around a rock crevice may indicate the presence of water inside, even if it can’t be seen. To remove water from crotches and cracks, stick a piece of clothing or cloth in, let it soak up any moisture, and wring it out. Repeat if you can, and return after a rain for a fresh supply.

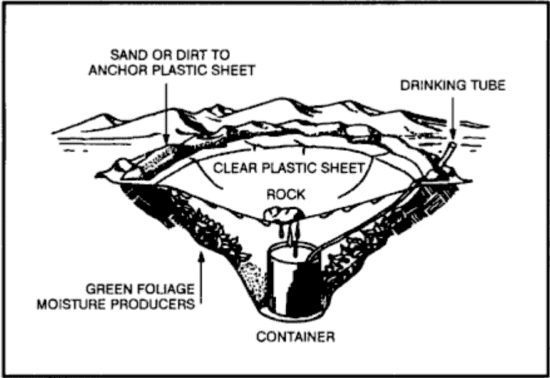
Dig an Underground Still

The benefit of creating a still is that it provides a reliable, fairly substantial source of water (compared to other methods), and you know roughly how much you’ll be getting, which helps you plan and ration better.
There are aboveground and underground varieties of sills; the underground is your best bet as it collects more water, but the aboveground variety can be useful if you’re extremely energy-depleted and can’t dig a large hole. Click here to see instructions for doing that (page 58).
Directions for your underground still:
Supplies

  • Container (the largest you have)
  • Clear plastic sheeting
  • Digging tool
  • Rocks
  • Optional: something to act as a drinking tube/straw (CamelBak straw, bamboo/other plant)

Instructions

  1. Find an area that gets sunlight most of the day.
  2. Dig a bowl-like pit 3’ wide by 2’ deep. Dig an additional small hole within that for the container.
  3. Optional: Attach the drinking tube to the bottom of the container. If you don’t have one, skip this step.
  4. Place the container in the pit, and run the tubing up out of the hole.
  5. Cover the hole with plastic, and use rocks and soil to keep it in place.
  6. Put a small rock in the center of your sheet, so that it hangs and forms an inverted cone over the container.
  7. If you have a tube, drink straight from it. Otherwise, collect the container from the bottom, and replace it when you’ve stored the water elsewhere.

There’s almost always moisture in the ground at that depth. That will react with the sun’s heat to produce condensation, which will collect on the plastic. The inverted cone forces that condensation down into your container. You can expect to gather .5-1 liter per day, so you’d need more than one (or another source) to account for an entire day’s supply.

Cold/Snowy-Specific Tips

Melt Snow and Ice

Especially in the mountains, snow and ice are abundant well into the summer months, and sometimes all year round. If you’re by or on the ocean in a polar region, look to icebergs for a source of fresh water and for “old ice” that has been through rains and thaws. As opposed to salty ice, which is opaque and gray, freshwater ice has a bluish color and crystalline structure, and splinters easily with a knife.
If you’re in a boat and surrounded by salt water, capture some in a container, and allow it to freeze. The fresh water will freeze first, while the salt will accumulate as slush in the middle. Remove the ice and discard the slush.
While snow and ice provide an excellent source of water, it should always be melted and purified first. Eating straight snow/ice will lower your body temperature, which dehydrates you because it forces your metabolic rate to speed up in order to keep you warm.
The best way to melt snow/ice and make it actually taste good is to simply mix it with other water you may have, even small amounts, and slosh it around until the snow melts. If you are heating it, add a little bit of other water to it; heating snow/ice directly can actually scorch it and produce a foul-tasting drink.

Desert-Specific Tips

In temperate, tropical, and frozen/icy climes, finding and collecting water is likely to happen within your 3-day window. Your primary concern is going to be collecting, storing, and purifying it. In desert environments though, simply finding a water source can be enormously difficult. Here a few tips specifically for arid environs:

Dig Wells

Start digging. Anywhere you see dampness on the ground or green vegetation, dig a large hole a few feet deep, and you’ll likely get water seeping in. The same is true at the feet of cliffs, in dry river beds, at the first depression behind the first sand dune of dry desert lakes, and in valleys/low areas. You may not be successful, but you just might. This water will of course be rather muddy, so it will especially need filtering/purifying, but you’ll have a water source nonetheless.

Collect Condensation from Metal

Extreme temperature variations between night and day can cause condensation on metal surfaces. Before the sun rises and vaporizes that moisture, collect it with absorbent cloth. This also means you should be placing your metal items in the open rather than stored in your pack.

Beach-Specific Tips

Dig a Beach Well

If you’re stranded on land near a body of saltwater, you can still attain fresh water by digging a well on the beach. Behind the first sand dune — typically about 100 feet from shore — dig a 3-5’ hole. Line the bottom with rocks, and the sides with wood (driftwood, most likely). This allows the well to fill up without collapsing or having too much sand in the water. In a few hours, you’ll have a well full of fresh water — a combination of collected rainwater (which runs down the dunes), and sand-filtered ocean water. If it tastes salty, you simply move a little further away from shore.
A variation of this method is to let the water seep in, but then heat some additional rocks and drop them in the water. This will create steam, which can be collected by holding an absorbent cloth over the well. Wring out the cloth and repeat. This ensures that your water is free of all salt and other contaminants, but you will yield less.

Avoid Water Substitutes

In any desperate survival scenario, you may be tempted to try non-water liquids as a substitute for the real thing. In all but the most dire of situations, these should be avoided. In general, non-water substitutes only worsen your heath and vigor. These substitutes, and their harmful characteristics below:

  • Alcohol. Dehydrates and clouds judgment.
  • Urine. Contains harmful body waste and is about 2% salt.
  • Blood. May transmit disease. Also has high salt content.
  • Seawater/Sea Ice. Contains 4% salt. It takes more water to rid your body of the waste from seawater than what you get from it. Just depletes your body’s H2O supply.

Of course, if you’re a Bear Grylls fan, you’ll know he famously drank his own urine while in the Sahara Desert. Is this safe to do, or was that for entertainment purposes? If you’re down to your very last resort, drinking your urine can keep you alive for another day or two. It’s 95% water, but that other 5% is comprised of waste products that will ultimately lead to kidney failure if subsisted on for more than a very short period of time. And of course as you get more dehydrated, this method becomes even more dangerous.
Before you resort to drinking your own pee, exhaust all the methods outlined above first. With a little effort, knowledge, and ingenuity, there’s a good chance you’ll be able to find genuine H2O.
Categories
Fieldcraft Gun Info for Rookies Hard Nosed Folks Both Good & Bad

Sounds like good advice to me!

Categories
Dear Grumpy Advice on Teaching in Today's Classroom Fieldcraft

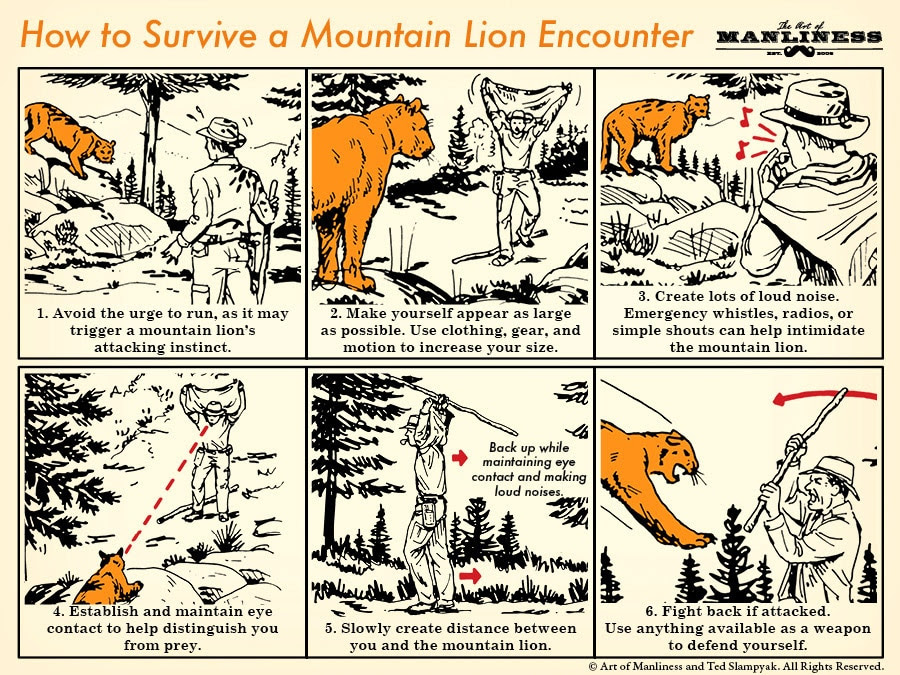
How to Survive a Mountain Lion Encounter

mountain lion on the trail illustration diagram

Spotting large predators in the wild is a thrill for any hiker or outdoorsmen, but coming face-to-face with a 220-pound cat can turn a walk in the woods into a fight for your life. Also known as cougars in some parts of the country, mountain lions tend to attack when cornered, or when they believe you might be a reasonable piece of prey. The key to avoiding a deadly encounter on the trail starts with a calm reaction.
Like this illustrated guide? Then you’re going to love our book The Illustrated Art of Manliness! Pick up a copy on Amazon.
Illustrated by Ted Slampyak

Categories
Fieldcraft Gear & Stuff

Over Yonder: The Ins and Outs of Laser Rangefinders by IAN KENNEY

When I first dipped my toes into precision rifle competition the very first match that I attended did not allow competitors to use laser rangefinders to get distances to the target.  This was familiar territory for me since I’d been trained in range estimation using the reticle in the Leupold M3A and Steiner binos.  Getting an accurate range estimation using just a reticle requires a good deal of skill and prior information though, such as the dimensions of the target.  If you didn’t know the dimensions of the target you were in a bit of a pickle but laser rangefinders don’t suffer that disadvantage.  Although you don’t have to know the size of the target to get a range, using a laser rangefinder isn’t always as easy as point and click.  Laser rangefinders were once expensive luxuries but the newer models are smaller, range farther, and pack more features than the models from just a decade ago.  However, it’s a good idea to research the options that are out there now to make sure that your money is well spent and that the unit will meet your needs.

New laser rangefinders pack in a lot of bang for the buck. The Leica 1200 CRF at the top was good for its day but newer models like the Sig KILO below provide the ability to range farther, range in meters or yards, account for angles, and adjust the brightness of the display

How Does It Work?

 In simple terms, the laser rangefinder will emit an infrared beam towards a target while another sensor looks for the reflection coming back.  Once the sensor has detected that reflection it calculates the range based on the time it took to get back to the unit and displays it for the user.  Current generations of rangefinders can not only do that in less than a second but also provide the angle to the target by way of an internal inclinometer as well as differentiate between clutter and the actual target.  The rangefinders that have a “brush” mode accomplish this by programming the rangefinder to essentially ignore close readings and display the farthest distance.  This is especially helpful for long range hunters that may have to punch through scrubs or foliage in order to get a reading on an animal.   Nearly all of the off-the-shelf rangefinders work the same way so what sets a $300 rangefinder apart from a $3,000 one?

Emitter and Sensor Quality

In the world of electronic devices, you tend to get what you pay for and laser rangefinders are no different.   One area that sets apart good laser rangefinders from great ones is the quality of their sensor and emitter package.  You may find that rangefinders at the lower end of the pricing spectrum use an emitter with a less focused beam coupled with a sensor that isn’t as sensitive to the reflected signal.  The result is a rangefinder that can maybe do 800 yards off of a reflective target in perfect conditions as opposed to 1000+ yards.   More expensive laser rangefinders with a higher maximum distance rating will use an emitter that has a tighter beam divergence in addition to a sensor that is better able to pick up the reflection off a variety of materials.
If you notice that some rangefinders use a Class 1 laser and some use a Class 3R laser I wouldn’t get too wrapped around the axle about it.  Class 1 lasers are more or less eye safe while Class 3R lasers are less so but still ok around humans as long as you take precautions.   The laser classification doesn’t necessarily mean that a rangefinder with one type is going to be better than the other one.  Again, the overall performance is going to be determined by the focus of the beam and the quality of the sensor used to pick up the return.

Optical Performance

The optical performance of the rangefinder is going to play a part in how well you can range objects, mostly in how well you can see the target.  All laser rangefinders have some level of magnification, most of the monocle rangefinders have 7X but sometimes you’ll see 6X and 8X too.  I like the 7X magnification, it offers a good balance between being able to see targets against brush or in shadows while still having a good field of view.  Some of the binocular laser rangefinders will have a higher magnification, typically 10X or so, which is just about perfect for hunting situations where you may have to look through brush or scan a far hillside.
Going hand in hand with the magnification of the unit is the quality of the glass.  I try not to be a glass snob but it really can make all the difference in a laser rangefinder.  I’ve used laser rangefinders before where the image looking through the unit was so dark it almost seemed like you were wearing sunglasses.  Now most rangefinders do have a coating on the lens to help you see the display inside but you’ll want a laser rangefinder with good glass quality.   Good enough that you can spot a gray, shot up piece of steel against a far hill while it’s sitting in the shadows of the brush.   That might sound a little far-fetched but that very scenario occurs at nearly every match I’ve been to.

Beam Divergence

I mentioned it a little bit earlier but when I was talking about the focusing of the laser I was talking about beam divergence.  Laser beams do not stay as focused points of light forever and ever.  If you take a laser pointer and aim it a close object you’ll probably see a nice point of light there.   Now, aim that same laser at a far wall and you’re likely to see an oblong patch of light instead of that defined point.   The beam from the laser pointer spreads out and the same thing happens to the beam in a laser rangefinder, this is called beam divergence.  The manufacturer can focus the beam in different dimensions to suit the overall requirements of the laser rangefinder.  Ideally, you want the tightest beam divergence that you can get, since too wide of a divergence can cause the unit to provide false readings.   The beam divergence in my Leica 1200 CRF is .5 X 2.5 mils, which translates to 1′-6″ X 7′-6″ at 1,000  yards.   That’s not too bad as rangefinders go, I can still range trees at over 1,000 yards, but my Leica is over a decade old, many of the newer models have a much tighter beam divergence for better ranging.

I used my Leica 1200 CRF to range a piece of farm equipment more than 130 yards beyond it’s stated maximum range. The combination of high quality emitter and sensor along with ideal lighting conditions helped push the boundaries of this compact laser rangefinder. The beam divergence at this range is approximately 2′-0″ X 10′ – 0″, luckily the farm equipment was huge.


Rangefinder Features

We’ve talked about the aspects of a laser rangefinder that help explain how it provides the range, now let’s talk about some of the things it should do. When you’re out looking for a new rangefinder my first piece of advice is to start looking for one that has a maximum distance rating 20-30% more than what you think you need.  If you get a unit that will range farther than you need it to, you can count on it to be able to hit those targets you need to get a range on in less than perfect conditions.  The rangefinder should also be able to give you the slope distance to the target, which is extremely important for a rifleman that’s shooting in steep terrain.  Whether you’re shooting uphill or downhill the actual distance the bullet is affected by gravity is less than the gun-to-target distance because gravity is pulling straight down.   Knowing this slope distance is very important when shooting at steep angles because just using the gun to target distance could result in a miss.  Integral ballistic computers are also becoming more and more common with laser rangefinders, something precision rifleman and hunters alike can appreciate.   Some units only display relatively generic ballistic information while others can offer custom gun profiles.  Probably one of the best full-featured rangefinders on the market is the Sig KILO2400ABS, a compact laser rangefinder with a built-in Applied Ballistics computer.

The Sig KILO can range to the 1/10th yard and automatically provides the adjusted range for slope when in AMR mode. This takes the guesswork out of adjusting the range for high angle shots.

Challenges

 Laser rangefinders can be hamstrung but a number of factors that can dramatically reduce their range and effectiveness.  Ambient lighting conditions can be the Achilles Heel of a rangefinder, with bright sunny days being the worst for trying to max out a laser rangefinder.  On really bright sunny days I’ve had my Leica 1200 CRF, which I know can range past 1,200 yards, fail to range anything past 900 yards.  In my experience, ideal conditions for a rangefinder are when the light is more diffused such as on overcast days or in the evening as the sun is going down.

Overcast lighting conditions such as this are ideal for laser rangefinders if you want hit the limits of their ranging ability. Bright, sunny conditions can reduce the effective range of some laser rangefinders by 30%.

Additionally, things like the orientation, color, and size of the target can all play into how well you’ll get a reading at distance.  A laser rangefinder works best when hitting a flat surface since it gives it the best chance of reflecting back a good signal.  If the target is angled away this can increase the chances of the sensor not picking up the beam.   Likewise, dark colors also do not do particularly well when trying to reflect a beam back to the unit, lighter colors work best in this regard.  I think it also goes without saying that trying to range small objects that are far away can also be challenging so try to pick large objects with lightly colored flat sides if you can.

Rangefinder Best Practices

 To get the most out of your rangefinder here are some things that you can do to help get an accurate distance reading.

  1. First, hold the rangefinder as steady as you can. If at all possible, mount the rangefinder to a tripod since this will be about as stable as you can get it.  Some rangefinders come with a built-in 1/4-20 but if you have to use a two-handed grip, brace against something for more stability.

    Using a tripod is the best way to get accurate long range readings with a laser rangefinder, especially if the target is small. Some rangefinders have a built-in 1/4-20 attachment point, however, in some cases you may have to use a secondary mount. This universal optics mount from Precision Rifle Solutions is an excellent way to mount laser rangefinders for a steady hold on a long-range target.

  2. Make sure the batteries are fresh. If you have been getting irregular readings or no readings on objects you know it should hit, switch the battery out for a fresh one.
  3. Choose your target wisely. As it was mentioned above, choose your target wisely to ensure you have a good chance of getting a good reflection. Avoid small targets, angled away from you that are dark in color.  If you are ranging vegetation, choose the densest part that you can find.

    There’s a road sign at the end of that tree line, you can’t see it, but with the help of the tripod mounted laser rangefinder I was able to easily get a hit on it multiple times.

  4. Range objects multiple times. When you are ranging a target, hit it multiple times to make sure the beam isn’t hitting an object in front of or behind the target. If you get two hits that are the same, aim the reticle off the side and get another reading.  If that reading is a lot different then the other two you know the first two readings probably good to go.

    This picture is a good example of how terrain can be deceiving if you’re not careful when using a laser rangefinder. While the building looks like it’s just beyond the trees, there’s actually a 900 yard separation between them.

  5. Keep the laser rangefinder protected. Scratched or damaged lenses can degrade the performance of the unit so when not in use keep the rangefinder in a protective case.  Remember, a clean lens is a happy lens.

    Most laser rangefinders come with a padded soft case for storage. These cases aren’t going to win you any style points but they do a good job of protecting the unit when not in use. Use them, the last thing you want to do is damage the lenses and potentially turn the rangefinder into a paperweight.

  6. Read the instructions. To get the most out of the features your rangefinder might have, read the instructions and then go out and practice with it. Learn its limitations, what the buttons do, and the best ways to hold it to get an accurate range reading.

    If you have to range vegetation, go for the thickest, darkest section you can find to help improve the chances to getting a hit to bounce back.

  7. It should go without saying but the laser rangefinder does emit a laser beam that can be harmful if directed at someone’s eyes. Don’t point the rangefinder at someone’s face and hit the range button, this isn’t kindergarten or an infantry platoon.

In Conclusion

As you may have guessed by now laser rangefinders are an incredibly effective tool for long range shooting, but they are not miracle workers.  That being said if you are going to get a laser rangefinder to fill out your long-range kit then spend as much as you can, buy once cry once applies here.  When I bought my Leica 1200 CRF over ten years it was one of the best compact rangefinders you could get and pricey.  Now, after a decade of use, it’s a little worse for wear but it works great and still ranges to beyond it’s stated limit so the cost is justified.
For some great laser rangefinder options check out the table below.

Laser Rangefinder Guide
Manufacturer Range Angle Compensation Multi-Mode Ballistics
Bushnell Elite 1 Mile ARC 5-1760 yards Yes Yes Yes
Bushnell Fusion 1 Mile ARC Binoculars 5-1760 yards Yes Yes Yes
Leica Rangemaster 2700-B 10-2700 yards Yes Yes Yes
Leupold RX-1300i 6-1300 yards Yes Yes No
Sig KILO2200MR 3400 yards Yes Yes No
Sig KILO2400 ABS 3400 yards Yes Yes Yes
Vortex Ranger 1500 9-1500 yards Yes Yes No
Categories
Fieldcraft

Pooping in the Woods: How to Dig a Cathole

how to dig a cathole poop in the woods illustration

When nature calls and you’re in its house, no toilets are going to spring up out of the ground ready to use. A good outdoorsman knows to dispose of their waste properly, using Leave No Trace ethics to dig a cathole in an appropriate location. Properly executed, a cathole ensures that your business decomposes quickly so your favorite trails and outdoor havens stay clean and tidy.
Like this illustrated guide? Then you’re going to love our book The Illustrated Art of Manliness! Pick up a copy on Amazon.
Illustration by Ted Slampyak

Categories
Fieldcraft

How to Track Animals: A Primer on Identifying Footprints

Brett & Kate McKay | January 11, 2016

Manly SkillsOutdoors

how to identify and track animal footprints illustration

“It is hard to over-value the powers of the clever tracker. To him the trail of each animal is not a mere series of similar footprints; it is an accurate account of the creature’s life, habit, changing whims, and emotions during the portion of life whose record is in view.” –Ernest Thompson Seton, Boy Scout Handbook, 1911

The other day while hiking some muddy trails with my family, my son pointed to a set of tracks and asked me what animal had made them. “That’s easy,” I said, “those are the tracks of a whitetail deer.” “What about those?” he asked, pointing to another set of footprints. “Those are, um, hmmm, well, I’m not sure what they are,” I confessed. I realized I needed to brush up on my knowledge of animal tracks.

Learning how to track and identify the footprints of animals is an ancient and largely forgotten art — one that’s not only important for hunters, but also enhances any outdoorsman’s experience in the wild. It’s fascinating to know what creatures are sharing the woods with you, and trying to track them down by following their trail is a lot of fun. Learning how to read tracks allows you to pick up on the little dramas enacted by wildlife that usually go unnoticed by the human eye. It’s thus a skill that both deepens your understanding of nature and heightens your all-important powers of observation.

Becoming an expert tracker takes years of practice. To get you started, today we offer a primer on the basics of identifying the footprints of common animals. We’ve taken as our guides two master woodsmen of yore — Ernest Thompson Seton, one of the founders of the Boy Scouts, and Charles “Ohiyesa” Eastman, who was raised as a Sioux tribesman — as well as drawn on tips from Tom Brown Jr., one of the foremost modern trackers.

Let’s head into the woods and see what we can discover!

Where to Look for Tracks

“Never lose the chance of the first snow if you wish to become a trailer.” –Ernest Thompson Seton

Winter is primetime for animal tracking, as the prints are easy to find in the snow and can be followed for a long distance. However, as Seton explains:

“the first morning after a night’s snow fall is not so good as the second. Most creatures ‘lie up’ during the storm; the snow hides the tracks of those that do go forth; and some actually go into a ‘cold sleep’ for a day or two after a heavy downfall. But a calm, mild night following a storm is sure to offer abundant and ideal opportunity for beginning the study of the trail.”

The drawback of snow tracking is that in deep, soft snow you may find only the holes made by the animal’s feet and legs. Further accumulation and melting can also easily obscure the trail. And of course, some animals don’t come out at all during the winter because they are hibernating.

For these reasons, mud and fine, wet sand can be an even better medium, as they hold the shape of the footprint well. A mudbank stream is one of the best places to look for tracks, as it’s frequented by shore birds and waterfowl as well as animals like the raccoon and muskrat looking for food. After a rain, sand bars, ditches, and muddy gullies are also fruitful places to find the tracks of deer, possums, and other creatures. Looking over a dewy, open field in the morning can reveal the tracks creatures made in the night as well.

Whether in snow or dirt, a track is best and easiest to follow when it is freshest — before wind, rain, melting (in the case of snow), and debris have obscured the prints.

While it’s surely fun to track animals through the wilderness, it’s also enjoyable to try to find their footprints in your very own backyard (and around the trashcan!). So always be aware of your surroundings wherever you go, and you never know what you’ll see.

Learning the Tracks

In learning which tracks belong to which animals, it can help to know the basic classifications of common animal families. Simply by counting the number of toes in a footprint, you can figure out which family the creature belongs to, and from there work on narrowing down which species you’re looking at.

In this narrowing down process, it’s useful to know which animals are common to your area. As Seton explains, “In studying trails one must always keep probabilities in mind”:

“Sometimes one kind of track looks much like another; then the question is, ‘Which is the likeliest in this place.’

If I saw a jaguar track in India, I should know it was made by a leopard. If I found a leopard in Colorado, I should be sure I had found the mark of a cougar or mountain lion. A wolf track on Broadway would doubtless be the doing of a very large dog, and a St. Bernard’s footmark in the Rockies, twenty miles from anywhere, would most likely turn out to be the happen-so imprint of a gray wolf’s foot. To be sure of the marks, then, one should know all the animals that belong to the neighborhood.”

Below you’ll find illustrations of the footprints of the track classifications for the most common families of animals; they break down not only what the tracks look like when the animal is walking (which is its typical gait), but also hopping/running (which it may do when chased by a predator, or doing some chasing of its own).

Cats

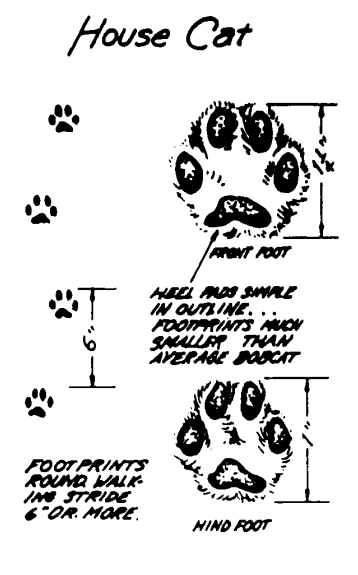
house cat footprints identify animal tracks illustration

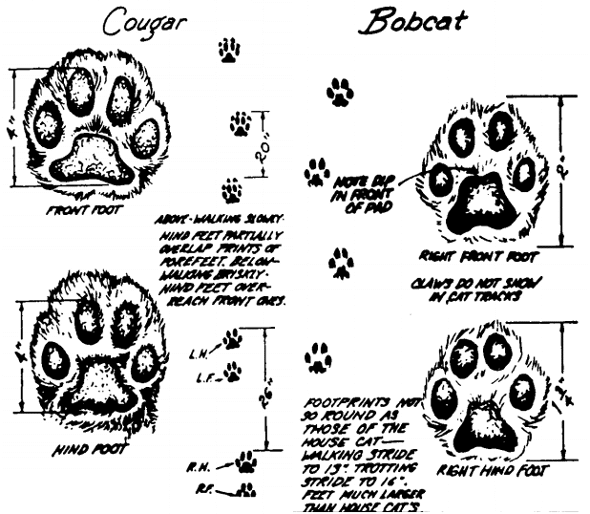
identify animal tracks illustration cougar bobcat paws

Cats leave rounded prints that show four soft, pliable, spread toes. The prints lack claws, since they’re retractable. A cat also walks in what’s called a “single register” —  its hind legs exactly track its front legs, so that it appears to only be walking with two legs, rather than four. This aids in quiet, stealthy stalking.

Canines

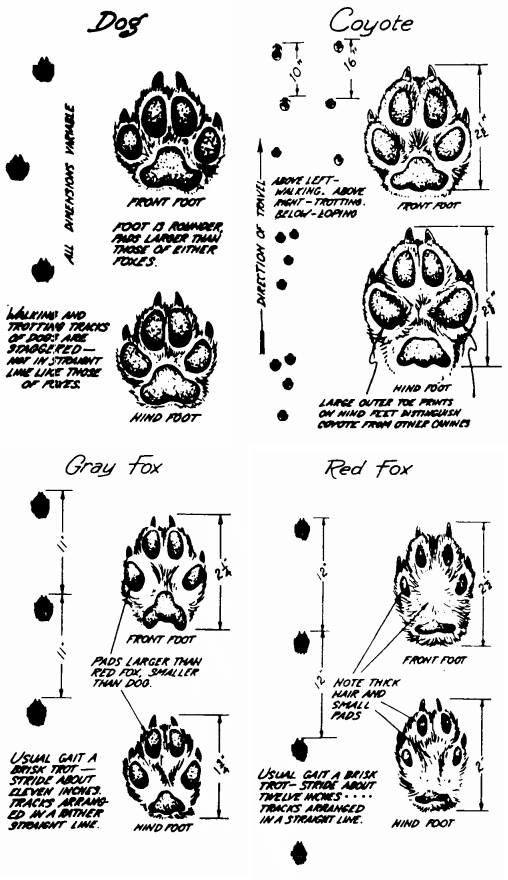
identify animal tracks illustration canines dog coyote

Canines have four toes like cats, but their feet are harder and their claws can be seen as they don’t retract. While the fox walks in a single register, dogs and coyotes walk in an indirect register — their hind legs land a little behind and to the side of the front print, leaving a messier track than that of a cat.

Weasels

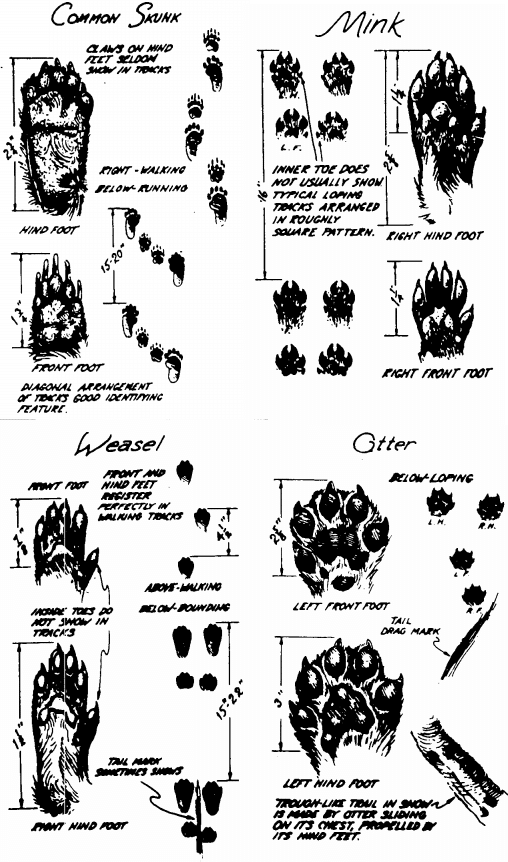
identify animal tracks illustration skunk mink weasel otter

Members of the weasel family have five toes on both their front and hind feet, though all five don’t always show in the track.

Five-Fingered Outliers

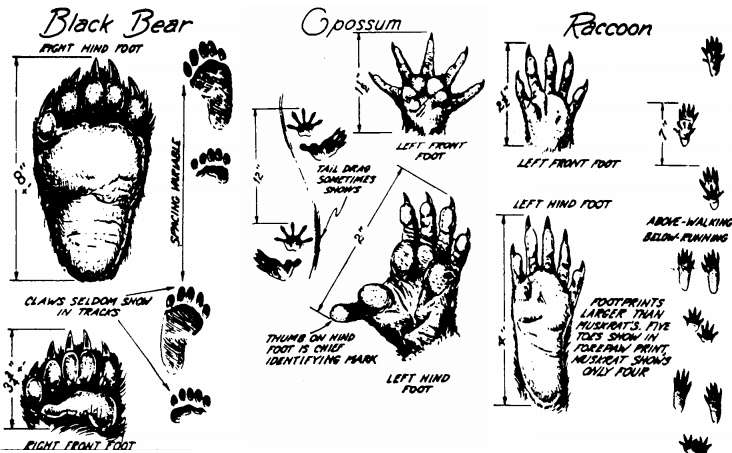
identify animal tracks illustration bear opossum raccoon

While bears, possums, and beavers don’t belong to the weasel family, their tracks are similar in that they also have five toes in both back and front. However, they differ in the flat, human-like nature of their feet.

Rodents

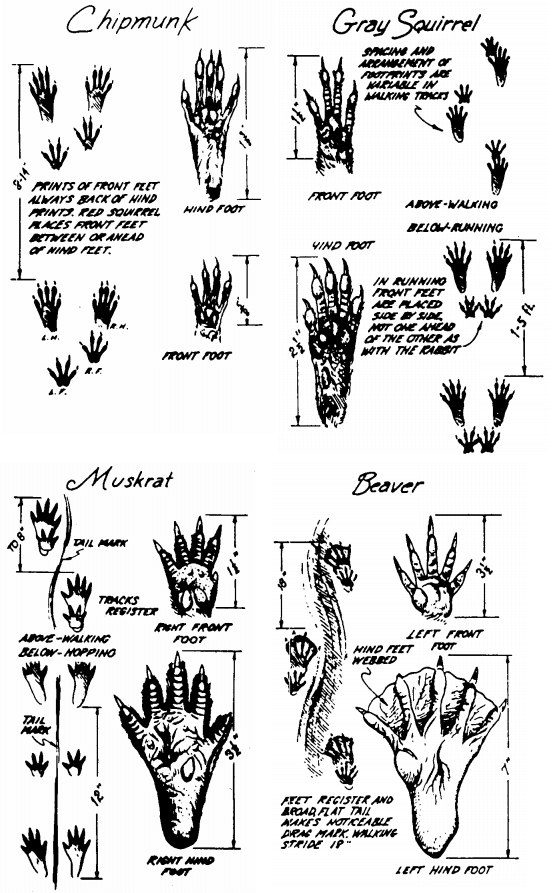
identify animal tracks illustration chipmunk squirrel muskrat beaver

Rodents have four toes on their front feet, and five toes on their hind feet.

Hares & Rabbits

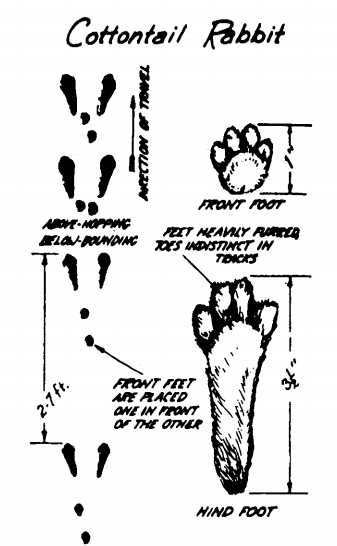
cottontail rabbit footprints identify animal tracks illustration

Rabbits have four toes on both their front and rear feet, and in almost all species the back feet leave tracks that are at least twice the size of the front.

Hoofed Animals

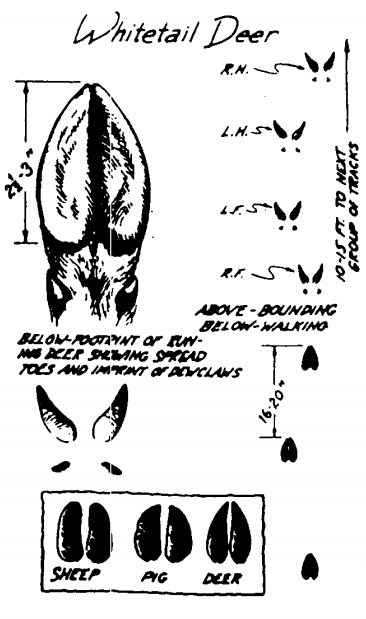
whitetail deer footprints identify animal tracks illustration

The tracks of hoofed animals are easy to recognize, and deer tracks are some of the most common to find in the woods. You can distinguish a doe from a buck, in that the female has sharper hoofs and a narrower foot than the male.

Tips for Following the Trail

“I will now ask you to enter the forest with me. First, scan the horizon and look deep into the blue vault above you, to adjust your nerves and the muscles of your eye, just as you do other muscles by stretching them. There is still another point. You have spread a blank upon the retina, and you have cleared the decks of your mind, your soul, for action.
It is a crisp winter morning, and upon the glistening fresh snow we see everywhere the story of the early hours — now clear and plain, now tangled and illegible — where every traveler has left his mark upon the clean, white surface for you to decipher.
The first question is: Who is he? The second: Where is he now? Around these two points you must proceed to construct your story.” –Charles Eastman (Ohiyesa), Indian Scout Talks, 1915

Now that you know what the tracks look like, how do you follow the trail once you’ve identified it?
When following an animal’s footprints, try to track towards the sun if possible, as the shadows will make the impressions stand out more. The sun’s position in the sky during the early morning and late afternoon will particularly enhance the tracks.

As you follow an animal’s tracks, don’t just focus on the discrete sets of prints themselves, but continually take in the trail as a whole — which may in fact be easier than finding individual footprints. For example, by looking ahead, instead of having your nose to the ground, you may see a trail of bent grass through a field. Also look for other disturbances like cracked twigs, or pebbles and leaves that have been overturned to reveal their darker, wetter undersides. If you lose the trail, place a stick by the last set of prints you discovered and then walk around it in an ever widening spiral until you pick up the trail again.

Eastman lays out other considerations for your hunt:

“It is essential to estimate as closely as you can how much of a journey you will undertake if you determine to follow a particular trail. Many factors enter into this. When you come upon the trail, you must if possible ascertain when it was made. Examine the outline; if that is undisturbed, and the loose snow left on the surface has not yet settled, the track is very fresh, as even an inexperienced eye can tell…It will also be necessary to consider the time of year. It is of no use to follow a buck when he starts out on his travels in the autumn, and with the moose or elk it is the same.”

Conclusion: What the Trail Gives — The Secrets of the Woods

Animal tracks are the alphabet of the wild — an education in their language can help you read more of the nature all around you. As Seton concludes, knowing this language opens books of the woods and its inhabitants that would otherwise be closed to you:

“There is yet another feature of trail study that gives it exceptional value — it is an account of the creature pursuing its ordinary life. If you succeeded in getting a glimpse of a fox or a hare in the woods, the chances are a hundred to one that it was aware of your presence first. They are much cleverer than we are at this sort of thing, and if they do not actually sight or sense us, they observe, and are warned by the action of some other creature that did sense us, and so cease their occupations to steal away or hide. But the snow story will tell of the life that the animal ordinarily leads — its method of searching for food, its kind of food, the help it gets from its friends, or sometimes from its rivals — and thus offers an insight into its home ways that is scarcely to be attained in any other way.

The trailer has the key to a new storehouse of nature’s secrets, another of the Sybilline books is opened to his view; his fairy godmother has indeed conferred on him a wonderful gift in opening his eyes to the foot-writing of the trail. It is like giving sight to the blind man, like the rolling away of fogs from a mountain view, and the trailer comes closer than others to the heart of the woods.
Dowered with a precious power is he,
He drinks where others sipped,
And wild things write their lives for him
In endless manuscript.”