Category: Gun Info for Rookies
As always when shooting, placement is a vital skill. If not there really no point in owning or using a gun. Grumpy

Taurus G3c image courtesy TaurusUSA.com
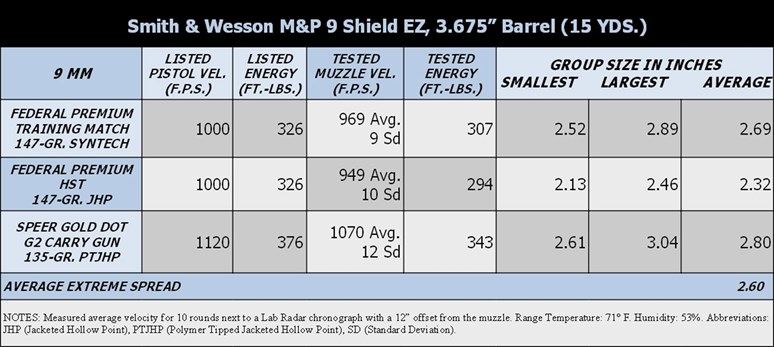
One of the most challenging things about being new to shooting sports is that so much of the information available in books, magazines and on-line articles is written for readers who already know the lingo. This is especially true when it comes to reading performance tables found in NRA publications, like this one included with the review Easy Choice: Smith & Wesson’s M&P 9 Shield EZ Pistols:
The first time I saw a table like this in a magazine (it was a few years before the Internet was a thing) I couldn’t see the forest for the trees! There’s a whole lot of jargon, numbers, abbreviations and behind-the-scenes-science packed into these things. At that time, it wasn’t clear how the sections of the tables fit together or how the information was even useful to me in trying to decide which gun to buy.
Luckily for me, I had a good friend who knew his way around these tables sit down and walk me through how to use them. It was just enough information to understand the tables without a deep dive into the chemistry, physics and mathematics behind them. This article is intended to do for you what my friend did for me all those years ago.
To aid the novice enthusiast with this walk through, I’ll be making some simplifications and generalizations, with a focus on defensive handguns. For those of you who have more experience, or PhDs in related scientific fields, please remember that the goal here is to turn the key in the ignition. We’ll save calculating the torque force required to rotate the key (τ = N m) for next semester.
The Purpose of Performance Tables
How we go about measuring performance depends on what’s being measured. Generally speaking, there are two main types of performance we’re striving to measure when testing a handgun: bullet energy and handgun accuracy. But it takes several different sources of information to get these metrics, including the type of ammunition for which the gun is chambered, barrel length, bullet weight, and data collected from tests conducted at the shooting range. Keep in mind, there is no fixed, worldwide standard for measuring handgun performance. Americans use different metrics than Europeans, and American publications use different test standards depending on who is publishing the gun review. I’ll point out what standards were used to produce the M&P9 Shield EZ pistol performance table as we go along. Now let’s take a closer look at each section of the performance table.
Title Bar
The title bar, located at the top of the table, lists the model of the handgun tested, the gun’s barrel length and the target distance in yards. The barrel length is important because it has a direct effect on both the metrics we’re looking for: bullet energy and accuracy. Longer barrels give the gun powder in the cartridge more time to burn and build up pressure. As a result, a bullet fired from a 6″ barrel is going to be traveling faster and have more energy when it leaves the gun than a bullet launched from a 2″ barrel.
A longer barrel also has more time to stabilize the bullet. This will keep it on target at greater distances for improved accuracy. Short barrels are easier to carry concealed but come with the trade off of less accuracy at extended distances. So how far should the targets be from the muzzle of the gun for accuracy testing? I followed the NRA’s American Rifleman guidelines for the tables shown here. For handgun barrels 2″ or shorter, the test targets are set 7 yards away from the muzzle. For barrels between 2″ and 4″ in length, the target is moved out to 15 yards and if the barrel is 4″ or longer, the targets are pushed back to 25 yards.
Ammunition Information Column
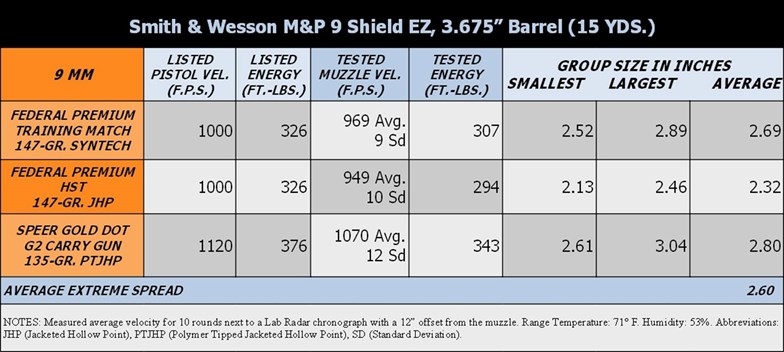
At the top of this column, on the left side of the table, is the caliber of ammunition the test gun fires. The three boxes below that Iist the brand (Speer Gold Dot), load name (G2 Carry Gun) bullet weight (135-GR.) and bullet type (PTJHP: Polymer Tipped Jacketed Hollow Point). The bullet’s weight is measured in grains, which are abbreviated -GR. It’s an archaic unit of mass based on, I kid you not, the weight of a single grain of barley. To bring it into a more modern perspective, 437.5-gr. equals one ounce.
The bullet weight is listed here because it plays a role in calculating how hard it will hit the target. There are quite a wide variety of different bullet types to choose from these days, but that’s a discussion for another article. Suffice it to say that the bullet-type abbreviations are spelled out in the Notes section of the table.
Understanding Bullet Energy
Calculating the amount of energy a bullet has just as it leaves a gun gives us a yard stick for how effective it’s going to be as a defensive tool, as well as what it’s going to feel like to shoot it. Additional tests and metrics are needed to fully quantify the ballistics of a bullet, meaning its flight path and what the bullet is likely to do when it strikes a target. But a bullet’s energy at the muzzle of the barrel is a good starting point.
Muzzle Energy Columns
Let’s talk about effectiveness first. The purpose of a defensive handgun is to stop a threat from harming us, whether it’s of the 4-legged or 2-legged variety. It does so with a transfer of kinetic energy (which is the energy of mass in motion) from the gun into the intended target via a fast moving bullet. As the bullet strikes, it transfers kinetic energy into the intended target, damaging it to some degree.
Just how much kinetic energy is produced at the muzzle of the gun, often shortened to just “muzzle energy” will play a role in how much damage it does. If the bullet strikes with too much energy, it could pass right through the threat (over penetration) and keep on going with the undesirable potential of striking an innocent bystander. But if the bullet’s energy is too low, it will not penetrate deeply enough into the target (under penetration) to effectively stop the threat. Determining the “just right” amount of muzzle energy for a defensive handgun continues to be a hotly debated topic.
In order to measure a bullet’s muzzle energy we’ll need to know the bullet’s mass and its velocity. As mentioned earlier, the mass is measured in grains (GR.) and is provided by the ammunition manufacturer.
A bullet’s velocity is determined by firing shots across, or next to, the sensors of a chronograph placed close to the gun’s muzzle. The speed is shown here in the number of feet traveled in one second (F.P.S) while some charts will use meters per second (M.P.S). Some bullets will travel slightly faster while others will be a bit slower because no two powder charges are exactly alike. That’s why it is customary for reviewers to fire multiple rounds of ammunition from the same box and then average the velocity of those shots together for a final number. In this case, 10 consecutive shots were fired for each load tested.
The bullet’s mass (GR.) and average velocity (F.P.S.) is then pumped through a kinetic energy algorithm (like this one: Ek= 1/2mv2) to get the muzzle energy, which is measured in foot-pounds (FT-LBS.) This unit of measure represents the energy required to lift one pound of weight the distance of one foot. The larger the muzzle energy number, the harder the bullet will strike the target.
Felt Recoil
This brings us to how it’s going to feel to shoot the gun. As Newton stated in his Third Law of Motion, “For every action, there is an equal and opposite reaction.” This means that when a cartridge is fired, it generates pressure in two directions. The bullet is pressed forward out of the gun while the gun itself is pressed backwards into the shooter’s hands. That sharp jerk, or kick, is what we call recoil. And how that recoil is perceived by the shooter is called felt recoil. How much felt recoil is too much for comfort? It depends on the person pulling the trigger. But those loads with greater levels of muzzle energy are going to kick harder than those that produce less energy.
Listed vs. Tested Data Columns
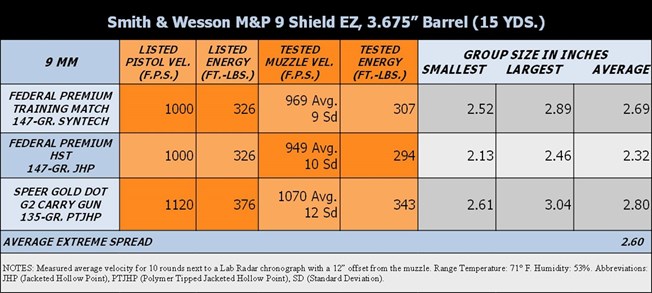
The table shown here has two sets of muzzle energy information, Listed and Tested. The “Listed” columns incorporate the pistol-length barrel performance data published by the ammunition manufacturer. Companies test their ammunition in laboratory conditions in order to make sure that it is safe to use. Most writers don’t include this information in their tables, but I find it to be a useful reference point. The “Tested” columns are the results from shooting the test gun at the range with the three listed loads of ammunition. In less-than-ideal, real-world conditions in which the barrel of the gun may be shorter than the test barrel used in the laboratory, the Tested velocity and energy levels are usually lower than the Listed results.
The two Federal 9 mm loads shown in this table have the same bullet weights and listed performance data. The Syntec is a less expensive practice-grade load while the HST is a premium defensive hollow point. They are “ballistically matched” so that the practice grade ammunition will produce recoil and accuracy on par with the hollow point loads in order to save money when practicing at the range. Based on the averaged results, both loads are statistically similar enough to say that yes, they are ballistically matched as advertized.
Just below the 10-shot average velocity number in the Tested velocity column, there’s an additional number with the abbreviation Sd next to it, which stands for Standard Deviation. The short answer for Standard Deviation is that it measures the consistency of the ammunition’s velocity. A smaller Sd means that the 10 rounds fired across the chronograph aretraveling at similar velocities with a predictable level of felt recoil. As the Sd gets larger, it means some cartridges had more powerful powder charges than others causing the levels of felt recoil to go up and down. This can detract from good shot placement. The Sd numbers shown here are fairly low showing that all three 9 mm loads produced consistent energy levels.
Group Sizes Columns
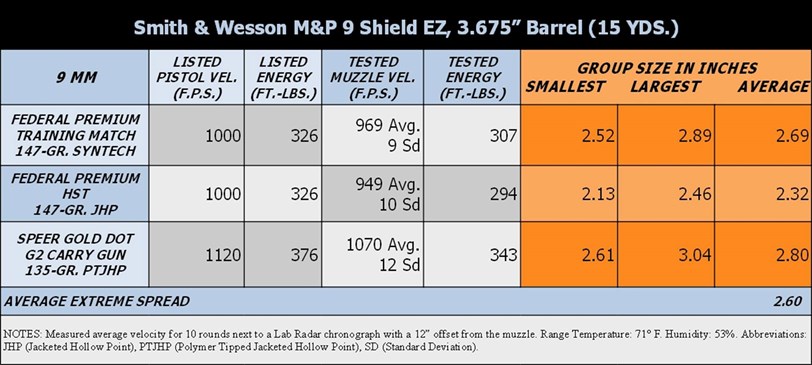
Understanding muzzle energy is all well and good, but not all that useful if you can’t hit what you’re aiming at. That’s what accuracy testing is all about. The most common approach is to fire a few shots in a row aimed at a particular location on a paper target. The bullet holes clustered together in that location are called a group. The distance between the two bullet holes that are the farthest apart from each other is measured in inches (or millimeters) and recorded. Firing just one group isn’t terribly scientific because groups tend to vary in size, just as the bullets tend to vary in velocity. In this case, a total of five groups of five shots each were fired from a seated position using a bench-rested handgun support to stabilize the pistol. Under the Group Size heading, the first column shows the smallest of the five groups followed by the largest group and the five-group average.
So what does good defensive handgun accuracy look like? There is no generally accepted industry-wide standard for acceptable accuracy but here is the rule-of-thumb that has served me well over the years. If a handgun, and the ammunition tested, can produce five shot group averages around 3″ to 3.5″ in size at a given target distance (7 yards, 15 yards or 25 yards), then the gun and ammunition are doing their jobs properly. If the groups are smaller than 3”, you’ve got yourself a winning combination.
However, if the groups are consistently larger than 3.5″, some adjustments are in order. There may be a mechanical problem with the gun, like a loose or crooked rear sight. The ammunition may be of a low quality or it’s a poor fit for the gun. If that’s the case, it should be traded out for a different brand or bullet weight. It may be that the shooter is trying to shoot past a reasonable distance for the gun’s barrel length, like shooting a tiny 2” barrel pocket pistol at 25 yards when 7- to 10 yards would be a better fit for the gun’s capabilities. Last, but certainly not least, it could be the shooter’s technique. Additional training and practice is often the key to getting groups down to the size they need to be.
Average Extreme Spread Bar
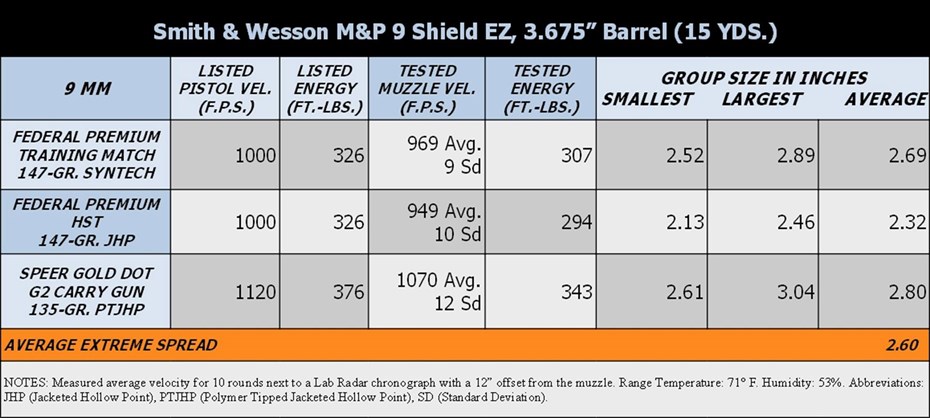
The Average Extreme Spread is a fancy name for a summary of the accuracy results. The three numbers in the Group Size Average column are averaged together to get the number you see, which in this case is 2.60″.
Notes Section
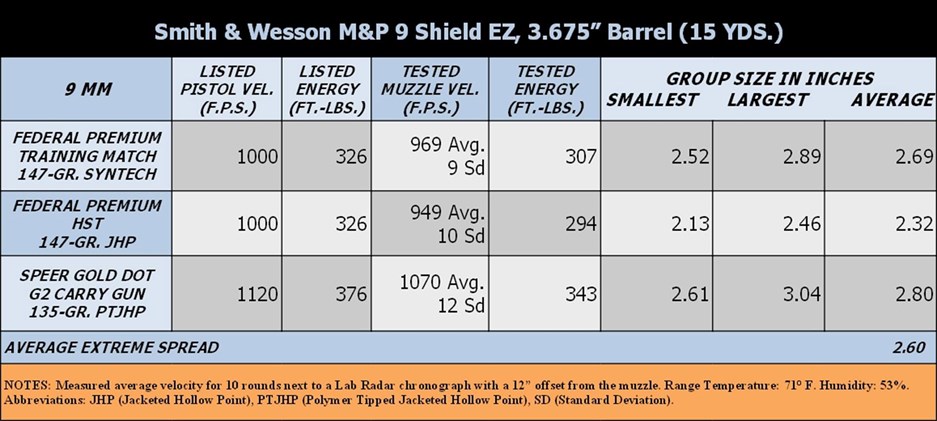
The information displayed at the bottom of the table is for the more detail oriented readers. It shows the type of chronograph used (Lab Radar), in addition to air temperature and the humidity levels since they can have an effect on the performance results. Finally, there’s a list of the bullet style abbreviations found in the far left column and a mention that Sd stands for Standard Deviation.
Putting Performance Tables to Work For You
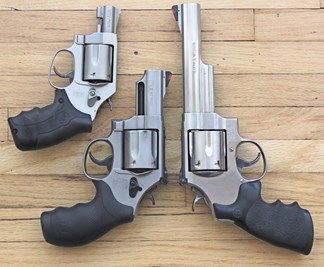
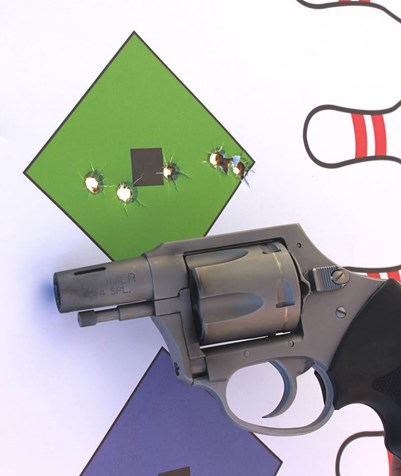
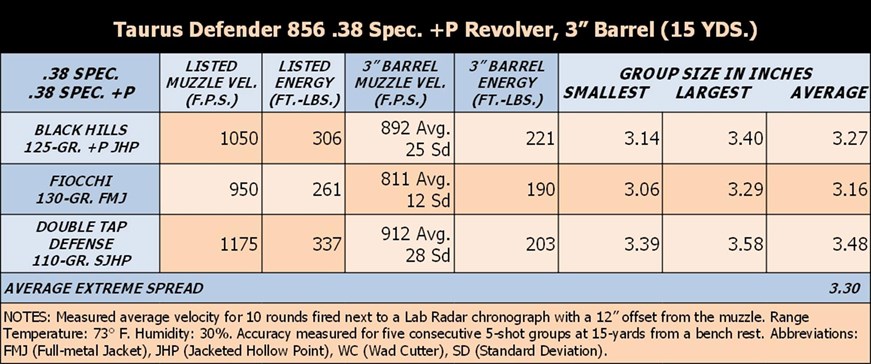
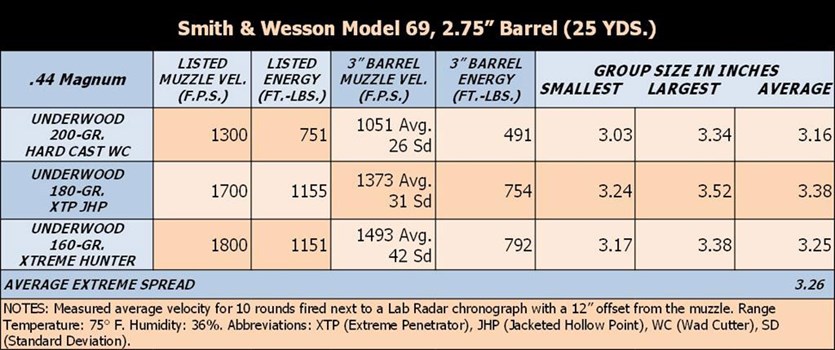
Now that you know the purpose of performance tables and what the lingo means, how can they be useful to you? Much like a one-page resume or a quick snapshot, these tables won’t tell everything there is to know about a gun you’re investigating. But they do provide just enough information to see if you want to learn more about that gun or take it for a test drive. I’ve found performance tables to be especially handy when comparing two different guns or calibers to see which would be a better fit for my needs. Here are the performance tables for two concealed carry revolvers that I tested which are chambered in different calibers. To test your newly acquired skills, take a look and see how they compare for accuracy, muzzle energy and felt recoil.
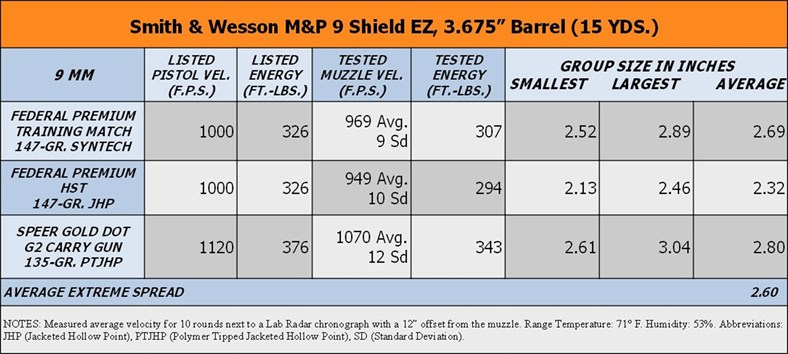
The first time I saw a table like this in a magazine (it was a few years before the Internet was a thing) I couldn’t see the forest for the trees! There’s a whole lot of jargon, numbers, abbreviations and behind-the-scenes-science packed into these things. At that time, it wasn’t clear how the sections of the tables fit together or how the information was even useful to me in trying to decide which gun to buy.
Luckily for me, I had a good friend who knew his way around these tables sit down and walk me through how to use them. It was just enough information to understand the tables without a deep dive into the chemistry, physics and mathematics behind them. This article is intended to do for you what my friend did for me all those years ago.
To aid the novice enthusiast with this walk through, I’ll be making some simplifications and generalizations, with a focus on defensive handguns. For those of you who have more experience, or PhDs in related scientific fields, please remember that the goal here is to turn the key in the ignition. We’ll save calculating the torque force required to rotate the key (τ = N m) for next semester.
The Purpose of Performance Tables
How we go about measuring performance depends on what’s being measured. Generally speaking, there are two main types of performance we’re striving to measure when testing a handgun: bullet energy and handgun accuracy. But it takes several different sources of information to get these metrics, including the type of ammunition for which the gun is chambered, barrel length, bullet weight, and data collected from tests conducted at the shooting range. Keep in mind, there is no fixed, worldwide standard for measuring handgun performance. Americans use different metrics than Europeans, and American publications use different test standards depending on who is publishing the gun review. I’ll point out what standards were used to produce the M&P9 Shield EZ pistol performance table as we go along. Now let’s take a closer look at each section of the performance table.
Title Bar
The title bar, located at the top of the table, lists the model of the handgun tested, the gun’s barrel length and the target distance in yards. The barrel length is important because it has a direct effect on both the metrics we’re looking for: bullet energy and accuracy. Longer barrels give the gun powder in the cartridge more time to burn and build up pressure. As a result, a bullet fired from a 6″ barrel is going to be traveling faster and have more energy when it leaves the gun than a bullet launched from a 2″ barrel.
A longer barrel also has more time to stabilize the bullet. This will keep it on target at greater distances for improved accuracy. Short barrels are easier to carry concealed but come with the trade off of less accuracy at extended distances. So how far should the targets be from the muzzle of the gun for accuracy testing? I followed the NRA’s American Rifleman guidelines for the tables shown here. For handgun barrels 2″ or shorter, the test targets are set 7 yards away from the muzzle. For barrels between 2″ and 4″ in length, the target is moved out to 15 yards and if the barrel is 4″ or longer, the targets are pushed back to 25 yards.
Ammunition Information Column
At the top of this column, on the left side of the table, is the caliber of ammunition the test gun fires. The three boxes below that Iist the brand (Speer Gold Dot), load name (G2 Carry Gun) bullet weight (135-GR.) and bullet type (PTJHP: Polymer Tipped Jacketed Hollow Point). The bullet’s weight is measured in grains, which are abbreviated -GR. It’s an archaic unit of mass based on, I kid you not, the weight of a single grain of barley. To bring it into a more modern perspective, 437.5-gr. equals one ounce.
The bullet weight is listed here because it plays a role in calculating how hard it will hit the target. There are quite a wide variety of different bullet types to choose from these days, but that’s a discussion for another article. Suffice it to say that the bullet-type abbreviations are spelled out in the Notes section of the table.
Understanding Bullet Energy
Calculating the amount of energy a bullet has just as it leaves a gun gives us a yard stick for how effective it’s going to be as a defensive tool, as well as what it’s going to feel like to shoot it. Additional tests and metrics are needed to fully quantify the ballistics of a bullet, meaning its flight path and what the bullet is likely to do when it strikes a target. But a bullet’s energy at the muzzle of the barrel is a good starting point.
Muzzle Energy Columns
Let’s talk about effectiveness first. The purpose of a defensive handgun is to stop a threat from harming us, whether it’s of the 4-legged or 2-legged variety. It does so with a transfer of kinetic energy (which is the energy of mass in motion) from the gun into the intended target via a fast moving bullet. As the bullet strikes, it transfers kinetic energy into the intended target, damaging it to some degree.
Just how much kinetic energy is produced at the muzzle of the gun, often shortened to just “muzzle energy” will play a role in how much damage it does. If the bullet strikes with too much energy, it could pass right through the threat (over penetration) and keep on going with the undesirable potential of striking an innocent bystander. But if the bullet’s energy is too low, it will not penetrate deeply enough into the target (under penetration) to effectively stop the threat. Determining the “just right” amount of muzzle energy for a defensive handgun continues to be a hotly debated topic.
In order to measure a bullet’s muzzle energy we’ll need to know the bullet’s mass and its velocity. As mentioned earlier, the mass is measured in grains (GR.) and is provided by the ammunition manufacturer.
A bullet’s velocity is determined by firing shots across, or next to, the sensors of a chronograph placed close to the gun’s muzzle. The speed is shown here in the number of feet traveled in one second (F.P.S) while some charts will use meters per second (M.P.S). Some bullets will travel slightly faster while others will be a bit slower because no two powder charges are exactly alike. That’s why it is customary for reviewers to fire multiple rounds of ammunition from the same box and then average the velocity of those shots together for a final number. In this case, 10 consecutive shots were fired for each load tested.
The bullet’s mass (GR.) and average velocity (F.P.S.) is then pumped through a kinetic energy algorithm (like this one: Ek= 1/2mv2) to get the muzzle energy, which is measured in foot-pounds (FT-LBS.) This unit of measure represents the energy required to lift one pound of weight the distance of one foot. The larger the muzzle energy number, the harder the bullet will strike the target.
Felt Recoil
This brings us to how it’s going to feel to shoot the gun. As Newton stated in his Third Law of Motion, “For every action, there is an equal and opposite reaction.” This means that when a cartridge is fired, it generates pressure in two directions. The bullet is pressed forward out of the gun while the gun itself is pressed backwards into the shooter’s hands. That sharp jerk, or kick, is what we call recoil. And how that recoil is perceived by the shooter is called felt recoil. How much felt recoil is too much for comfort? It depends on the person pulling the trigger. But those loads with greater levels of muzzle energy are going to kick harder than those that produce less energy.
Listed vs. Tested Data Columns
The table shown here has two sets of muzzle energy information, Listed and Tested. The “Listed” columns incorporate the pistol-length barrel performance data published by the ammunition manufacturer. Companies test their ammunition in laboratory conditions in order to make sure that it is safe to use. Most writers don’t include this information in their tables, but I find it to be a useful reference point. The “Tested” columns are the results from shooting the test gun at the range with the three listed loads of ammunition. In less-than-ideal, real-world conditions in which the barrel of the gun may be shorter than the test barrel used in the laboratory, the Tested velocity and energy levels are usually lower than the Listed results.
The two Federal 9 mm loads shown in this table have the same bullet weights and listed performance data. The Syntec is a less expensive practice-grade load while the HST is a premium defensive hollow point. They are “ballistically matched” so that the practice grade ammunition will produce recoil and accuracy on par with the hollow point loads in order to save money when practicing at the range. Based on the averaged results, both loads are statistically similar enough to say that yes, they are ballistically matched as advertized.
Just below the 10-shot average velocity number in the Tested velocity column, there’s an additional number with the abbreviation Sd next to it, which stands for Standard Deviation. The short answer for Standard Deviation is that it measures the consistency of the ammunition’s velocity. A smaller Sd means that the 10 rounds fired across the chronograph aretraveling at similar velocities with a predictable level of felt recoil. As the Sd gets larger, it means some cartridges had more powerful powder charges than others causing the levels of felt recoil to go up and down. This can detract from good shot placement. The Sd numbers shown here are fairly low showing that all three 9 mm loads produced consistent energy levels.
Group Sizes Columns
Understanding muzzle energy is all well and good, but not all that useful if you can’t hit what you’re aiming at. That’s what accuracy testing is all about. The most common approach is to fire a few shots in a row aimed at a particular location on a paper target. The bullet holes clustered together in that location are called a group. The distance between the two bullet holes that are the farthest apart from each other is measured in inches (or millimeters) and recorded. Firing just one group isn’t terribly scientific because groups tend to vary in size, just as the bullets tend to vary in velocity. In this case, a total of five groups of five shots each were fired from a seated position using a bench-rested handgun support to stabilize the pistol. Under the Group Size heading, the first column shows the smallest of the five groups followed by the largest group and the five-group average.
So what does good defensive handgun accuracy look like? There is no generally accepted industry-wide standard for acceptable accuracy but here is the rule-of-thumb that has served me well over the years. If a handgun, and the ammunition tested, can produce five shot group averages around 3″ to 3.5″ in size at a given target distance (7 yards, 15 yards or 25 yards), then the gun and ammunition are doing their jobs properly. If the groups are smaller than 3”, you’ve got yourself a winning combination.
However, if the groups are consistently larger than 3.5″, some adjustments are in order. There may be a mechanical problem with the gun, like a loose or crooked rear sight. The ammunition may be of a low quality or it’s a poor fit for the gun. If that’s the case, it should be traded out for a different brand or bullet weight. It may be that the shooter is trying to shoot past a reasonable distance for the gun’s barrel length, like shooting a tiny 2” barrel pocket pistol at 25 yards when 7- to 10 yards would be a better fit for the gun’s capabilities. Last, but certainly not least, it could be the shooter’s technique. Additional training and practice is often the key to getting groups down to the size they need to be.
Average Extreme Spread Bar
The Average Extreme Spread is a fancy name for a summary of the accuracy results. The three numbers in the Group Size Average column are averaged together to get the number you see, which in this case is 2.60″.
Notes Section
The information displayed at the bottom of the table is for the more detail oriented readers. It shows the type of chronograph used (Lab Radar), in addition to air temperature and the humidity levels since they can have an effect on the performance results. Finally, there’s a list of the bullet style abbreviations found in the far left column and a mention that Sd stands for Standard Deviation.
Putting Performance Tables to Work For You
Now that you know the purpose of performance tables and what the lingo means, how can they be useful to you? Much like a one-page resume or a quick snapshot, these tables won’t tell everything there is to know about a gun you’re investigating. But they do provide just enough information to see if you want to learn more about that gun or take it for a test drive. I’ve found performance tables to be especially handy when comparing two different guns or calibers to see which would be a better fit for my needs. Here are the performance tables for two concealed carry revolvers that I tested which are chambered in different calibers. To test your newly acquired skills, take a look and see how they compare for accuracy, muzzle energy and felt recoil.
