The following list was compiled from various online and print sources, including the major ammo manufacturers’ sales lists and the sales of RCBS reloading dies.
The various sources tend to parallel each other, with certain exceptions.
Bear in mind that a lot (probably the majority) of .223 and 7.62×39 ammo sold is for plinking or “tactical” use, not hunting.
The same probably applies to a lower, but still significant, percentage of the .308 ammo sold.
The .223, .308, .30-06, .30-30, .270, .243, 7mm Rem. Mag. and .300 Win. Mag. appear on almost all lists.
The .22-250, 7.62x39mm, .300 WSM, .338 Win. Mag. and 7mm-08 Rem. have appeared on at least one list, but not others, while the .222 Remington, .30 Carbine and .303 British (once Top 10 stalwarts on most lists) have dropped back in popularity.
The .300 Win. Mag. and 7mm Rem. Mag. swap places on some lists. Anyway, here are the averaged results based on the data that I could find.
Consider it approximate.
USA (Averaged 2015 sales rank)
.223 Remington
.308 Winchester
.30-06 Springfield
.30-30 Winchester
.270 Winchester
.243 Winchester
7mm Remington Magnum
.300 Winchester Magnum
7.62x39mm Soviet
.22-250 Remington
Honorable Mention: .300 WSM, 7mm-08 Rem. and .338 Win. Mag.
An interesting survey of the most popular hunting cartridges in use in south/central Alaska was published by the Alaska Department of Fish and Game back in 2000.
Very large animals, such as moose and the great bears are hunted here, as well as deer, goats, black bear and caribou, and the Alaskan list reflects this.
The number in parenthesis is the percentage of hunters using each caliber.
Note the abrupt fall off in popularity after the .30-06, .300 Win. Mag. and .338 Win. Mag.
ALASKA TOP TEN CARTRIDGES (Alaska Dept. of Fish and Game survey, 2000)
Opinion : John explains why he prefers Collectibles Insurance Services’ gun insurance policy over his regular homeowners insurance.
About a year ago I started looking into how to protect myself not only for theft but also from other events like fire or flooding.
U.S.A. –-(Ammoland.com)- Imagine if you come home to find your treasured collection of firearms gone. Years of collecting and thousands of dollars down the drain. If only there were a way to protect your investment!
This scenario has been one of my greatest fears. About a year ago I started looking into how to protect myself not only for theft but also from other events like fire or flooding.
There is always homeowner’s insurance, but that can be very risky. Depending on your policy, homeowner’s insurance might not cover your firearms. If your policy does include your guns, the policy will most likely base the value of your collection on the sale price of your guns minus depreciation and your deductible. This formula means that it considers your Colt Python at most is worth $125 since that was the original sale price.
The policy also usually has a limit of the amount that the insurance company will cover for the items in your house. For example, my homeowner’s policy will only cover up to $2500 for my gun collection. I found out that some policies have an even lower cap.
Most insurance companies also want a list of the firearms you have including serial numbers. Giving this information over to an insurance company makes me nervous. Maybe it is just paranoia, but I don’t want information on my collection being turned over to Big Brother.
Most homeowner’s insurance companies do not cover acts of God such as floods and earthquakes unless the homeowner has additional insurance. I found this out the hard way when there was damage to my house after an extremely rare Virginia earthquake.
There is a way to keep your investment your gun collection safe. Collector’s insurance is something every gun owner with more than one or two guns should consider buying. It gives me a little more peace of mind when I compare it to just relying on my homeowner’s policy.
Collectibles Insurance Services
Collectibles Insurance Services
One of the best companies that offer collector’s insurance is Collectibles Insurance Services. Their rates were even cheaper than it was to schedule my firearms onto my homeowner’s policy.
The product that they sell is far superior to my homeowner’s policy. One of the most significant advantages it has over traditional policies and what drew me to it is the fact that the policy covers more than just my firearms.
Optics and other firearms accessories are not cheap. I am into long range shooting. Some of my scopes cost more than my rifles. Collectibles Insurance Services covers all my optics even when I do not have them mounted on my guns.
I also buy ammunition in bulk. It is cheaper in the long run, but the upfront cost is a lot higher. Losing all my ammo means losing a lot of money. Luckily for me, Collectibles Insurance Services (CIS) even covers the cost of ammunition! Not only that, but they also include coverage for the price my gun safes.
CAS Hanwei Oni Katana
I also prefer how Collectibles Insurance Services calculate the value of my guns. Different from the homeowner’s policy that I have, CIS uses the actual market value of the firearms with no deductible. That means that I would get paid out the current price of the Mosin Nagant I paid $75 for at a gun show back in the day. With my homeowner’s insurance policy, it wouldn’t be worth putting in a claim if something happened to my Mosin.
CIS ties their policies to the firearms and not the home. If your gun gets stolen from your car, then you are covered. I also travel with a firearm when I fly. If my gun gets taken from my checked bag when traveling, I know they still have my back. Collectibles Insurance Services even covers your guns if the postal services lose it when mailing my gun out to say a gunsmith.
Another cool thing about the collector’s policy offered by CIS is that it covers bladed weapons. I have a CAS Hanwei Oni Katana. It’s a real cutting sword. Its quality is impeccable, but that quality comes with a steep price. If anything ever happened to it, I would be able to put in a claim for its value.
No Firearms Serial Numbers Required, Your Guns Remain Private
This ‘like’ is a big deal. I like that Collectibles Insurance Services doesn’t ask for the serial numbers of your guns. Call me paranoid, but I don’t like sharing those with anyone. You only need to list firearms valued over $25,000 on the policy individualy. Even then, they only ask for make, model, and an estimated value of the gun.
CIS also covers my antique firearms along with my modern guns. This wide range of coverage saves me the pain of getting multiple policies.
CIS makes the process of getting a quote straightforward. All the collector have to do is answer a few easy questions on their website. They also have a toll free number ( 888-837-9537 ) where one of their team members can answer any question about their products.
From the collector to the dealer (yes they cover FFL dealer’s too!) everyone needs to protect his or her investment, and that is what Collectibles Insurance Services does best. Their service is something I hope I never have to use, but if I do, then I will be glad I have it.
You can get a free quote from Collectibles Insurance Services at https://collectinsure.com/guns
A CIS team member can answer any questions you have for them. They are available Monday to Friday from 8:30 AM to 5 PM ET at 888-837-9537.
About John Crump
John is an NRA instructor and a constitutional activist. He is the former CEO of Veritas Firearms, LLC and is the co-host of The Patriot-News Podcast which can be found at www.blogtalkradio.com/patriotnews. John has written extensively on the patriot movement including 3%’ers, Oath Keepers, and Militias. In addition to the Patriot movement, John has written about firearms, interviewed people of all walks of life, and on the Constitution. John lives in Northern Virginia with his wife and sons and is currently working on a book on leftist deplatforming methods and can be followed on Twitter at @crumpyss, on Facebook at realjohncrump, or at www.crumpy.com.
The Mosin Nagant is a simple design that is easy to repair and maintain, but proper technique and an understanding of the design is important.
This page will attempt to guide Mosin owners through partial and complete disassembly and provide a pictorial reference of the various parts. For information on which parts will interchange between various models, see the Mosin Nagant Parts Compatibility page. Tools Quality gunsmithing tools are imperative to prevent damage during firearm disassembly. Anyone who’s handled surplus firearms has seen the stripped screw heads, scratched metal and scarred wood.
While damage in battle is part of the history of a firearm, damage from poor maintenance techniques is a destruction of that history. Past damage can’t be undone, but future damage can be prevented.
A good set of hollow ground screwdrivers in various sizes is the most useful tool on the firearm bench. Following that, brass and steel punches and a light hammer are very handy. Forceps for handling small parts and a magnetic bowl for keeping track of them are useful.
A well lit, clean work area also helps prevent the loss of small parts. A protective mat on the bench will protect the finish of the firearm and a gun vise can make the job much easier when “three hands” are required. Plastic picks, nylon brushes, paper or cloth towels, swabs and pipe cleaners make detail cleaning easier.
A quality cleaning rod and patches will soon be appreciated over the discount variety for periodic maintenance.
Types of solvent and opinions on their use are almost as numerous as gun owners and is beyond the scope of this page. Dummy cartridges for checking function, a firing pin protrusion gauge, and a set of headspace gauges round out the well equipped bench. Exploded Views Below are exploded views of a Soviet M91/30. Other models have variations in the parts which will be covered later. The primary differences are in the stock hardware and sights, especially among the later Finnish models. For larger views, click on the pictures.
1. receiver and barrel
2. stock
3. handguard
4. magazine body/triggerguard
5. nosecap
6. nosecap screw
7. front barrel band spring
8. rear barrel band spring
9. front barrel band
10. rear barrel band
11. cleaning rod
12. cleaning rod retaining nut
13. stock recoil bolt
14. stock recoil bolt nut
Disassembly The following pictures and comments will illustrate the disassembly procedure for the Soviet M91/30.
Before beginning disassembly, maintenance, or cleaning on any firearm visually inspect the chamber and magazine to be sure that it is unloaded.
Remove the sling by unbuckling the dog collars and removing them from the sling slots.Unscrew the cleaning rod counterclockwise
Depress the barrel band retaining springs and slide the barrel bands forward.
Slide both barrel bands forward past the end of the stock and remove the handguard. The barrel bands will not come off the barrel at this time due to the front sight. Other models may differ in this.
Hold the trigger back and pull the bolt straight to the rear.
Decock the bolt by turning the cocking knob 90 degrees counterclockwise and pull the bolt head and connector bar forward.
Rotate the bolt head 90 degrees clockwise and pull it off the connector bar. Using the large notch on the bolt tool or the connector bar as a wrench, grasp the firing pin between the fingers and unscrew it counterclockwise. Be careful to grasp it firmly as the spring is under pressure.
Remove the magazine tang screw.
Remove the receiver tang screw.
Remove the magazine assembly and receiver assembly from the stock. Some Mosins, especially Finnish, but Russian and Soviet also, have shims at the tang and recoil lug. When removing the action from the stock be careful not to lose the shims and note their location. The trigger pin is held in place only by the stock and if it is loose can fall out upon removal of the action.
Depress the floorplate latch and pull the floorplate away from the magazine body. Compress the follower assembly and pull it straight down from the magazine body.
This completes partial disassembly for routine cleaning and maintenance.
For detailed disassembly, including the magazine and bolt assemblies, continue below.
Unscrew the butt plate.
Drift out the front and rear barrel band springs from the opposite side of the stock with a small blunt nail or punch. A hole for this purpose should be visible. These springs are delicate and can be easily broken if pulled out by the leaf.
Remove the nose cap screw and slide the nose cap forward off the end of the stock. The nose cap screw will thread into the top of the cleaning rod retaining nut and can aid in pulling it out of the stock.Note: Removal of the retaining nut is seldom necessary or worth risking damage to the nose cap screw.
Turn the stock recoil bolt nut counterclockwise with retaining ring pliers or another suitable tool. Carefully drive the recoil bolt out of the stock with a punch.Note: Removal of the recoil bolt is seldom necessary and there is a risk of damaging it.
Remove the floorplate latch screw and pull the floorplate latch straight down out of the magazine body/trigger guard.
Drift out the follower pin and follower carrier pin. The follower carrier spring is screwed to the floorplate. The follower spring can be removed from the follower carrier by lifting up and back.
Drift out the trigger pin and remove the sear/trigger spring screw.
Lift the ejector/interrupter spring and remove the ejector/interrupter from it’s slot. Remove the ejector/interrupter spring screw and slide the ejector/interrupter spring forward from the dovetail slot.Note: Early Russian ejector/interrupter were integral with the spring and are removed in one piece just as the spring is removed above.
Drift out the rear sight leaf pin and lift the rear sight leaf spring out of the rear sight base. Remove the rear sight slide from the leaf and pull the buttons and their springs out each side.
Drift out the rear sight base pins and drift the rear sight base forward off of the dovetail.
Drift the front sight off of it’s base. The barrel band can now be removed from the barrel.Note: The front sight base is staked to hold the sight in place. It should only be removed if necessary.
Drift the extractor out the back of the bolt head.Note: Removal of the extractor is seldom necessary and there is a risk of damaging it. If it is necessary, a drop of penetrating oil beforehand is recommended.
Reassembly Reassemble the rifle in the reverse order of disassembly taking note of the following:
Screw the firing pin into the cocking knob until the back end is flush with the rear of the cocking knob and the slot lines up with the index mark. After fully assembling the bolt, decock it, make sure the bolt head is tight against the connector bar and check the firing pin protrusion with a gauge. The firing pin should touch the shallower (75) of the two center notches in the gauge and not touch the deeper (95) of the two center notches. If necessary, adjust by screwing the firing pin in or out of the cocking knob, always stopping with the index mark aligned.
A small C-clamp is useful for compressing the rear sight leaf spring.When replacing the front sight be sure to realign the index marks.
When replacing the action in the stock tighten the magazine tang screw and receiver tang screw evenly and securely. Loose action screws are a common cause of inaccuracy.
Model Specifics The M91/30 was chosen because it is one of the most common models of the Mosin design and is more similar to all other models than any other model. Below are the exceptions to the above instructions for all other commonly encountered models of Mosins.
Russian M91
The M91 barrel bands are not retained by springs, but are held on by tension. The bands are loosened by turning the screw clockwise as if it were being tightened. The screw is captive to the band and if it is turned too far the wrong way it will break. The front band is removed first, the rear one is loosened to remove the handgaurd and then the rear band is removed. The bands will fit over the front sight to remove them from the barrel.
The rear sight leaf spring is retained by a screw. The sight base is soldered to the barrel. The rear sight slide is removed from the rear of the slide and can be done with the slide on or off of the rear sight base. Line up the notches on the bottom of the slide with the notches on the bottom of the leaf near the rear.
Depress the spring cap on one side through the notches with a small punch while depressing the corresponding button. Pull that side of the slide slightly toward the rear of the leaf to prevent the spring cap from reseating. Repeat on the other side and remove the slide.
The buttons, springs, and spring caps can now be removed from the slide.
Soviet M38
The M38 barrel bands will come off over the front sight globe because it is closer to the end of the barrel. The front sight base is a sleeve held on with a pin. Removal is not recommended.
The M38 rear sight base is a sleeve held in place by a pin.
Soviet M44
Eastern European M44
Chinese T53Rear sight same as M38.
The M44/T53 has an attached bayonet that can be removed by taking out the screw. The screw is staked on the opposite end and can be difficult to loosen. The bayonet lug and front sight base are integral and held on by two pins. Removal is not recommended. The barrel bands cannot be removed without removing the bayonet/sight base.
Soviet M91/59Same as M38.
Soviet M91/38Rear sight same as M38.
The M91/38 barrel bands will come off just as the M38 bands. The front sight base is often made from a turned down M44 bayonet/sight base and cannot be removed without damage because the rear pin is partially removed in the turning process.
Finnish M91
M24
P-seriesSame as Russian M91.
Some Finnish long rifle barrel bands are retained by a pin which goes completely through the band and stock. It must be drifted out before removing the band in the same way as the Russian M91.Note: The pin can be delicate and should be removed with care only when necessary.
Some Finnish long rifle barrel bands are retained by a small wood screw into the stock just forward of the band. It must be removed before removing the band in the same way as the Russian M91.
Some Finnish long rifles use metal sling hangers in place of the dog collars and they must be removed before removing the rear barrel band. The screw passes through the stock and threads into the opposite side of the hanger. The rear hanger is attached in the same way but is larger.
Finnish M27Rear sight same as Russian M91.
Some M27s have a sling swivel through the front slot. It must be removed before removing the rear barrel band.
Some M27s have a rear sling swivel that is held in place by two wood screws.
The M27 nosecap has a transverse and longitudinal bolt. Remove these to hinge the top of the cap open and slide it forward off the stock. Some nosecaps have extensions to the rear that contain the transverse bolt.The rear barrel band is retained by a transverse bolt.
The front sight is soldered in place and cannot be removed without heating it.
Finnish M28Rear sight same as Russian M91.
Rear barrel band same as M27.
Front sight similar to M27.
The M28 nosecap has a transverse bolt that is removed to slide the nose cap forward off the stock. Some nose caps have a seperate front plate that is attached to the stock by two wood screws. The nosecap will not come off over the front sight.
Finnish M28/30Rear barrel band same as M27.
Nose cap similar to M28.
The M28/30 rear sight base is a sleeve held in place by a retaining screw under the sight leaf and solder.
The slide is removable from the leaf by removing the leaf from the base. The slide buttons are retained by pins. (M39 sight pictured)
The M28/30 front sight has a blade that is adjusted with two screws, one on each side. The screws are removed counterclockwise and the blade is lifted from the base. (M39 sight pictured)
Finnish M39Rear sight similar to M28/30.
Front sight similar to M28/30.
The M39 has two set of sling attachment points. The lower rear sling swivel is similar to the the M27. The side rear sling attachement is held in place by two wood screws.
The M39 barrel band is held in place by a spring similar to the M91/30. It also has a captive vertical bolt on the opposite side to provide tension.
The M39 nose cap is held in place by a captive vertical bolt and transverse bolt. The top hinges to the left to allow the nosecap to be removed to the bottom of the stock.
Finnish M91/30Sling hangers same as Finnish M91.
Some Finnish M91/30s have a blade front sight that allows the barrel bands to be removed over it. It also has “stacked” base.
Every time you fire your gun, carbon, lead, copper and plastic—if shooting shotgun—residue are left in the barrel, chamber and action. Each time you fire your gun more of this fouling residue builds up.
This fouling comes from the powder, wad and bullets. Further, moisture from weather and sweat can cause corrosive rust to damage your gun’s metal parts. Fouling built up over time can impact a gun’s reliability. You will find that a dirty gun causes many malfunctions.
Types of Fouling
Almost all bullets—centerfire and rimfire—are made of a lead core with some type of copper jacket surrounding it. Even lead-free ammunition contains copper. The four most common types of fouling are:
Carbon, which occurs as a result of the burning powder that propels the bullet from the chamber through the barrel
Copper, caused by copper-jacketed bullets leaving residue in the gun’s barrel after firing
Lead, caused by lead bullets leaving residue in the gun’s barrel after firing
Plastic, caused by the plastic wads from shotshells
It is impossible to find ammunition that will not foul your gun.
Black powder, most Berdan-primed and a lot of military surplus ammunition is corrosive. This means there are salts in the ammo’s primer.
These salts will damage your gun. If you shoot a gun using corrosive ammunition, you should clean it after each shooting session. As far as the rules regarding frequency of gun cleaning go, this is where it stops.
No Rules
There is no hard and fast rule to when you should clean your guns. Some people clean their gun after every shooting session. Others never clean their guns. Truly, there is no right answer.
Retired military and law enforcement tend to clean their guns after every shooting session. Because of their training, they feel that a clean gun prevents malfunctions.
One retired police officer told me, “Clean them as if your life depends on it.” This is somewhat true. Dirty semi-automatic guns tend to fail-to-fire (FTF) and failure-to-feed (FTF) more often than when the gun is clean.
A gunsmith told me his gun cleaning routine depends on the gun. After every use, he cleans his precision rifle. However, he rarely cleans his .22s.
Copper build-up inside a gun’s barrel can effect the bullets velocity by slowing it down. Further, barrel fouling also affects the barrel’s rifling. Shooting a dirty precision rifle can greatly effect the gun’s accuracy.
The Rusty Gun Gets the Oil
Rust can cause severe damage becoming corrosive and eating through the metal. I’ve even heard horror stories of parts rusting together. Rust also will affect the rifling in the barrel causing pits to occur.
A retired Air Force veteran cleans his semi-autos after each use, but not his .22s: He says he just leaves a little bit of oil on the outside of his rimfires to prevent rust. If you are going to store your gun for a long period, you should take preventative measures to avoid damaging rust.
So can you clean your gun too much? Some say you can, but over cleaning is just like under cleaning—it’s all a matter of opinion. I know someone who ran over 40,000 rounds through his Remington 870 and cleaned it only once because he felt guilty.
Despite differing opinions on when and how often you should clean your guns, all experienced gun owners agree that a little oil and lube goes a long way. I keep oil in my range bag.
I have never cleaned my semi-auto .22 rifle, but when I get malfunctions at the range, I just add a little oil and I’m good to go.
A friend of mine who participates at shooting leagues goes one-step further by running a bore snake through her pistols when she experiences issues. One of the most experienced shooters I know says, “A gun that has no lubrication is going to fail much sooner than a dirty, but well-lubricated firearm.”
You aren’t doing anything wrong if you clean your gun after every range visit. Some find it relaxing and therapeutic. Others just love breaking down their gun and putting it back together.
On the other hand, you aren’t doing anything wrong if you don’t clean your gun after every range visit. One seasoned shooter I know says, “If it doesn’t work dirty, than it’s not a dependable gun.” Whatever your cleaning routine is, it is important to remember that guns are a machine, periodic maintenance never hurts it and will only keep it in proper working order. For the very basics on cleaning your gun, read our post New Year New Gun: Cleaning and Maintenance.
________________________________ Me? I try and clean my guns every time I shoot them. Unless my back is acting up. Then I will clean them as soon as I am physically able to! Grumpy
You’re in the right place! We’ll cover pros/cons, average price, recoil, and recommended ammo for a bunch of popular rifle calibers.
Rifle Caliber Smallest to Largest
What Does Caliber Mean?
Caliber is the size of the bullet’s diameter and can be measured in both imperial (inches) and metric (mm) units. If it doesn’t say mm after, it’s likely in inches (because ‘Murica).
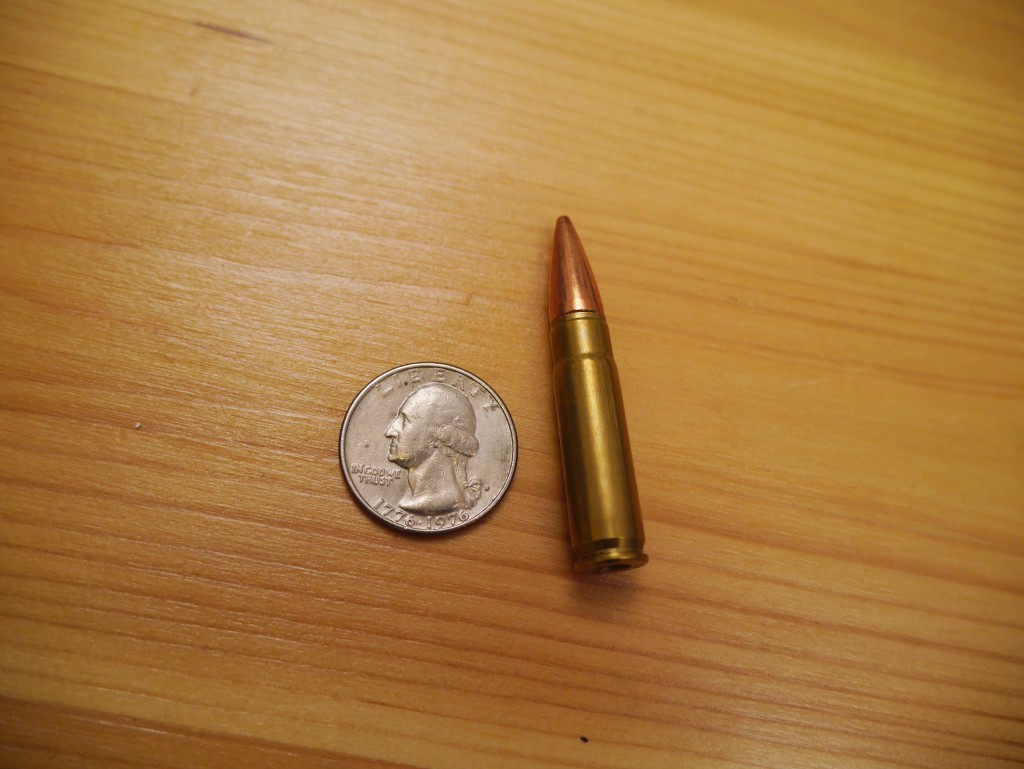
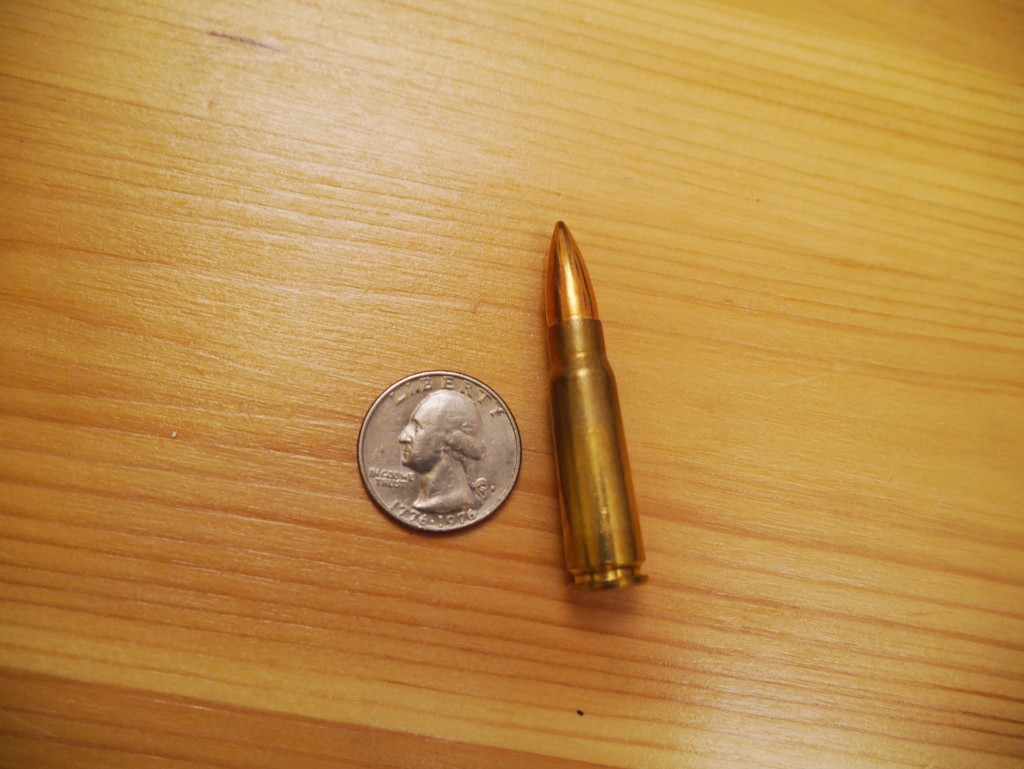
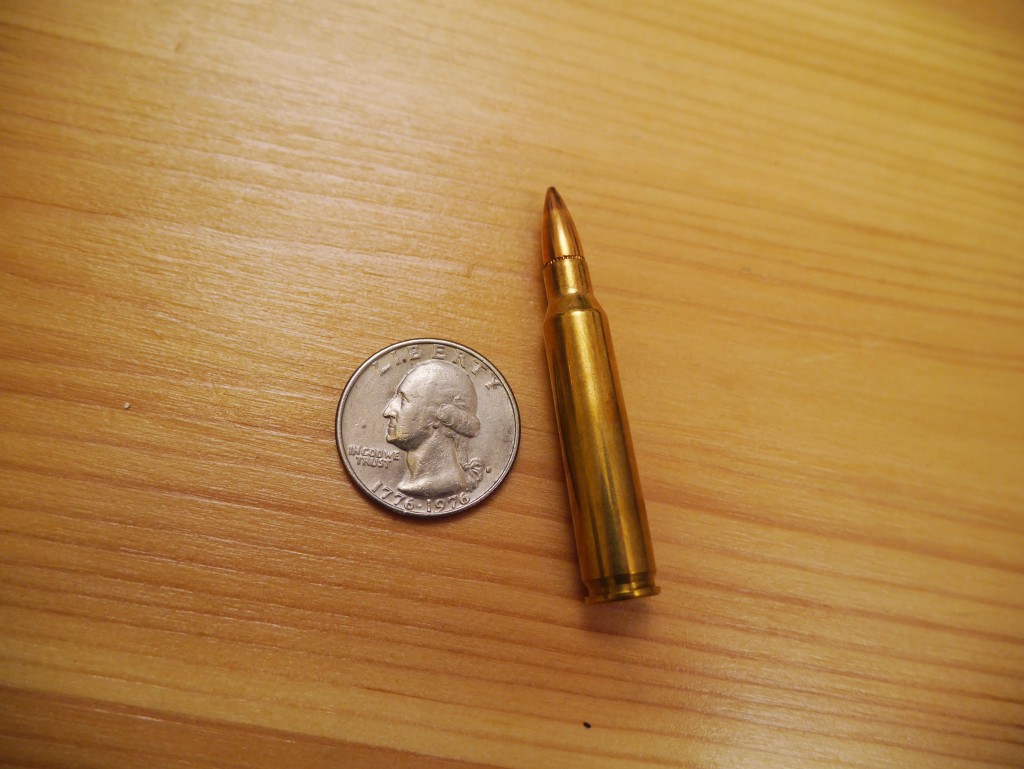
And for terminology’s sake…a “bullet” is just the metal projectile while the entire thing is called a “cartridge” or “round.”
Parts of a Bullet Cartridge
Rifle Bullet/Cartridge Guide
Rifles and rifle cartridges can do that at ranges that pistols cannot and were never designed to.
The rifle, itself, is only half the equation. The cartridge is the other half, and when it comes to that other half, you have a number of options.
Shooting squirrels? You might want something small and accurate. Shooting xenomorphs? Probably something bigger.
Here’s the definition and units of some of the things we’ll be using to compare the different calibers.
Bullet weight: Measured in grains (gr) where 7000 grains make up a pound…so it’s a really small unit.
Velocity: Speed of the bullet in feet/sec
Energy: Measured in Joules (J), a rough approximation for the power of the round
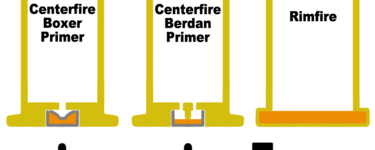
This tiny low-recoiling round is popular for both rifles and pistols. Called the “twenty-two” long rifle, it’s a “rimfire” cartridge instead of “centerfire” because the firing pin hits the rim of the case instead of…the center.
Centerfire vs Rimfire Primer
The .22 long rifle is probably the most popular rifle round out there.
Its small size and high velocity make it ideal for hitting small game like squirrels at range, and its low recoil make it a great round for beginners and children who want to shoot but don’t want the shoulder bruises that come with a larger round.
Usually reserved for target shooting or small pests, that doesn’t mean it’s not deadly to human targets either. The small caliber bullets tend to bounce around inside a body and wreak havok.
Bullet Weight: 30-40 gr
Velocity: 1200-1600 ft/s
Energy: 140-160 J
Price Per Round: ~7 cents
.30 Carbine
.30 Carbine
Blast to the past! Not super common nowadays, but it was the ammo for the M1 carbine back in WWII and up to the Korean War. Pretty low recoil and really fun to shoot in the M1 if you get a chance.
Bullet Weight: 110 gr
Velocity: 2000 ft/s
Energy: 1300 J
Price Per Round: ~40 cents
.300 BLK
.300 Blackout
The “three-hundred Blackout” is a new round (20011) that aimed to put the larger .30 caliber bullet (such as the AK-47) into the AR platform that normally took .22 caliber bullets. And also to offer great suppression abilities and the use of current magazines. Recoil is pretty similar to the regular soft-shooting 5.56x45mm of the AR-15.
Bullet Weight: 125 gr
Velocity: 2200 ft/s
Energy: 1360 J
Price Per Round: ~70 cents
7.62x39mm
7.62x39mm
The 7.62x39mm cartridge is a Russian round designed for use in the venerable AK-47 and SKS rifles. With the importation of these rifles to the U.S., the 7.62x39mm has become a popular round, and some bolt-action rifles, notably from CZ, and semi-autos like the Ruger Mini-30 use it. The round is large enough for medium sized game such as deer and more than adequate for self defense. Moderate recoil and moderate range but great knockdown power.
Bullet Weight: 123 gr
Velocity: 2400 ft/s
Energy: 2180 J
Price Per Round: ~20 cents
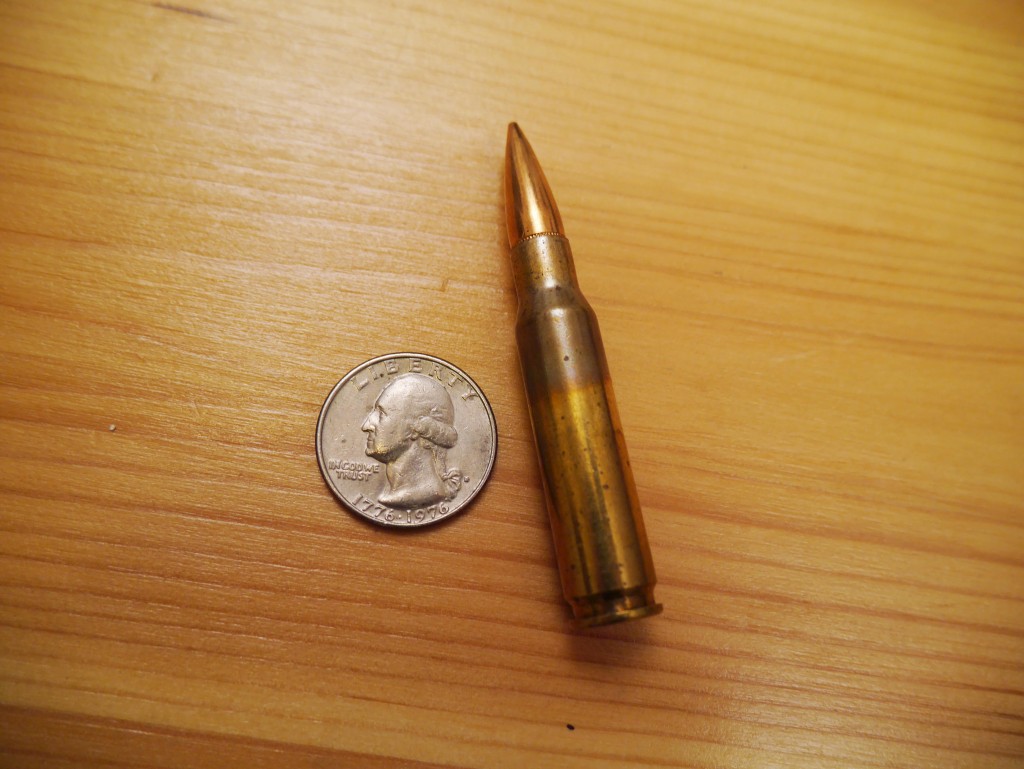
5.56x45mm or .223
5.56x45mm
The standard caliber of the M-16, M-4, and the civilian AR-15. 5.56x45mm (five-five-six) is the NATO round and is normally loaded a little “hotter” than the civilian .223 (two-two-three) even though the two are dimensionally the same. Extremely accurate and soft shooting. BONUS: Shoot better. Download our exclusive shooting targets for FREE ($47 value)Larger than a .22lr, but not by much, many states don’t allow hunters to use .223 on large game like deer because it’s considered inhumane. It’s used, therefore, more as a varmint round, used to kill prairie dogs at long range or predators such as coyotes. Best AR-15 Ammo: Home Defense & Range
Bullet Weight: 55-62 gr
Velocity: 3100 ft/s
Energy: 1770 J
Price Per Round: ~30 cents
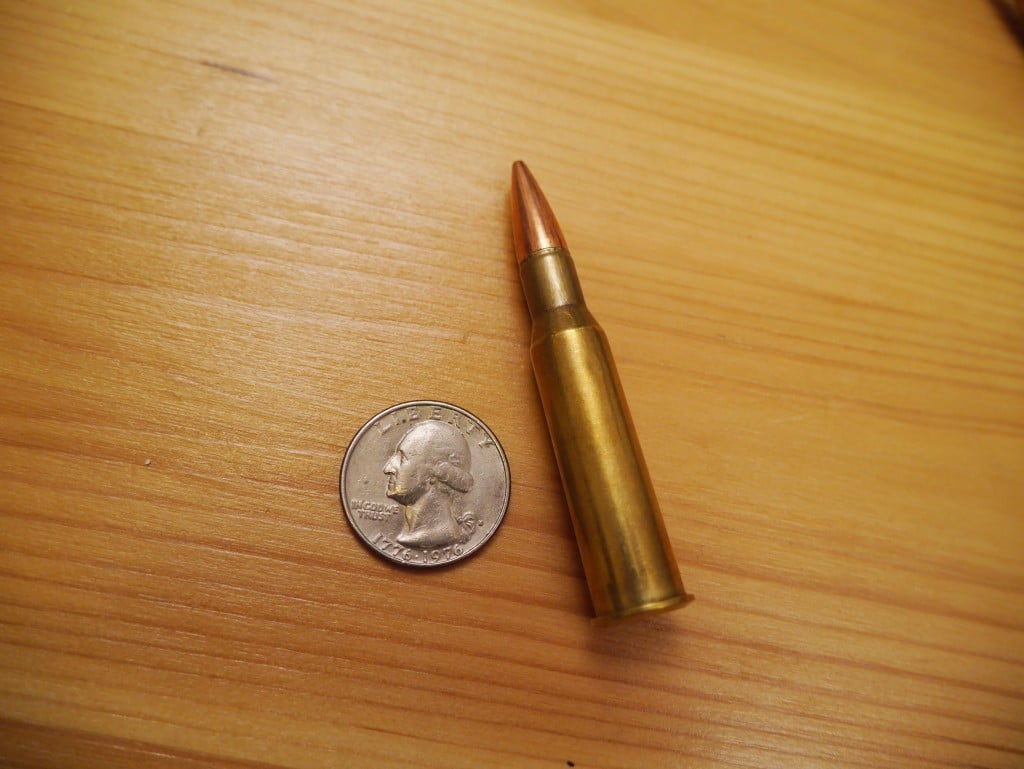
7.62x51mm or .308
7.62x51mm
The big brother of the 5.56, the “seven-six-two” NATO round is used by the US military and the .308 “three-oh-eight” is its civilian equivalent. But this time, the .308 is usually the hotter round. Much more recoil than the 5.56 but with extended range and knockdown power. There’s very few animals this round won’t take down and it’s also the de facto sniper round the world over.
Bullet Weight: 147-175 gr
Velocity: 2600-2700 ft/s
Energy: 3300-3500J
Price Per Round: ~75 cents
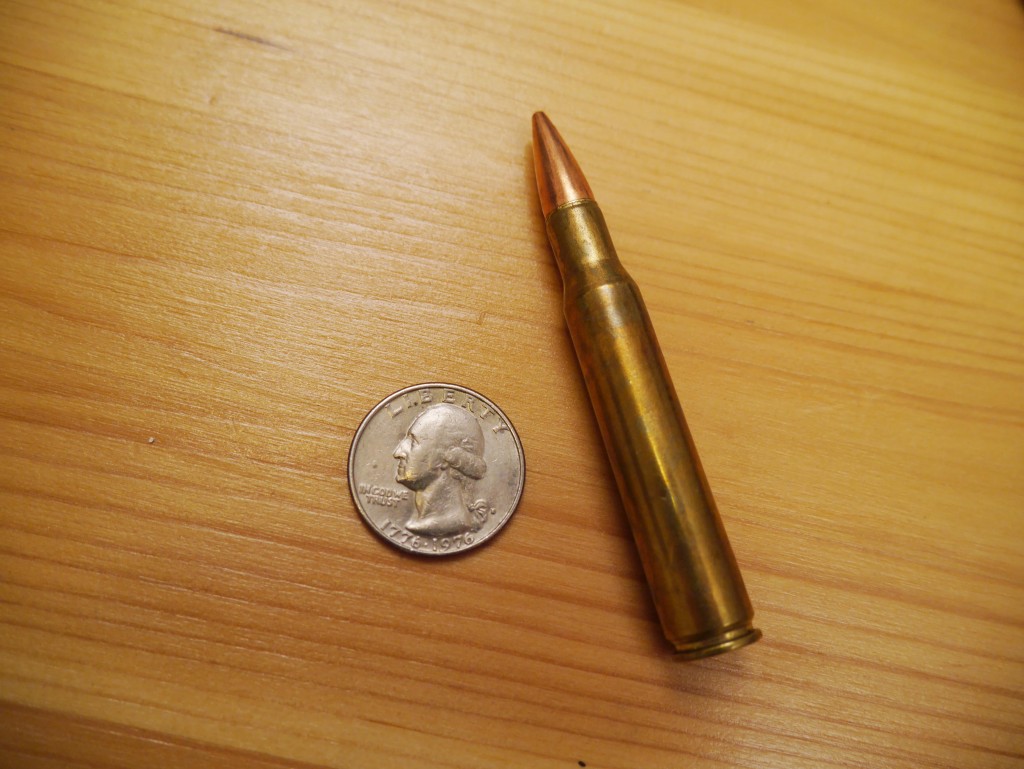
7.62x54mmR
7.62x54mmR
Russian cartridge that is still in military issue today. Popular for their sniper rifles, the 7.62 “Russian” (the R actually stands for rimmed and not Russian), is hard hitting with a good amount of recoil. When you hear this round mentioned, there is one rifle that is always associated with it: the Mosin Nagant. Surplus makes it cheap to shoot such a large caliber though.
Bullet Weight: 150-181 gr
Velocity: 2500-2800 ft/s
Energy: 3600 J
Price Per Round: ~60 cents
.30-06
.30-06
The .30-06 began life as the .30 government and was made the primary U.S. military round in 1906 (hence the “06” in the name), replacing the .30-03 round. Though it was eventually replaced by the 7.62x51mm round in the military after 50+ years, the 06 remains a popular bolt-action hunting round capable of killing any animal in North America given it’s tremendous knockdown power and range. With great power comes great recoil, and a pretty steep price per round.
Bullet Weight: 150-200 gr
Velocity: 2500-2900 ft/s
Energy: 2800-3000 J
Price Per Round: ~$1.50
.50 BMG
Rifle Caliber Smallest to Largest
No rifle caliber guide is complete without the big boy “fifty-cal” BMG (Browning Machine Gun). It puts everything else to shame with it’s immense size difference. Super long range, knockdown ability, and recoil in the form of everything from machine guns to sniper rifles.
Bullet Weight: 647-800 gr
Velocity: 2800-3000 ft/s
Energy: 18,000 J
Price Per Round: ~$3.00
Conclusion
So there you have it, our guide of some common rifle calibers. Anything we missed that you really think should be here? Here’s some other articles you might want to check out:
Tom McHale schools us on the proper use of quick turrets and scope reticles when shooting for long distances in this continuation of his article series on long-range shooting.
There are lots of options for both scope turret and reticle types. We’ll examine some pros and cons.Tom McHale
USA –-(Ammoland.com)- Turrets and reticles generally compliment each other, although sometimes they can perform the same function.
On old-school rifles, one commonly used the turrets for initial zeroing and the reticle for shooting. As the “turrets” were capped and required a screwdriver or coin to make adjustments, they weren’t conducive to on the fly adjustments in the field.
The idea was that you would do a one-time set to get the rifle shooting to where the cross hairs were indicating at a certain distance. Later, shooting in the field, the user would rely on holdover to account for longer distances.
Before we get into nuances and differences of turret and reticle combinations, we can limit the scope of turret types. Since this is a series about long-range shooting, we’ll stick to “target” or “tactical” turrets. Those differ from more traditional capped turrets that are designed primarily for initial zeroing of a rifle.
Here, we’ll focus on turrets that remain exposed and are intended to be used in the field on a shot-to-shot basis to adjust for elevation, windage, and target movement. These taller drums aren’t just big and bulky to look cool – they show you the adjustment markings so you can adjust for each different shot requirement.
There are numerous concepts to consider when making an optics decision when it comes to turrets and reticles, so let’s try to hit some of the biggies.
Oh, one more note before we start. To keep this article less than “one billion” words, we’re going to skip differences between first and second focal plane scopes when talking about reticle holdovers. We’ll be covering that topic separately next month.
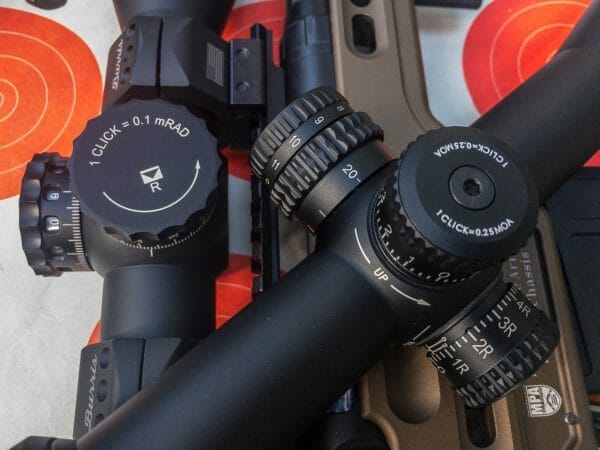
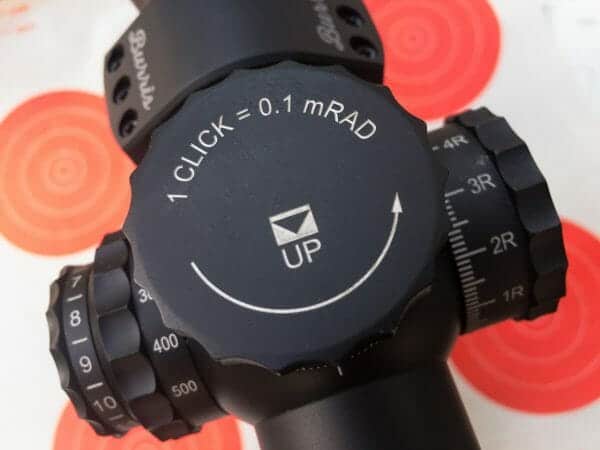
This Steiner T5Xi has both a milliradian reticle and turrets that adjust in .1 mil clicks.
Mismatched Turret and Reticle Graduations
On far too many scopes (in my opinion) you’ll find a reticle graduated in milliradians combined with turrets that adjust in minutes of angle. Sure, they both do the same thing, but it gets confusing. A milliradian represents 3.6 inches at 100 yards while a minute of angle corresponds to 1.04 inches at the same distance.
To put that practical terms, if you choose to make a shot adjustment through the reticle of one milliradian, there’s no “exact” way to do the same adjustment with the turrets unless you resort to (brace yourself)… math!
Maybe companies do this for economies of scale so they can manufacture one scope body and offer it will all sorts of MOA, mil, and ballistic compensation reticles.
Whatever the reason, it drives me nuts. It’s kind of like having car speedometers marked in miles per hour with highway speed limit signs that only show the metric numbers.
The benefit of using the same units of adjustment on the reticle and turret is simplicity. You can make the same shot adjustment using either a reticle holdover or a turret adjustment. That’s especially handy when you use both to make a shot.
For example, you might adjust the elevation turret for drop and use the reticle to account for wind drift. You’re always working with the same units of measurement, and that’s a good thing.
Most minute of angle scopes feature .25 MOA per click adjustments. That represents a smidgen over a quarter of an inch at 100 yards. Most mil-dot scopes use .1 milliradian per click adjustments. That’s about .36 inches per click at 100 yards.
Standard Mil-Dot and MOA Reticles
Here comes my institutional bias. There, I warned you.
There are infinity trillion reticle designs on the market, and at least half of those are cool and useful. To me, the most practical are those that offer straightforward mil or minute of angle increments.
The reasons will become more evident as we talk about ballistic compensation reticles next, but in short, I like the flexibility of mapping my own bullet trajectories to a standardized scale.
If the reticle shows a constant array of minutes or mils with fractional indicators between them, you don’t have to remember obscure reticle designs like “OK, so the second and third lines below the crosshair are 6.3 minutes of angle apart according to the manual,” or “that circular thing is 4.2 mils wide…”
This Vortex Strike Eagle 4-24×50 scope features MOA adjustments on the turrets and an EBR-4 reticle also graduated in minutes of angle. Oh, and one of you is going to own it along with the Palmetto State Armory 6.5mm Creedmoor rifle (another upcoming AmmoLand giveaway) on which it’s about to be mounted.
One added benefit is that a traditional mil or minute of angle reticle can move from rifle to rifle and caliber to caliber with ease. Not being “hardcoded” to the trajectory of a single round, you can do whatever you like with it.
Give me two “rulers” in a cross pattern any day, so I can easily see each mil or minute of angle adjustment in whole and fractional increments. Since a picture is worth a thousand words, I’ve included one here.These reticles, in almost any style, make me happy.
It’s hard to go wrong with an infinitely flexible reticle like this classic Mil-dot pattern from Nightforce.
Ballistic Compensation Reticles
Most optics companies offer reticles that have markings which correspond to the trajectory of individual cartridges.
For example, since the trajectories of standard .223 Remington and .308 Winchester rounds happen to be so similar, you might run across scopes that have markings for specific yardages in the reticle itself for those calibers. These work fine as long as you stick to standard ammunition and conditions.
Give me two “rulers” graduated in even mils or minutes any day, and I’m happy, as with this Steiner SCR reticle.
The drawback is a loss of precision. As we’ll see when we build a long range shooter’s databook later in this series, for every combination of rifle, ammo, and weather conditions, the trajectory is different.
Ballistic compensation reticles get you close, but by definition, they can never be as precise as mapping your own rifle and ammo combination at each desired distance. Also, a change in temperature and pressure will throw off BDC reticles even more.
If your goal is to get “close enough” then BDC reticles are great. They’re simple to use and fast to get on target. If you need maximum precision, then go with standard reticle graduations and make your own distance/adjustment map based on actual performance.
Custom Turrets
Some manufacturers offer custom turret marking services. Here’s how that works.
You gather and submit specific information about your gun, scope, ammunition, and normal shooting conditions. This includes inputs like sight height above the bore, bullet ballistic coefficient, actual velocity from your rifle, zero distance and average temperature, pressure, humidity, and altitude in your area.
The manufacturer uses that information to calculate the ballistic trajectory of your round and makes a reticle marked with yardage distances. So, to adjust for a 600-yard shot, just spin the dial to 600 yards and, in theory, you’ll be close to dead on.
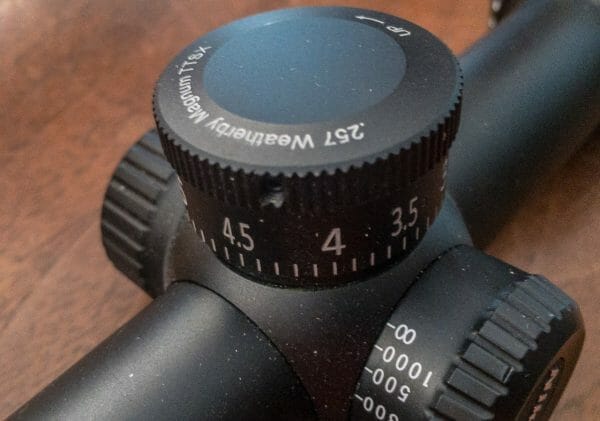
This Nikon ProStaff has a custom turret marked in hundreds of yards specifically for a Weatherby rifle firing a specific load with the Barnes TTSX bullet.
I’ve tested a couple of these, and they work well for applications where you’ll stick with the same rifle and ammo and where you’ll be shooting in similar altitude and temperature conditions. If you travel to places where conditions differ, then you’ll be off.
Which to Use? Turrets or Reticles?
Depending on your optic, there may be some redundancy between the turret and the reticle. While traditional hunting scopes may have a single crosshair, your long-range ready optics will likely have a complex set of windage and elevation graduations.
Part of the decision as to whether to hold over with the reticle or use turret adjustments depends on how much time you have. If you have time before a shot, using the turrets for elevation adjustments to account for bullet drop and the reticle to account for windage and moving targets is a great approach.
That allows you to forget about the drop and focus on reading the wind or establishing the correct windage lead adjustment. The related benefit is that wind changes rapidly, so by the time you make a windage turret adjustment, you might have to do it all over again.
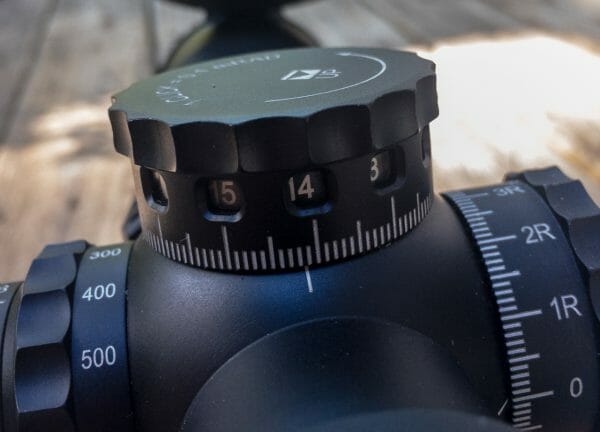
This Steiner T5Xi very elegantly handles the situation of turning a turret more than one full rotation. It shows the next set of numbers in the windows, so there is no confusion.
So, What to Buy?
If you want flexibility and precision, stick with a graduated reticle with standard and consistent milliradian or minute of angle marks.
For simplicity, make sure that the reticle pattern matches the click adjustments – mil to mil and MOA to MOA. Which system is entirely a matter of personal preference, as is the complexity of the reticle.
Some, like the Horus TReMoR3 reticle, look amazingly complicated, but they’re not as intimidating as they appear. The purpose of such reticles with an upside down Christmas tree of marks is merely a visual tool that allows fast holdover adjustment for both windage and elevation at the same time. It’s all about options. About Tom McHale is the author of the Practical Guides book series that guides new and experienced shooters alike in a fun, approachable, and practical way. His books are available in print and eBook format on Amazon. You can also find him on Facebook, Twitter, Instagram, and Pinterest.