When in brown bear country, you need an utterly dependable rifle.
I am recently home from a wonderful hunt in coastal Alaska for both black and brown bears; if you’ve never had the opportunity to hunt the Forty-Ninth state, I highly recommend it. I was hunting with my buddy Bob Jewett of Top Gun Treks (www.topguntreks.com); he is a veteran Registered Alaskan Guide with plenty of experience hunting both kinds of bears. We were on native lands in Tyonek, Alaska, on the north shore of Cook Inlet, where the bears have plenty of food and especially protein. They stay out of hibernation longer and grow larger than their inland counterparts. Bob and his assistant guide Pat Donelson, have guided a large number of clients for Alaskan animals of all sorts, and are well-versed in what it takes to anchor a bear at distances from 300 yards to those measured in feet. Invariably, the conversation turned to rifles and cartridges, and I wanted to get their take on suitable Alaskan bear rifles and compare and contrast them with the choices made by their clients, including Yours Truly.
As Bob told me when preparing for the hunt, there is a big difference between killing a bear and stopping a bear, and in the thick willow and alder jungle of coastal Alaska, you may very easily have a brown bear rear up out of the brush inside of twenty yards, or have one appear at your bear station seemingly out of thin air. “They make very little noise when they circle a bait station, and while the common .30 calibers have been used to hunt them, I personally prefer something a bit bigger,” Jewett related, and I personally agree with him. As you’ll see, I’m not alone in my choice of caliber, as well as the setup of the rifle. Let’s begin with the guide’s rifles, and move onto the client’s.
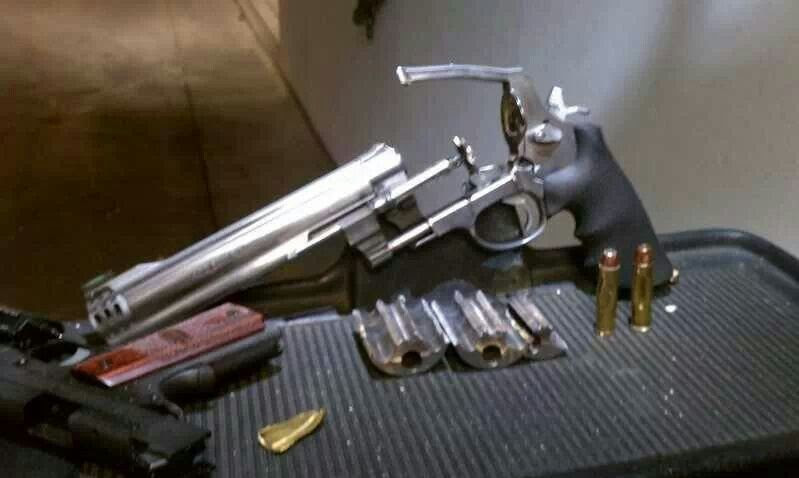
- Bob Jewett’s .338 Winchester Magnum

Bob Jewett’s .338 Winchester Magnum, a Model 70 Classic Stainless topped with a Leupold Stainless 2.5-8x40mm

I love to look at Professional Hunter’s firearms; they show the rigors of day-to-day hunting life and are often beat nearly to death. While we all have our safe queens, I appreciate those beat up, well-hunted guns that invariably have a story to tell, be it that one shot that even surprised the owner, of those hair-raising tales of dangerous game at close quarters. Bob Jewett’s daily rifle is exactly that, a gun which bears (proudly) the scars of daily use, and has been tested ad nauseam. In terms of being a highly valuable or collectible piece, it probably doesn’t hold a ton of value, but it is an American staple; I had to chuckle because I have the same rifle chambered in .300 Winchester Magnum, and while neither of them is much to look at, they certainly perform.

The .388 Winchester Magnum makes a wonderful choice for all of North America.
Bob’s rifle is Winchester Model 70 Classic Stainless, with the controlled-round-feed configuration and a 26-inch stainless barrel, set in a black synthetic stock. Like my own rifle, Bob’s rifle has a sweet trigger, three-position safety, and hinged floorplate. The pre-’64 style action uses the Mauser-style non-rotating claw extractor, which so many Professional Hunters and experienced clients have come to depend upon. This rifle spends its life in and out of aircraft, boats, and trucks, it’s carried along with frame packs and other assorted gear that a guide is responsible for, and shows it, but is utterly dependable. It is topped with a Leupold Stainless 2.5-8x40mm scope – partially covered in the remnants of camo tape – allowing Bob to handle close-in backup shots on a client’s bear, or to dispatch a caribou at 400 paces. “That old girl has been with me through thick-and-thin. She ain’t pretty, but she shoots.”

With a Leupold 2.5-8x scope, Bob’s rifle can handle all sane hunting ranges
Bob prefers the 250-grain Nosler Partition bullet for his .338; he reported that it has handled a brown bear inside of ten yards, as well as sheep, goats and caribou at respectable distances. He runs a candy stripe of electrical tape up the barrel to minimize glare while out in the field.
- Pat Donelson’s .338 Winchester Magnum

Donelson’s Ruger Model 77 MkII in .338 Winchester Magnum, a sensible, weather-proof Alaskan combination

Pat’s setup isn’t far off from Bob Jewett’s; it’s a Ruger stainless M77 MkII in .338 Winchester Magnum, topped with a Burris Fullfield II 3-9x40mm scope. “When I started guiding, I didn’t have a lot of money to spend on a rifle, and needed something that would not only handle the day-to-day rigors of Alaskan hunting, but could also save my bacon in the thick stuff, or save a client’s trophy at longer distances.”

Topped with a Burris Fullfield II 3-9×40, Donelson’s rifle can handle the day-to-day activities of an Alaskan guide
The guide’s collective choice of the .338 Winchester Magnum isn’t shocking to me, as I’ve long considered it the crossover cartridge between the flat-shooting .30s and the high horsepower .375 H&H. Pat Donelson agreed: “The .338 allows me to get the job done, whether I’m guiding for a distant moose, a ram on the scree slopes, or a caribou across the tioga. Thankfully, I have good clients and I don’t need to shoot it very often, but it has served me very well.”

All the metal on Donelson’s rifle is stainless steel, which will survive in the salty air of the Alaskan coast
Pat also like the Nosler Partition bullet, though recently he has begun to use the 225-grain Barnes TTSX. Note that both guides have what many would call “commonplace” rigs – regarding both rifle and optic – and they have performed perfectly.

Donelson (with Ruger Model 77 MkII on shoulder), Jewett, and Massaro checking Alaskan bait stations
- My own .404 Jeffery

A Mark Bansner custom rifle in .404, topped with a Leupold VX5-HD 1-5x24mm, in Talley Rings.

It’s not every day that I have the opportunity to hunt Alaskan bears, and even rarer is the possibility of one of the big coastal brownies. I have more than one rifle that could’ve filled the bill – depending how you look at it – so I thought long and hard about which gun would make the long trek with me. I wanted a rifle that would handle the worst situation first and foremost – a brown bear at spitting distance – and that would also withstand the elements that coastal Alaska has to offer: the salt air, the dust of logging roads, and the intermittent rain showers that frequent the area. To my mind, a synthetic stock and rust-proof metal made all the sense in the world.

The M704 action is a controlled-round-feed design, without the claw-style extractor.
For a cartridge, anything equal to or larger than the .375 H&H would be perfect, as shots would generally be inside of 200 yards. I settled on my Mark Bansner .404 Jeffery, as the rifle itself would be perfect for this hunt – Bansner makes a great synthetic stock, and as the rifle began life as a Legendary Arms Works Big Five, all the metal is Cerakoted – and the cartridge has been very good to me on more than one continent, while hunting the largest beasts that walk.

The Bansner custom rifle and the claws of an Alaskan black bear
This particular rifle wears a Leupold VX-5HD 1-5x24mm scope, set in Talley detachable rings, and it loves the Norma African PH .404 Jeffery load. Driving a 450-grain Woodleigh Weldcore softpoint to a muzzle velocity of 2,150 fps, for over 4.600 ft.-lbs. of energy, the rifle will print one-MOA groups, so accuracy was no issue. A three position wing safety and the M704 controlled-round-feed action make for a very reliable setup, especially with all the loading and unloading involved with checking bait stations daily.

Phil and Suzie Massaro with an Alaskan black bear, taken with his Bansner .404 Jeffery
I didn’t get a shot at a brown bear, but took a very nice black bear boar, and the rifle stood up to the test just fine. As a matter of fact, I became very fond of this rifle during this hunt, and though I own other dangerous game rifles, this will be my Alaskan bear rig. I can quickly switch between the excellent Leupold scope and the rifle’s iron sights, and with this level of horsepower, I feel very confident traversing the willow thickets.
- Dan McDowell’s .50 Alaskan.

Dan McDowell’s Wild West Guns lever-action .50 Alaskan

Daniel McDowell – better known as The Last Frontiersman (www.lastfrontiersman.com) – is an Alaskan fishing guide, born in Alaska before it was a state. He has a lifetime of experiences hunting and fishing the 49th state, including running a set of boats modeled after a landing craft, fully equipped to handle wheelchairs. You see, Dan has done extensive work with paralyzed veterans, putting smiles on many faces while sharing a common interest with those who have sacrificed for our country. Dan is also an accomplished hunter, having hunted Alaska as a resident since his youth; he has an impressive trophy room, including a beautiful black bear that squares over seven feet.

Dan McDowell, the Last Frontiersman, with his favorite bear rifle
Dan’s chosen bear rifle is a Wild West Guns lever-action .50 Alaskan, and a sweet rifle it is. It began life as a Marlin 1895GS, rechambered to the big rimmed .50 Alaskan, and outfitted with a peep sight, large lever loop and a MagnaPorted barrel, and converted to a takedown. “I’m on the rivers quite often, and I appreciate the takedown rifle; it fits neatly into its small case, yet has the horsepower to any bear,” McDowell related, “and I’ve come to rely on it.”

The .50 Alaskan – based on a blown-out .348 Winchester – makes a good bear stopper
The .50 Alaskan is based on the rimmed .348 Winchester cartridge (which was the only cartridge offered in the Winchester Model 71), and will drive 500-grain bullets to a muzzle velocity of over 1,600 fps. The quick-handling nature of the narrow lever guns is a definite benefit in the thick coastal regions of Alaska, and when equipped with a peep sight, target acquisition is fast; that’s a good thing when encountering a bear of any color in thick brush. “I love those heavy, wide bullets at moderate velocities, and that large loop fits my hand very well;” McDonell told me, “for hunting coastal Alaska it’s my favorite rifle.”
- Doug Warren’s .375 Holland & Holland Magnum

Doug Warren’s .375 H&H, known as “Bear Medicine”

“Bear Medicine” is the inscription on Doug Warren’s rifle, and rightfully so. The Winchester Model 70 – aptly nicknamed ‘The Rifleman’s Rifle – has been one of the most reliable, dependable and sound designs ever to come out of an American factory. It has many of the features of the classic 98 Mauser, and has served hunters very well since 1936.

No words needed here!
Couple those features with a cartridge that is – in the opinion of this author – possibly the single most useful cartridge ever to grace the hunting fields, and you’ve got a recipe for success. Doug’s rifle started out as a Winchester Classic Stainless, but there has been some serious custom work done to it. Doug sent the rifle out to gunsmith Brad Stair for a complete makeover, including cutting the barrel down to 20-inches and re-crowning, installing a Timney trigger, lapping the bolt, bedding the action into a new Bell & Carlson fiberglass stock and Cerakoting the exposed metal. Fiber optic sights were affixed to the barrel, and a Trijicon 1.25-4x24mm scope completed the package.

The Cerakoted receiver of Warren’s Winchester Model 70
This rifle loves the 260-grain Nosler AccuBond – a fine choice for the .375 H&H, especially at longer distances – making for a true do-all combination. The .375 H&H may be one of the best choices for big bears, as there are bullets available from 235 to 350 grains, and despite the cartridges inexorable connection with large African game, it is a relatively flat shooting cartridge, especially when mated with a spitzer boat tail bullet. Doug Warren spent years organizing outdoor events for the Paralyzed Veterans of America, bringing a multitude of veterans for both hunting and fishing trips – working closely with both Bob Jewett and Dan McDowell – so his .375 has seen plenty of action. “When I head to Alaska to hunt bears, this rifle gets the nod. It handles bears of all sorts, whether at 10 or 210 yards,” Warren told me. I’ve seen the accuracy of this rifle, and wouldn’t hesitate to carry it myself; it’s a rock-solid piece of gear.

Doug Warren with an Alaskan black bear
I saw a common thread among the rifles, with the exception of McDowell’s slick lever gun, in that controlled-round-feed bolt guns were preferred. My own choice was based upon the performance of this style of rifle in the wild places of North America, Africa and Australia, but the other three bolt-action rifles have seen a considerable amount of time in Alaska. The cartridges represent a cross-section of cartridge choices suitable for the largest North American game; there are those that prefer even larger cartridges, such as Phil Shoemaker’s famous ‘Old Ugly”, a Mauser in .458 Winchester Magnum, but I think the .338 Winchester Magnum, .375 H&H Magnum, and the .404 Jeffery (and you could easily substitute one of the .416s) offer enough cartridge for any traveling sportsman headed to Alaska for the largest bears. Both the guides had a definite preference for cartridges larger than .30-caliber, regarding the brown bears, and please realize that when you’re hunting coastal Alaska, you’re in brown bear country, irrespective of what your intended quarry may be.

A trio of Alaskan rifles: a Winchester 70 in .338 Win Mag, a Bansner custom in .404 Jeffery, and a Ruger 77 MkII in .338 Win Mag


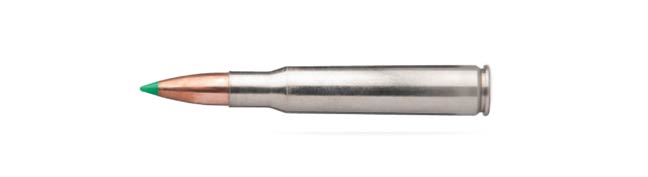
 .280 Ackley Improved


.jpg)