Case in Point: Most lockable gun cases meeting TSA requirements will last you for years.
Ralph Smith
The TSA agent called an airport police officer to inspect the firearms in my checked luggage. The officer didn’t seem to know much about guns, but she was a large woman with a Glock on her hip and the authority to lock me in the airport jail. Call it intuition, but I got the sense that her friendly demeanor could change.
I’d removed the barrel from my 870 so that it would fit into the case a little easier. Rather than open its action, she grasped the receiver and slide in a few places, as if gauging the firmness of a big zucchini. Then she held the barrel up, squinting one eye as she peered through the muzzle with the other.
Satisfied with that, she then picked up my carry gun, which, unlike her Glock, has a manual safety that at first prevented her from cycling the slide. She began wrenching on it like a frustrated toddler.
You have to take the safety off first,” I said softly. “It’s right there.”
Tempted as I was to say something clever, the sure outcome of any smartassery would’ve been more time spent in the airport back room with my new friends, and I had no interest in that. I kept my mouth shut, and a few minutes later, I was on the way to my gate.
Flying with firearms makes people nervous, and I’m frequently asked about the difficulty of it. I fly 10 to 12 times a year, and almost always with a firearm. Most trips end without any delays or questions from security. But on occasion, situations like the one I just described—which happened to me after a turkey hunt last spring—do arise.
If you’re not prepared, you might have a long day and some probing in your future. You don’t want that. Plan ahead and be informed, and nothing in your travels with guns will be unmanageable.
Know the Rules
TSA rules for flying with firearms are explicit and easy to understand, and they apply to every domestic airline. Read them here.
Some airlines (and airports) implement rules of their own, but in general, if you understand and follow the TSA rules without exception, you will be O.K.
Your firearm and ammunition must be in your checked baggage. Gun parts—magazines, choke tubes, bolts, etc.—need to stay in your checked bags as well. You can throw a fit in the security line and argue over the harmlessness of a choke tube, but it won’t do you any good—and it could be the first step toward that probing I mentioned earlier.
You can’t just drop your .45 in your suitcase, either. To legally check your firearm, you need a hard-sided case that meets TSA specifications (most appropriate cases are labeled as such). I’ve flown all over the country with a $30 hard-sided plastic pistol case with a pair of padlocks on it. I have checked rifles and shotguns alike in a basic $40 Plano case as well, but if you’re protecting optics, it’s worth investing in a beefier case.
Pistol cases can be put inside other checked luggage; long guns need to be checked in individual bags. Be certain to remove any detachable magazines, and check twice to ensure that the gun is unloaded. A limited amount of ammunition can be checked in the case alongside the firearm or separately in your luggage, but it must also be packaged per TSA regulations. The easiest thing to do is to keep ammo in its factory packaging. Don’t forget any loose rounds in pockets or packs. You don’t have to use TSA locks to secure your gun case, but they do make life easier. Ensure that there are no potential access points into your case, particularly if you’re using a plastic case, which has corners that can be pried open. When in doubt, add another lock.
Once you’re positive that everything is secured properly, arrive at the ticket counter at least 30 minutes earlier than normal. You’re required to “declare” your firearm to the airline immediately upon checking in. It’s better to softly say, “I’m checking a rifle and ammunition,” than to loudly say, “I’ve got a gun!”
After that, you’ll be required to sign a declaration form that your firearm is unloaded. They may ask to see inside the case, they may call for a TSA inspection on the spot, or they may tape the form to your case and send you on your merry way. Be prepared for any of the above—but do not allow the firearm to leave your possession unless the case is locked and you have the keys. If your firearm is sent down the line, hang out for 10 to 15 minutes before heading through security yourself, because you could very well be called to unlock the case for an inspection.
Some people who dislike guns also work at airports—especially around major metropolitan areas. If you sense that someone is uncomfortable around your firearm, then they probably are. Even personnel tasked with their inspection, like TSA officers or airport police, may not know much of anything about guns. That’s why it’s worth hanging out a few extra minutes with the keys to your locks, just so you can be present if they need to look inside your case.
Once you’re called into the back room, you can give them a good rant about your Second Amendment rights, their ineptness, and the overall wretched state of their administration. But that won’t get you to your gate or back home any faster. Being cordial and helpful—but saying nothing more than what’s needed—-probably will.
TIP OF THE MONTH: Airports and Archery Gear
Interestingly, I’m stalled in security more consistently with bowhunting tackle than with firearms. In fact, I can recall one hunt where the security officer virtually ignored the locked pistol case in my bag but spent 15 minutes inspecting the innards of my bow case. Although you’re not required to declare archery tackle, the TSA may want to see it anyway—and you don’t want them tampering with your bow unsupervised. That advice about arriving early if you’re flying with guns applies to flying with bows, too. —W.B.
Would you know what to do if a gunman invaded your office? THOMAS_EYEDESIGN/GETTY IMAGES
If you heard gunshots at work, would you know what to do?
Would you know the fastest escape route or the best place to hide? And if it came down to saving your own life and those of your co-workers, would you be prepared to fight back?
Media reports to the contrary, mass shootings actually are more likely to occur in places of business than schools. When the FBI studied active shooter cases from 2000 to 2013, it found that 45.6 percent of the incidents happened in areas related to commerce (like offices and malls).
This was followed by environments related to education (like schools and colleges) at 24.4 percent.
And the number of shooting incidents keeps rising: In 2000, there was one active shooter incident, resulting in seven casualties, according to the FBI; in 2017, there were 30, resulting in 729 casualties.
The FBI defines an active shooter as “an individual actively engaged in killing or attempting to kill people in a populated area.”
The truth is that none of us really knows how we’d respond in the unlikely event of an active shooter in the office. Which is exactly why education and preparation are so important, so you’ll know what to do in such a terrifying situation.
Rob Berryman is a safety consultant with the American Contractors Insurance Group who presents frequently at risk management conferences about active shooter training and response.
One of Berryman’s favorite sayings is, “People don’t rise to the occasion. They retreat to their level of training.”
While nothing replaces a thorough, in-person training by active shooter response specialists like the ALICE Training Institute, Berryman shared some life-saving tips for how to survive an active shooter attack in an office.
His tips are organized under the active shooter survival mantra: Run. Hide. Fight.
If You Can Escape, Run
The first and best option in any active shooter situation is to escape to safety. But to do this, you first need to know all of the exits and escape routes in the office.
This is why it’s so important to plan for precisely this kind of emergency. Every worker needs to ask themselves, “If I’m at my desk, on the elevator, in the break room or in the bathroom, what’s the quickest way out?”
If the shooter isn’t yet in your area of the office, stay low and move as quickly as you can toward the nearest exit. Don’t hesitate and always keep moving.
While fleeing, prevent anyone else from entering the building. Only when you’re free and clear of the immediate danger should you call 911.
If You Can’t Get Out Quickly, Hide
This is not an “old-school lockdown,” says Berryman. Hiding does not mean passively huddling in the corner of an office. Sadly, that only makes it easier for shooters once they discover the hiding place.
Law enforcement and training experts recommend a much more “active” form of hiding intended to keep the shooter out or escape if possible.
Again, knowing the best hiding places in the office requires planning ahead. The ideal locations are rooms with thick walls that can be locked from the inside.
Cubicle walls won’t stop a bullet, and glass-walled conference rooms can be shot open. Even doors with glass panels are too risky.
Many office walls are made of thin drywall, which also is too weak to stop a bullet. Interior rooms closest to an elevator shaft tend to have thicker, reinforced walls.
If none of the rooms in your office have locks, you need to know what it takes to keep that door closed. That means knowing which doors open inward and which open outward.
Doors that open inward can be barricaded with heavy pieces of furniture (filing cabinets, refrigerators, desks) or jammed closed with a pair of rubber doorstops.
For doors that open outward, Berryman recommends tying an electrical cord around the door handle and using two or more people to pull hard on the cord to keep the door closed.
If an outward opening door has a hydraulic arm at the top, you can tie a belt tightly around the v-shaped arm and door won’t open.
“Shooters are opportunistic,” says Berryman. “They’re holding a gun, so they only have one free hand to work with. If you can secure that door using any and all means, it’ll be harder to get inside one-handed.”
Remember that hiding is still your second-best option. If your hiding place is on the first or second floor, consider escaping through a window.
That’s what saved several students’ lives during the Virginia Tech shooting. A brave teacher corralled his students out the window before the shooter breached the door.
If you need to break the window to escape, smash it from a top corner using any heavy object, including a chair, fire extinguisher or “salesman of the year” trophy.
Clear out as much glass as possible before escaping, not forgetting hanging glass shards above you. If you’re on the second floor, hang by your hands from the window ledge to lessen the distance of the fall.
If All Else Fails, Fight Back
Fighting back does not mean actively seeking out the shooter and facing him one on one. Instead, it’s the last resort if the shooter breaks into your hiding place, but one that could save many lives, including your own.
While hiding, you and your co-workers need to be ready to react quickly if that door opens. That means staying low, but not sitting or laying down on the floor. Grab anything available that you can throw at the shooter or use as a weapon.
“I challenge people to go back to their desk and find five things that can defend themselves with,” says Berryman. “Staplers, scissors, coffee mugs, anything.”
The first defense if the shooter gets through the door is to throw stuff directly at his face. Berryman, a certified self-defense instructor for the NRA, says that it’s impossible to aim when solid objects are flying at your head.
Then comes the hardest part. For the split second that the shooter is thrown off guard, everyone in the room needs to swarm him. Not just one or two people, or the biggest, toughest people, but everyone.
This is no time to go lightly or fight fair. The goal should be to incapacitate the shooter with aggressive physical force using any means necessary.
Berryman admits there’s a very real risk of somebody being shot while swarming, but the risk of doing nothing is far worse.
Again, one of the huge benefits of training and preparing for active shooter situations is that you and your co-workers are on the same page and ready, if necessary, to fight for each other’s lives.
Get Trained, Be Prepared
If your workplace doesn’t already have active shooter training and drills, let your bosses and human resources team know that it’s important.
Local law enforcement can often provide free training, or you can reach out to professional training institutes like ALICE. The Department of Homeland Security also has an excellent Active Shooter Preparedness program that includes instructional videos, training booklets, posters and more.
***Proper Planning Prevents Piss Poor Performance! Grumpy***
Yeah I know, It’s Tacky but you have to admit it is amusing in a Dark Humor way. So lighten up Folks!
If you have a hard time with graphs and charts(Or if you want another trick to remember) I have another trick for you.
Hold your Sight on the Belt Buckle.
Belt Buckle is your point of aim.
At 25 meters/yards its dead on.
At 50 meters/yards it lands in his belly button.
At 100 meters/yards it lands on his solar plexus.
At 150 meters/yards it lands on his upper chest.
At 200 meters yards it lands on his solar plexus.
At 250 meters/yards it Groups around his belly button
At 300 meters/yards it Groups around his belt buckle.
At 300 meters your 2 MOA dot is the size of your Target’s Face and your Irons are about the size of his shoulders.
Level your front sight post on to the chest at his Nipple Line or put that Red Dot’s top apex on the base of the targets neck.
Then… Always fire 3 rounds @ 300 meters/yards or beyond in a slow succession. This is to account for the decrease in terminal velocity(less damage), weapon heat, and for your spread due to inherent MOA.
This process works for match ammo or bulk ammo.
And should be used with both.
It’s best to let your triggers reset be released in a reversed fashion compared to your pull. This will keep you steady and wise during firing.
Now the Formula is.
300 meters/yards is “dead on”
350 meters/yards groups on the solar plexus area.
400 meters/yards groups on the belly button.
450 meters yards groups on the belt buckle.
500 meters/yards groups on the thighs.
550 meters/yards groups on the knees.
600 on the feet.
Now. Past 600 is alot harder to shoot on the fly than you think because of wind and your angle. You need to fire 5 rounds slowly and methodically at any range past 600 meters or yards with any 5.56 round.
FYI this is called the “Fly Formula” for letting lead fly on the fly at multiple targets.
You need to level your Irons on your target’s “head” to get a pelvis/guts/chest group @ 600 meters.
If you can see that far good for you. I can as I am blessed with the gift of uncorrected 20/20 vison. Some people are not or no longer with age. Buy a scope. ACOG works great. So do traditional scopes.
Ignore 650, 750, 850, and 950 meters.
Just add a “head” to each point of aim at 700, 800, 900, and 1000 yards.
Fire your 5 rounds very carefully. You can fire 2-3 rounds before your target even hears it at these distances.
This works very well. You should get 2-3 hits out of 5 rounds at 600 meters. And probably 1-2(probably 1) @ 1,000
And that’s all. I used to be a SDM in Sadr City, Baghdad. So fuck you if you disagree. This shit works.
I just taught you how to kill bad guys like a real meat eater. Sips Tea*
Every night at 6 PM the Sherriff of Butte County reveals the grim count of the dead discovered, so far, in the ashes of Paradise. He also reveals the latest number of known missing persons who cannot be located by family or friends. Finally, there is the list of homes and businesses destroyed. The raging fires that destroyed Paradise utterly have passed (for now) but the search for the dead is only beginning.
Last night’s official tally was:
DEAD: 71 (all but one found inside a home.)
MISSING: 1,100
HOMES DESTROYED: 9,740 (only about 5% have been search so far)
BUSINESSES DESTROYED: 336
In short, they have only begun the search for the dead. It will be some time before there is an OFFICIAL tally of the dead, but whatever that is it will always be on the low side. This is the kind of town and the kind of disaster that means five years from today hikers in the ruined but reviving forests will be stepping on skulls.
Paradise is not a town on some flat land out on the prairies or deep in the desert. Paradise is a series of cleared areas and roads superimposed on an extremely rugged terrain composed of deep, narrow ravines and high and densely wood ridges. The Skyway is fed by hundreds of paved and unpaved roads that twist and turn and rise and dip and then, at their OFFICIAL ends, run deeper still and far off the grid. If you live in Paradise you know there are hundreds of people living back up in those ravines and ridges that would be hard to find before the fire. In those places, the poor are lodged tighter than ticks.
I’ve seen, before the fire this time, people in the outback of Paradise so abidingly poor they were living in trailers from the 70s resting on cinder blocks and at most only two winters away from a pile of rust. These people would have had no warning of a fire, no warning at all. Instead of “sheltering in place” they would have been “incinerated in place.”
In the ravines and forests of Paradise, cell reception was so spotty that AT&T gave me my own personal internet driven cell-phone tower. If those off the grid in Paradise actually owned cell phones they would have been lucky to get an alert. But most of those did not own cell phones, and landlines didn’t run that deep in the woods. When the fire closed over them they would have had no warning. No warning until the trailer melted around them. And then there was, out behind but still close to their trailer, their large propane tank.
How many bodies will be found in the pyre of Paradise? Right now nobody knows for sure. Nobody will ever know for sure. In five years from today, somewhere in the reviving forest of Paradise, some hiker is going to step on a skull. He won’t be the only one.
BY MASON DIXON TACTICAL In the real world with real bad guys, practical accuracy is the only accuracy.
____________________________________________________________________________________________ There’s a lot of confusion even among longtime shooters between what a rifle is capable of doing off the bench on a nice controlled square range and what’s actually practical for a serviceable combat weapon.
The two really aren’t the same. While tight groups are definitely a plus and a goal to be attained, having a precision weapon in the general purpose role is not always completely necessary to make one combat effective.
There’s a happy medium to be found, and getting there is not always hard or expensive. Above all else, it’s the fundamentals of the shooter that make a weapon deadly, no matter what.
One of the really neat things about the past couple decades, firearms-wise, is the real renaissance we’ve seen in weapons development and maximization of potential.
Most visibly is this phenomena with the proliferation of the AR-15 platform, but really among all classes of weapons. One can pick up even a lower-tier carbine and have a decent action capable of making solid hits at further distances than many shoot on average. That is, if the shooter is capable. Some of this has to do with the plethora of modern ammo choices out there, some with the advent and precision of CNC machines, and some with the proliferation of free-floated handguards.
While the Colt M4A1 series has a mil-spec tolerance of 4 MOA, or a ~4 inch group at 100 meters, and usually easily exceeding this your common off the shelf AR-15 can expect much better than that on average. It begins, however, with the skill of the man behind the trigger.
The same can be said for the huge boom in the Long Range hobby. Lots of people are getting into it and it can be a lot of fun putting steel on target from 500m or more.
The ability to squeeze every last fraction of capability is definitely nice. And usually the underlying question, whether plinking, running 3 gun or Long Range type stuff, is ultimately protection of hearth and home.
But the question that comes to my mind is do you really need all of that to make an effective rifleman? The answer is largely determined by the rifleman’s purpose.
For a combat weapon, even a designated marksman’s role, it doesn’t necessarily have to be a .5 MOA rifle or even one that really impresses at the range.
Gasping for air, I know. Practical accuracy is a different animal from mechanical accuracy. But let’s look at some reasons why. 1. What is the median distance you plan to engage?
For my operating environment, I live in mostly dense forest with rolling hills. The long distance stretches are either pastures, power lines, or highways.
From a light fighter’s standpoint, these three amount to the cardinal rule of never walking in the open or crossing a linear danger area with no overwatch.
Overwatch, by the way, is not some fancy buzzword to sell you junk but actually is someone on your team hidden watching for muzzle flashes in case you get shot…while you’re crossing in the open or across linear danger areas. They watch over you.
That said, my average engagement distance here is under 100m. Are you accurate enough to be lethal within 100m? How about 200m? How about 300m?
Do you really need to shoot further than that? Maybe, maybe not. What are the intermediate barriers, i.e. potential cover (rocks, deadfall, etc) between you and where an adversary may fire from? Are you capable of shooting over those same open areas that they may cross?
Average backwoods of NC.
A good way to put this into context is to think of the average shot a deer hunter will make in a given area. Around here, between thick Carolina conifer and hardwood stands, shotguns do just fine for 99% of putting meat in the freezer.
Rifles are nice for shooting across cutovers or fire breaks- those open areas requiring a little more range I just warned you about.
And how accurate is that Remington 770 or 742 with meat ammo versus a heavyweight barreled Remington 700 5R and precision handloads?
Mechanically it wouldn’t make much difference in the woods over relatively short distances. But the weight sure as heck will, regardless of whether you’re a twenty something stud out shootin’ n’ lootin’ or a mid 50s patriarch looking to protect his home.
Doesn’t mean that any of these are my personal choice for anything other than hunting game, but the concept is basically the same. Which bring my next point. 2. What is your Weight Threshold?
I knew a guy a while back who had a uber-high end semi-auto AR-10, decked out to the nines, with every cool guy thing you can imagine and a giant NightForce 56mm celestial telescope on top.
Beautiful rifle, crisp glass. Weighed 18lbs empty and carried like a 4×4 in the hands. And there’s nothing wrong with that, if you want a high end benchrest-type gun.
But that’s a ridiculous and unnecessary amount of weight for a general purpose weapon. For him, making tiny groups at a given distance was a lot of fun. But when it came time to carry it, you’d see him ditch that for his handy WASR-10 that weighs half as much loaded and accomplishes the same task within 100m.
The point is that what feels heavy but tolerable in your hands at the gunstore becomes a boat anchor after carrying it over distances with supporting equipment.
Common knowledge usually dictates weight equates superior accuracy, but too much becomes self-defeating. That lightweight AR-15 with a pencil barrel can get heavy too.
After a four day cave clearing mission in Afghanistan my M4 felt like a cinderblock. And aside from a PEQ-15, it wasn’t too far removed from the AR-type carbine pictured above.
Granted, I was carrying a lot of other equipment including a SMAW-D and several days worth of 5590 batteries (which is like toting aroundbricks), but the point is that a carbine I intend to fight with needs to remain lightweight to keep me unencumbered.
There’s a reason the broad shouldered bubbas get picked to hump the M-240B; it’s big and heavy, and the small guys can’t handle and effectively employ it over long distances.
Even the meat eaters get tired though, and shaving a few ounces here and there makes a world of difference when you’re gassed. 3. Remaining Combat Effective- Remember BRAS
The reality of fighting in armed groups is that it is nothing like sitting at a range plinking targets. That’s nice for basic rifle marksmanship, and it’s really important to work on fundamentals.
It’s purpose is to confirm zero & dope (Data Of Previous Engagement- a record of ballistic data for that weapon and specific ammo load) and make sure you can hit a target at a given specific distance, hence why most square ranges are referred to as Known-Distance or KD ranges.
Square range time is critical, and should be at least a monthly training event for you and your group. But understand it is not the end-all-be-all; its just a foundation for Basic Rifle Marksmanship consisting of BRAS- Breathe, Relax, Aim, Squeeze. For creating and maintaining proficiency this is the proper cadence for trigger control.
It’s easy to get right when relaxed and very easy to get wrong any other time. Only training on a 100m square range is a dangerously false sense of security.
Only shooting from a bench and calling it good is preparing you for nothing except shooting off a bench. Getting out and humping that safe queen through the woods for a bit is critically more important than making tiny groups from the bench or even shooting fast at stationary targets in the 3-gun stall.
You learn the ins and outs of that weapon on a patrol and get to make it better.
You may very well learn that what you can do with a 12lb rifle you can also do with an 8lb rifle, and that 4lb weight saving could make a big difference.
If I’m running a .5 MOA rifle but it’s a beast to carry with that 20in bull barrel, I may end up being so exhausted after a movement or a quick react to contact that I can’t hit anything with it because I can’t settle down behind the gun. Under duress this will happen to you.
If you’re out of shape this will be you. And at that point the rifle’s accuracy is irrelevant. Shooting a half inch at 100m now becomes not even being able to acquire a target in that 14x zoom lens, because you’re spent and can’t think through your situation. Believe me, it will happen to you. 4. “If you can’t do it with irons, don’t bother with optics”
I was talking recently with an old-hand Sniper Instructor who told me this. It may come as a shock to some of you but I agree wholeheartedly for making new riflemen.
The optics themselves make life easy, especially today in the world of precision machining and glass manufacturing that makes even lesser-expensive options fairly high quality. And it can produce marksmen in a shorter amount of time because the process of sight-aquire-fire now becomes streamlined.
But- and this is a big objection- without the fundamentals of proper marksmanship, an optic of any type does you little good and in some cases might make you worse.
If I’m running way more glass than necessary, such as putting a 16×50 on an M4 because it helps me shoot tiny groups off a bench or in the prone, I’m not effective anywhere but in that one scenario.
I may very well lose my target if something throws me off kilter as usually happens in a dynamic environment and I may also have trouble getting on target with any amount of speed.
If I back the zoom off but have a second focal plane scope, now my reticle is worthless for any sort of bullet drop or ranging measurements.
His logic is that if I can do it with iron sights, then I have zero problem with optics. The fundamentals are there, along with my confidence.
The foundation is laid. Optics of any type are a tool to enhance one’s capability, not a shortcut in training. If Joe knows he can ring steel with irons on his weapon at an average engagement distance, then an optic of any type enhances his capability.
He now has confidence in himself and his weapon. And confidence is the difference maker above any piece of kit. So with that said, anyone getting started in rifle marksmanship should begin with iron sights and graduate to implementing optics down the road. Simplicity equals success.
Keep in mind this is for basic training purposes; a standard for those new or inexperienced. Additionally, for those simply thinking optics always equate accuracy, buying airsoft-grade trash or even decent glass but a skimpy or improper mounting solution is a recipe for problems in the long run.
If it’s worth doing, it’s worth doing right. If you genuinely don’t know, swallow that pride and get some instruction- I promise, it will be worth it. Mechanical vs. Practical
Mechanical accuracy definitely plays a large role in practical accuracy, but if your fundamentals are trash nothing is going to make you a good shooter.
While you’ve read up until now that pinpoint accuracy is not a central requirement in a primary fighting carbine or rifle, good mechanical accuracy is definitely a desirable asset.
If my weapon shoots 2 MOA, or a 2 inch group at 100 yards, that means on an average man-sized target at any given distance I have some margin of error to still make solid hits, all things being equal. Anything up to 4 MOA for a general purpose carbine then becomes perfectly acceptable.
Even out to 600m this gives us, in theory at least, 24 inches of spread but still perfectly capable of a solid hit if you do your part. But you have to know how to do your part, and that only comes from solid training.
But will you need to shoot that far? Probably not in most cases- and only your own situation can determine this. Most often our expectations should be half that distance at the most, but if everyone in your group can make those kinds of shots, then they’ll have no problems engaging closer than that.
Practical accuracy comes from the individual rifleman; riflemen are only produced and maintained through quality training. The tactics of the Team of Riflemen are the real difference maker. You should be seeking out training outside the square range on a regular basis.
My friend JC Dodge has an upcoming class which will go beyond the typical comfort zone of most, pushing both the student and his equipment.
In addition, I’m available for those seeking private instruction on both making the shot and proper field techniques, along with other small units skills such as off-grid communications, Recon & Surveillance, and Combat Casualty Care.
We’re not the only ones who can teach this stuff; there’s many others. But I highly implore the reader to get that training along with all the other skills to give you the tactical edge in setting up a secure retreat, even if you think you’re the ‘expert’. And with that, I’ll leave you with a quote from the late, great Peter Kokalis:
To train others in the art of war, you must both know war from the trenches and undergo constant training from others, both to keep the sharp edge and be exposed to the ever-evolving tactical concepts of combat at the down and dirty level.
Several have asked why an “expert” (God how I loathe that word) like me would need to participate in training at a firearms school. The answer is simple: for the same reason tennis and golf pros constantly train under other tennis and golf pros.
You cannot observe yourself while shooting, but the professional firearms instructors under whom I train can constantly detect slight nuances of incorrect movement that need to be reprogrammed.
-From Weapon Tests and Evaluations, The Best of Soldier of Fortune
The idle musings of a former military man, former computer geek, medically retired pastor and now full-time writer.
Contents guaranteed to offend the politically correct and anal-retentive from time to time. My approach to life is that it should be taken with a large helping of laughter, and sufficient firepower to keep it tamed!
____________________________________
I’ve had a few readers take issue with my article on Wednesday about defensive firearms on a budget, particularly my comments about training disabled shooters using table tennis balls or equivalent targets.
Some people seem to think that such results are impossible – in other words, they think I’m lying. Others believe it’s irresponsible to recommend the ‘puny’ .22LR as a defensive round. I’d like to take a little time to address both perspectives.
Let’s start with .22LR’s viability for defensive use. I completely agree that a defensive round should have adequate power to get the job done.
The trouble is, allhandgun rounds are deficient in energy, not to mention the nebulous concept known as ‘stopping power’, when compared to almost any centerfire rifle or shotgun round. The ‘gold standards’ of handgun cartridge effectiveness are widely perceived to be .45 ACP in pistols, or .357 Magnum in revolvers.
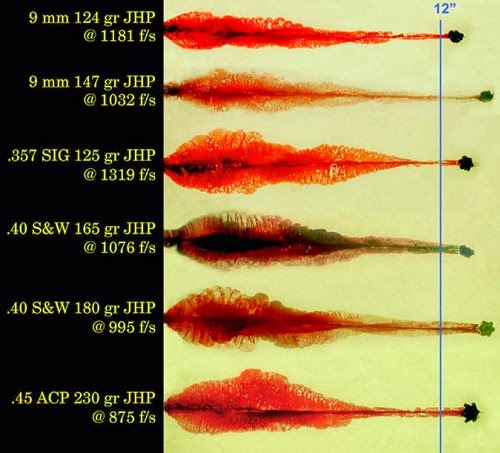
However, there have been many ‘failures to stop’ using both rounds. They’re far from infallible. Furthermore, most modern defensive ammunition appears to offer very similar performance, irrespective of caliber or cartridge, when results are compared in uniform test media such as ballistic gelatin, as the image below shows.
The image is taken from this excellent discussion of the topic, which I highly recommend you read in full. Given an effective round, defensive success appears to be far more dependent on shot placement – putting one’s bullets where they’ll do the most good (or harm, depending on one’s perspective) – than on bullet diameter, weight or energy level.
The average muzzle energy of all six of the above rounds is 404.33 foot-pounds. In comparison, a .22LR hollow-point round weighing 36 grains, fired at a muzzle velocity of 1020 feet per second from a 4″ handgun barrel, offers muzzle energy of a mere 83.2 foot-pounds – about one-fifth that of a handgun round considered more suitable for defensive use.
That’s pretty weak. However, it will also generate very much less recoil than the better-performing rounds. For example, the first round in the illustration above, a 124gr. 9mm. bullet fired from a Glock 19 pistol at a muzzle velocity of 1181 feet per second, produces free recoil energy of 7.69 foot-pounds.
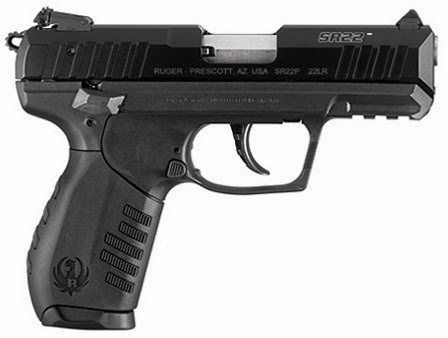
(Most of the other rounds mentioned in the image will produce greater recoil energy than that from a typical handgun.) The .22LR round described above, fired from a Ruger SR22 pistol, will produce free recoil energy of only 1.37 foot-pounds.
Ruger SR22 pistol
That recoil figure is why the .22LR is a game-changer for some people. I’ve worked with disabled and handicapped individuals who have limited upper body strength and/or mobility, including their arms and hands.
They find it difficult or even impossible to control an average handgun in recoil. However, the very low recoil impulse of a .22LR handgun is a different kettle of fish. Basically, if they can pick up a tennis ball, they can cope with a .22’s recoil.
Therefore, such individuals are much better served being able to shoot something in self-defense, even if it’s generally considered less than optimum, rather than be left with nothing at all.
That brings us back to the training I provide to such individuals – the training some readers seem to think is ‘impossible’. It’s not. In fact, I’m going to challenge all of my readers to try this experiment for themselves.
First, I’m assuming that you’re capable of keeping all your shots from a handgun inside a 6″ circle at a range of 20-25 yards, firing slowly and deliberately. If you’re not yet at that level of competence, you should work on that before proceeding with this exercise.
Next, you’ll need a BB pistol and ammunition, given the high cost and limited availability of .22LR ammo right now. If you don’t already have one, I suggest this one (that’s the model I use, but there are many alternatives – do your own research and select one you like).
Buy also a pack of CO2 cartridges and a supply of BB’s. All three purchases together will cost you about $62, which will give you up to 2,400 shots for a total cost (including the pistol) of about 2½ cents per round. If you want to go to 4,800 shots (which I frankly recommend), buy two packs of CO2 cartridges and two of BB’s for a total investment of under $84 – well under 2 cents per round. (If you’d prefer to use an Airsoft pistol rather than a BB, that’s your call. Personally, I find the BB more effective as a training tool.)
Once you’ve bought those things, you need to invest in some suitable targets. 60 cheap tennis balls will cost you a dollar apiece and are tough enough to last for a long time, but might be a bit heavy for BB pellets to roll them across uneven ground. These ‘small balls’ are even cheaper and weigh less, but probably won’t last as long. I’ve used both options. (I know one shooter who invested in a small ball pitching machine to help his training.) As your skills improve, you’ll need smaller targets. I use these mini practice balls, and also bulk packs of ping-pong (table-tennis) balls – the latter don’t hold up well to multiple bullet impacts, but they react very well when hit, making them a lot of fun. You’ll also need hearing protectionand eye protection (VERY important, particularly the latter!).
Finally, find an open area of bare ground on which to place the balls, with a suitable backstop (an earthen berm, a solid wooden fence, etc.) to stop the BB’s ricocheting off the ground and endangering others. (A grassy surface isn’t optimum, as the grass will slow down the balls, perhaps even prevent them from rolling at all under the very light impact of BB’s. However, if a grass surface is all that’s available, consider laying down a tarpaulin or old carpet on top of it as a rolling surface. It’ll get torn up, so don’t use anything you want to keep in good condition.) As a commenter has noted, you can also use the interior of your garage provided you line the walls with old carpets, or cardboard boxes, or something else to absorb BB’s that ricochet off the cement floor. You don’t want them bouncing off the walls and coming back at you! (A great source for old carpets is a carpet seller/installer. They rip out old carpets by the mile every week, recycling the best and throwing away the worst. You can often get old carpet rolls from them free of charge, or for nominal sums.)
Start by laying out a few of the larger tennis balls or ‘small balls’ at random. From a range of about 10 feet, try lining up your sights on each one and hitting it with a magazine full of BB’s, moving it along the ground. Don’t try for speed at first, but concentrate on accuracy. As you get better, start shifting your sights between balls with each shot. Hit one ball, start it moving, swing to another ball, hit it and start it moving, then swing back to the first and hit it again. Do this until you can make every shot count, then move back to first 15 feet, then 20 feet, then 25 feet. Practice until you’re competent at every distance, including putting balls at varying ranges from near to far and hitting them all.
When you’ve got this down pat, move to the smaller balls and repeat the process. Practice until you can hit a stationary table-tennis-ball-sized target with every round at ranges up to 25 feet. When you achieve that, you’ll need to call upon a friend for help to get to the next level. His job will be to stand next to you, or just behind you, and toss the balls ahead of you so that you have to hit them while they’re moving. When you’ve acquired that skill, he should start bouncing them off a plank or other obstacle to either side, so that they’re moving across your front instead of away from you. This makes them much harder to hit. As you’re able to hit more and more balls one after another, increase the speed and frequency at which they’re thrown, making the shooter’s task more difficult. You can work up to a point where he’s throwing several balls at once.
The object of the exercise is to reach a level of skill where you can hit 7 out of 10 randomly moving table-tennis balls within 5 seconds. I find even disabled or handicapped students can reach this level of skill after about 3,000-4,000 rounds of practice. The best can hit all 10 in that time. (A few shooters, after much more practice, can even hit several balls firing from the hip, without using the sights.) Once you can attain that standard using a BB pistol, it’s not hard to do likewise with a .22LR handgun (assuming your backstop is adequate to prevent the bullets from ricocheting outside your range area and endangering others – I use a field with a hillside behind it to prevent that happening).
Now, consider this from a defensive shooting standpoint. You’re capable of hitting 7 out of 10 moving targets not much bigger than a human nose, using a .22LR handgun, at typical defensive ranges. Using the same handgun, do you think you could put 7 out of 10 rounds into the inverted triangle formed by the human eyes and nose (a larger, easier target) at the same distance – even if your target is moving? You bet you could! I think we can take it for granted that any bad guy receiving a faceful of high-velocity hollowpoints (my standard recommendation for defensive use in .22LR is CCI Velocitor ammunition, with CCI Stinger as a second choice) is going to be discouraged. Three of my disabled students (so far) have already demonstrated that to their (and my) complete satisfaction. They’re still here, and uninjured. Their assailants . . . not so much.
Under those conditions, for shooters with physical limitations but with that sort of training, you’d better believe the ‘lowly’ .22LR is a viable defensive round!
Peter
I grew up around guns my entire childhood. My dad was a federal game warden, so seeing him holster up or clean his gun are some of my boyhood memories. Despite being around guns, I never really took an interest in them. I’m not sure why. I guess I just saw them as my dad’s work stuff. Nothing to get really excited about.
A few months ago, I had a sudden urge to shoot a gun. I called my dad on the phone. “Hey Dad. I want to learn to shoot a handgun. Can you teach me how?”
He was sort of surprised.
“Why do you want to learn to shoot a gun all of a sudden?” he asked.
“Oh, I don’t know. It’s just something I think I should know how to do.”
So my dad took me, my brother, and my wife, to the gun range and showed us how to fire a gun.
It got me thinking. I know I’m not the only man out there who has gone their entire life without shooting a gun. For some of these men it’s a deliberate choice. They don’t want anything to do with guns and that’s cool.
But I’m sure there are a lot of men out there who have never fired a gun, but like me have the desire to do so. Or maybe you never shot a gun, but got invited to the gun range by some buddies. You want to go, but you don’t want to look like an idiot when you handle the gun. You’d like to have an idea of how to fire a gun safely and correctly before you go.
To get the lowdown on how to shoot a handgun safely and correctly, I headed over to the United States Shooting Academy in Tulsa, OK and talked to Mike Seeklander, the Direct of Training at the Academy. He explained the basics of firing a handgun so a first-time shooter could do so safely and semi-accurately (the accuracy part will take some practice!).
The Four Cardinal Safety Rules of Firing a Handgun
The very first thing Mike brought up were four rules, that if followed strictly, will keep you and others safe so you can have a good time unloading a few rounds. 1. Always treat every firearm as if it were loaded. No ifs, ands, or buts. Even if you know the gun is unloaded, still handle it as if it were loaded. 2. Always keep the firearm pointed in a safe direction, a direction where a negligent discharge would cause minimum property damage and zero physical injury. According to Mike, even the most experienced gun handlers break this rule all the time. They’ll take a gun and start pointing it all over the place while exclaiming, “Ah, sweet bro, this gun is kickass.”
“They don’t even know they’re doing it,” says Mike, “which makes it even more dangerous.”
The safest direction to point a gun is always downrange (as long as there aren’t any people downrange!). 3. Always keep your trigger finger off the trigger and outside the trigger guard until you have made a conscious decision to shoot.
4. Always be sure of your target, backstop, and beyond. You want to be aware of what’s in your line of fire. This isn’t usually a concern if you go to a professional gun range. They make sure that people and property stay out of the path of the guns firing downrange. Where this becomes a concern is when you go shoot with your buddy out on his property.
“Ask your friend what exactly is beyond the target and backstop you’re shooting at, especially when you’re shooting into a wooded area. Don’t just settle for, ‘Oh, don’t worry. There’s nothing back there.’ Ask specifically if there are any houses, property, etc beyond your backstop. Err on the side of being overly cautious,” says Mike.
How to Grip a Handgun
Alright, let’s get down to business. How do you hold a handgun?
For beginners, Mike says a two-handed grip is a must.
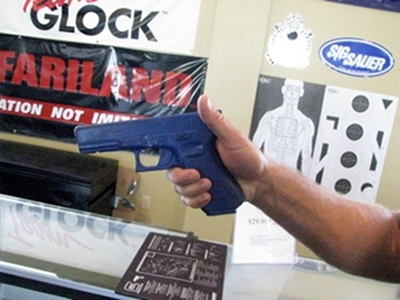
1. The gun hand (your dominant hand) should grip the gun high on the back strap (the back strap is the back of the grip on the gun). This gives you more leverage against the weapon which will help you control recoil when you fire the gun. Mike showing how to hold the gun high on the gun’s grip with your gun hand.
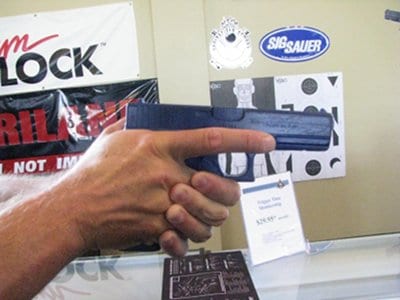
2. Place your support hand (your non-dominant hand) so that it is pressed firmly against the exposed portion of the grip not covered by the gun hand. All four fingers of your support hand should be under the trigger guard with the index finger pressed hard underneath it. Here’s Mike demonstrating for us: Fingers of support hand directly under the trigger guard. Notice Mike’s trigger finger is on the outside of the trigger guard. Safety first!
Like you did with your gun hand, you should place your support hand as high as possible on the grip with the thumb pointing forward, roughly below where the slide meets the frame. Look at the back of your hands. There should be a distinct fit, like the fit of a puzzle, with your gun and support hand, like so: Notice how your hands fit together. Just like a puzzle.
Assume the Extended Shooting Position
Stand with your feet and hips shoulder width apart. Bend your knees slightly. Mike calls it an “athletic stance.” It allows you to fire the weapon with stability and mobility. Raise the weapon toward your target. Here’s Mike showing us how it’s done:
How to Aim a Handgun
Use your dominant eye. You want to aim with your dominant eye. To figure out which of your eyes is the dominant one, perform a quick eye test by forming a one inch circle with your thumb and index finger. Hold the circle at arm’s length. Look at a distant object and look through your circle so that the object appears in the center of it. Keeping both eyes open, bring your circle toward your face slowly. Your hand will naturally gravitate toward one eye. That’s your dominant eye. Align your sights. Your handgun has a front sight and a rear sight notch. Aim at your target and align the top of the front sight so that it lines up with the top of the rear sight. There should also be equal amounts of empty space on both sides of the front sight. Proper sight alignment Set your sight picture. The sight picture is the pattern of your gun’s sights in relation to your target. When you’re aiming a gun, you’re looking at three objects: the front sight, the rear sight, and your target. However, it’s not possible to focus simultaneously on all three objects. One of the objects will inevitably be blurry when you’re aiming. When you have a correct sight picture, your front and rear sight appears sharp and clear and your target appears to be a bit blurry. Like so: Correct sight picture. The sights are in focus and the target is blurry.
According to Mike, the further away your target is, the greater the need for a clear focus on the front sight.
Trigger Management (aka Pulling the Trigger)
To fire a gun, we often use the popular phrase “pull the trigger.” However, to fire a gun properly, you don’t actually want to pull the trigger, but rather press it in a controlled fashion so you don’t disrupt your sights. Here’s a brief and very basic rundown on proper trigger control when firing a gun. 1. Press, don’t pull. Instead of pulling the trigger, press (or like my dad likes to say “squeeze”) the trigger straight to the rear. Apply constant, increasing reward pressure on the trigger until the weapon fires. Ensure that you’re only applying pressure to the front of the trigger and not the sides. 2. Take the slack out of the trigger. Squeeze the trigger to the point you start feeling resistance. 3. Surprise yourself. Keep pressing the trigger straight to the rear until the gun fires. Don’t anticipate when the gun will fire. You sort of want to surprise yourself as to when the gun actually discharges.
And there you go. Now you can go fire a gun at the gun range and look like you know what you’re doing. However, none of the information in this article can replace the instruction and supervision of a professional instructor. If you’ve never fired a gun before, we strongly suggest you visit a firing range and talk to an instructor who will walk you through the process. Have any other tips for the first time shooter? Share them with us in the comments! Editor’s note: This article is about how to fire a gun safely and correctly. It is not a debate about gun rights or whether guns are stupid or awesome. If you try bringing up that dead horse around here, your comment will be deleted. I will show no mercy. Keep it on topic, please. _____________________________________________________________________________
Special thanks goes out to Mike and the crew at U.S. Shooting Academy for their help on this article. Mike along with the U.S. Shooting Academy Handgun Manual were the source of this article. If you’re ever in the Tulsa area, stop by their facility. It’s top notch and the staff and trainers are friendly, knowledgeable, and super badass.


 There’s a lot of confusion even among longtime shooters between what a rifle is capable of doing off the bench on a nice controlled square range and what’s actually practical for a serviceable combat weapon.

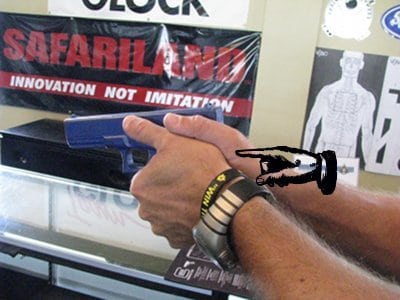 Notice how your hands fit together. Just like a puzzle.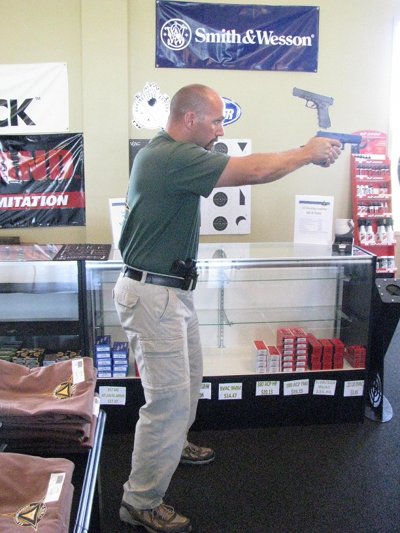
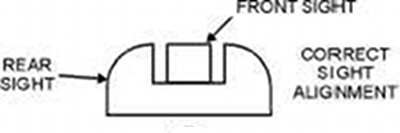 Proper sight alignment