Categories
All About Guns Useful Shit

Exploded View: Walther PP Pistol by GARRY JAMES

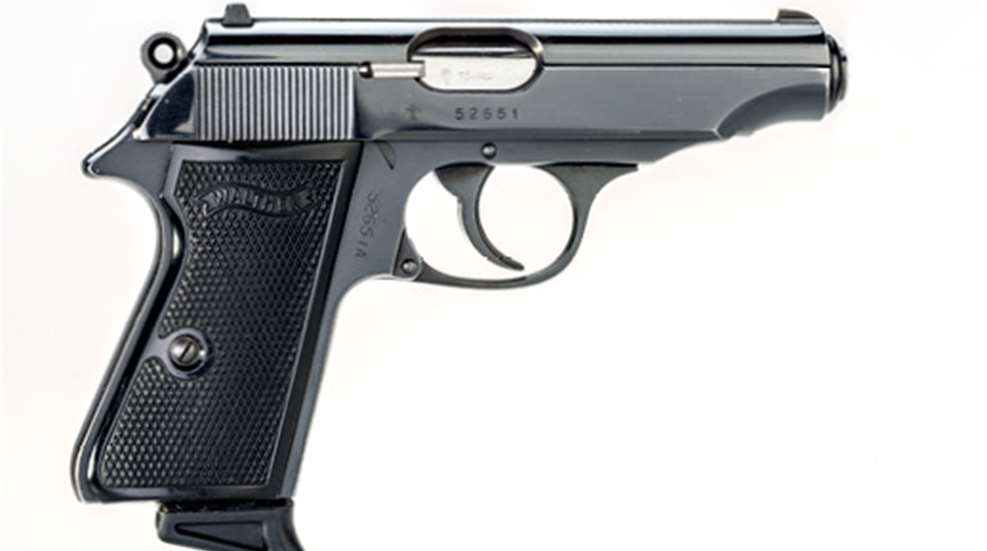
Very simply put, the Walther PP is one of the most influential handguns ever and, together with its variants, tops the pocket pistol popularity list. Introduced in 1929, Carl Walther’s PP (Polizei Pistole) was by no means the first double-action semi-automatic ever designed—several had appeared since 1905—but unlike most of the earlier attempts it worked, and worked well.

The basic platform owed some thanks to the earlier single-action Model 8, but also incorporated a whole new set of proprietary features. Initially offered in 7.65 mm Browning (.32 ACP), and eventually chambered for 6.35×16 mm (.25 ACP), .22 Long Rifle and 9 mm Kurz (.380 ACP), the PP was sleek, user-friendly and, particularly in pre- and post-war incarnations, extremely well-made.

Featuring a blowback, unlocked mechanism, the gun had a slide secured to the frame by the front lugs of a hinged trigger guard, which could be easily lowered and pushed to the side to allow the slide to be pulled to the rear and lifted off the frame. The barrel, around which the recoil spring was sited, was fixed to the frame to provide stability for the slide, thereby preventing the slide from inadvertently coming loose and, ostensibly, allowing for better accuracy than a removable barrel.

The double-action mechanism consisted of a simple disconnect that kept the pistol from firing more than one shot each time the trigger was pulled by using a trigger bar that was pushed down as the slide moved rearward, dropping below the position where it disengaged the sear from the hammer.

Other features included a loaded-chamber indicator pin on the 7.65 mm and 9 mm Kurz models (eliminated on some of the rougher, wartime PPs) and an automatic safety, which prevented the hammer from contacting the firing pin when forward. That allowed the pistol to be carried with a loaded chamber and the hammer down, even if the slide-mounted hammer-drop/safety lever was in the “off” position. When on, the safety catch secures the firing pin by means of a steel cylinder that rotates around the pin, locking it to the rear.

In 1930 the PP spawned an attenuated version of itself, the PPK (Polizei Pistole Kriminal) which, as its name implies, was also initially intended for police use. Both handguns were also readily adopted for civilian and military use.

An issue sidearm with the Germans during World War II, after the war Walther made an agreement with Manhurin in France to continue production of the pistol. Eventually manufacture was resumed by Walther in Germany, and models and variations have been made under license in the United States. The PP is still a serious contender in the pocket pistol field, one that is user-friendly, rugged, reliable and simple to dismount.
Disassembly Instructions
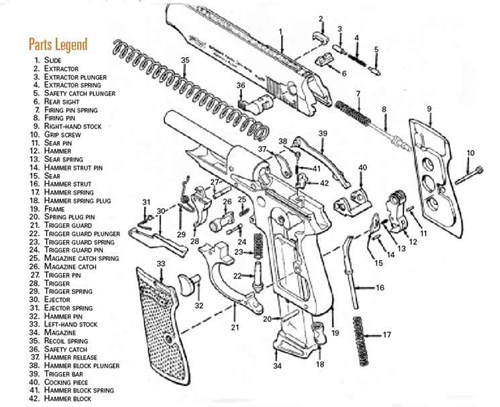
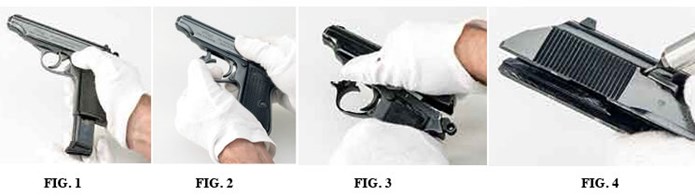
Disassembly for routine maintenance and cleaning is as follows: Remove the magazine (34) and empty the chamber (Fig. 1). Pull down the front end of the trigger guard (21) and push it to the right. It will rest against the frame (19) and remain open (Fig. 2). Pull the slide (1) to the rear as far as it will go.Lift up and ease it forward off the frame (19) (Fig. 3). Remove the extractor (2)by depressing the extractor plunger (3) well below the edge of the slide. Use a thin awl or a jeweler’s screwdriver as shown (Fig. 4), and rotate the extractor toward the firing pin.

After removing the extractor spring (4) and safety catch plunger (5) remove the safety catch (36) by first rotating it to the off position. Then, while pushing the firing pin deep into the slide, lift out the safety catch.

Finally, the magazine catch (26) is retained by the trigger guard plunger (22). Removing the plunger and spring (23) is not recommended unless it is absolutely necessary as they are under strong tension. If it is necessary, first push out the trigger guard pin (24). Again, it is not advisable to remove the trigger bar (39) or cocking piece (40) unless absolutely necessary. If so, do not pry out the trigger bar; rather, remove the cocking piece first.

Reassembly is in the reverse order. For instructions on detail stripping the PP, which can obviously be tricky, visit americanrifleman.org/walthertips.

Categories
All About Guns Useful Shit

The M1 Garand: History & Disassembly by IVAN F. INGRAHAM

A History of the M1 Garand

During World War I, the United States Army experimented with a number of different machine gun designs, and the news reports of the tests got a young inventor thinking about, and eventually designing, a machine gun of his own.

His initial attempt was a primer-actuated light machine gun he submitted to the National Bureau of Standards, which had instructed him to make a model of it. That design became the basis for what would, eventually, become the M1 rifle—commonly called the “Garand” after its inventor, John Cantius Garand.

Garand, who became a Springfield Armory employee in 1919, had an extensive background in design and production. Once at Springfield, he was tasked with designing a semi-automatic shoulder rifle based upon his earlier machine gun. He worked on and improved the design for the next 17 years. The now-familiar M1 was finally adopted on January 9, 1936, the rifle was adopted as the “U.S. Rifle, Cal. .30, M1.”

Early production rifles used a “gas trap” instead of the later “gas port” design and initially did not perform as well as expected, but once the “bugs” were worked out, the rifle was favorably received. It was fed by an eight-round en-bloc clip that was ejected along with the last spent casing, locking the bolt back and leaving the receiver open for a fresh clip to be inserted. User-friendly, accurate and chambered for the powerful ​​​
.30-’06 Sprg. cartridge, the M1 gained a reputation as a hardy and well-made service rifle.

World War II was the rifle’s baptism of fire, and it performed admirably. To a man, the G.I.s put their faith in their M1 rifles and took them from North Africa to Okinawa. Along the way, Garand made more improvements to the rifle based upon field experience and soldiers’ comments.

Although late to adopt the rifle, the Marines liked it, too, and found it well-suited for jungle fighting. America was the only country to equip its fighting men with a semi-automatic rifle as a standard shoulder arm. The venerability of the rifle was further established in the Korean War.

The M1 rifle is not without faults. At just under 10 lbs. it is heavy and the en-bloc clip does not allow for easy “topping off.” Because of those drawbacks, America sought a high-capacity, fully automatic rifle for individual soldiers. Reliability and accuracy were paramount, however, and the M1 was the measuring stick. What later became the M14 was based upon the M1.

Combined, Springfield Armory and Winchester Repeating Arms manufactured more than 4 million M1s during World War II. International Harvester and Harrington & Richardson manufactured them as well, and, during the Korean War, more than 500,000 were made.

The rifle is considered one of the finest ever produced by American armories. Its popularity is evidenced by its representation on the firing line at Camp Perry and other highpower rifle matches to this day. It is accurate, robust and its service record speaks for itself.

Disassembly

Disassembly of the unloaded M1 rifle begins by pulling the bolt rearward until it locks back. Visually inspect the chamber to ensure it is not loaded, then press down on the slide and follower while holding the operating rod and ease the bolt forward. Do this carefully or you will end up with a case of “M1 thumb”—a highly unpleasant condition!

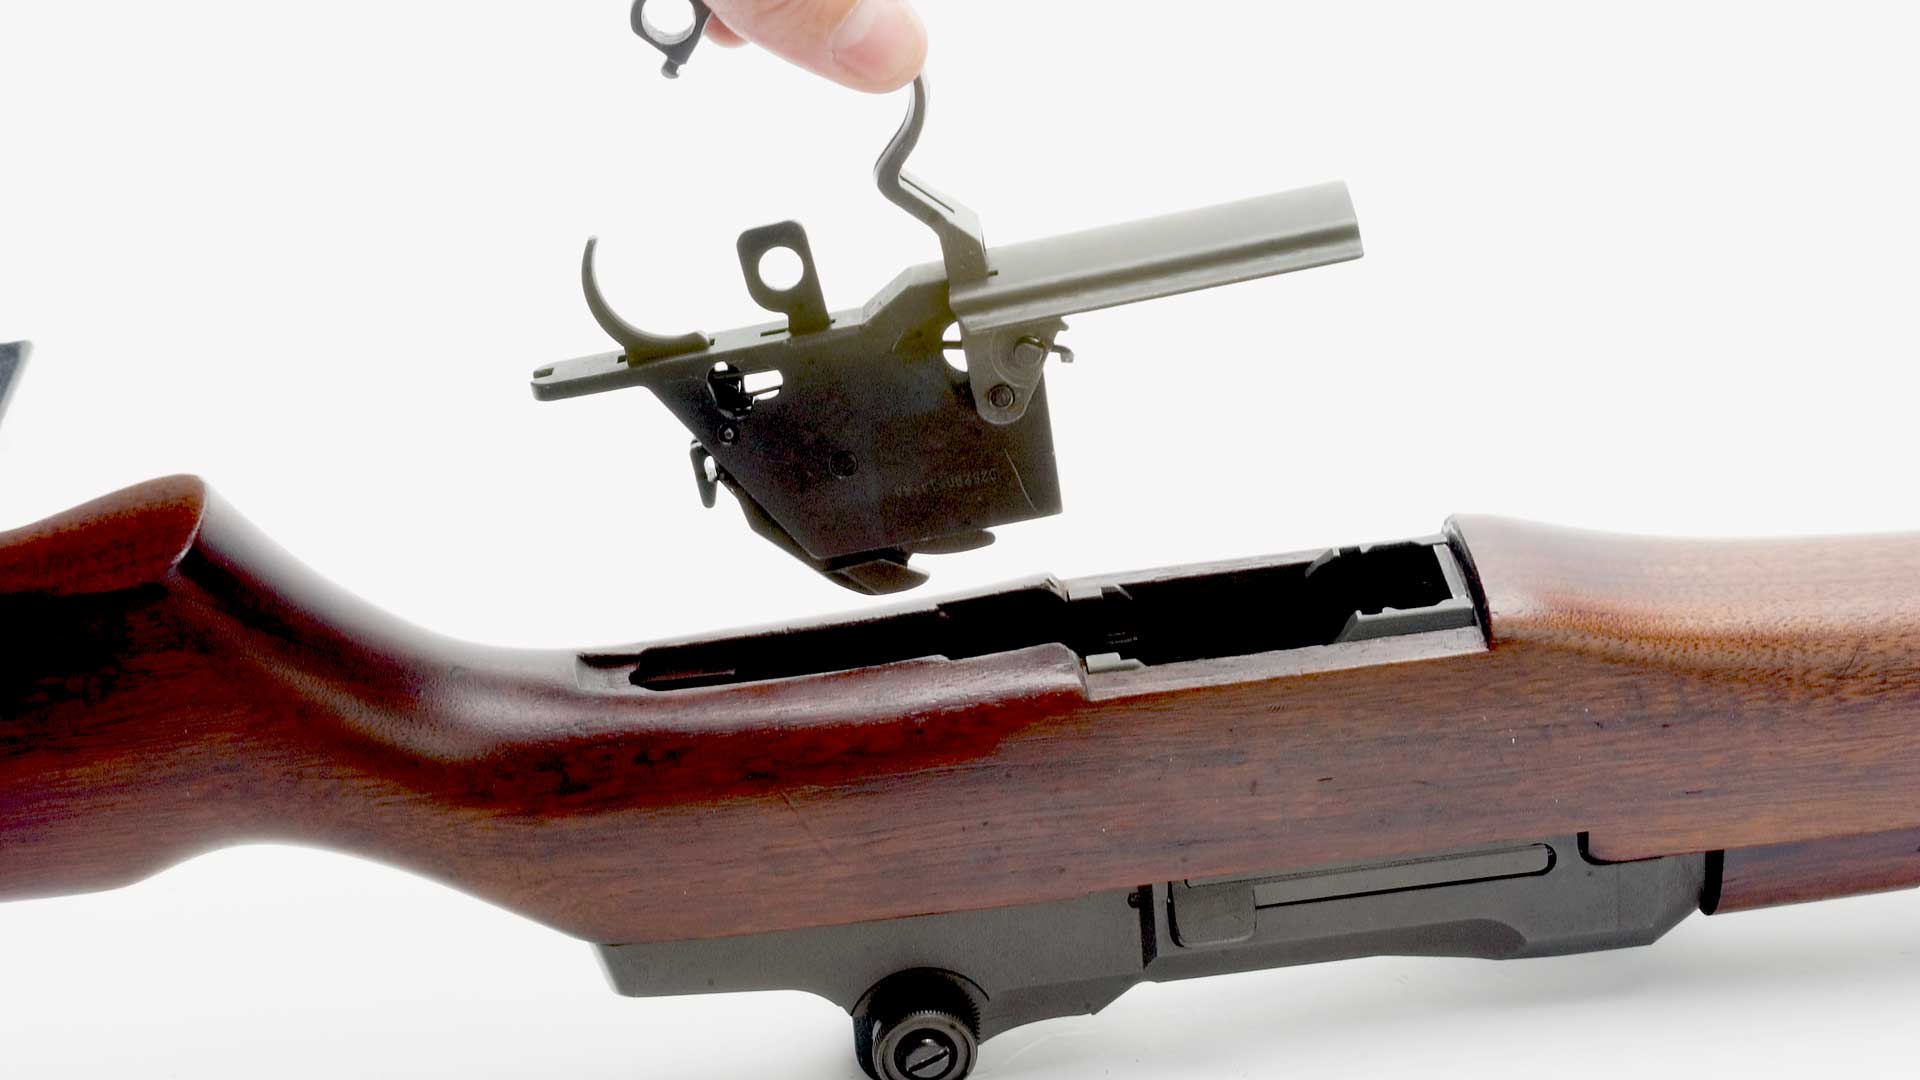
Fig. 1

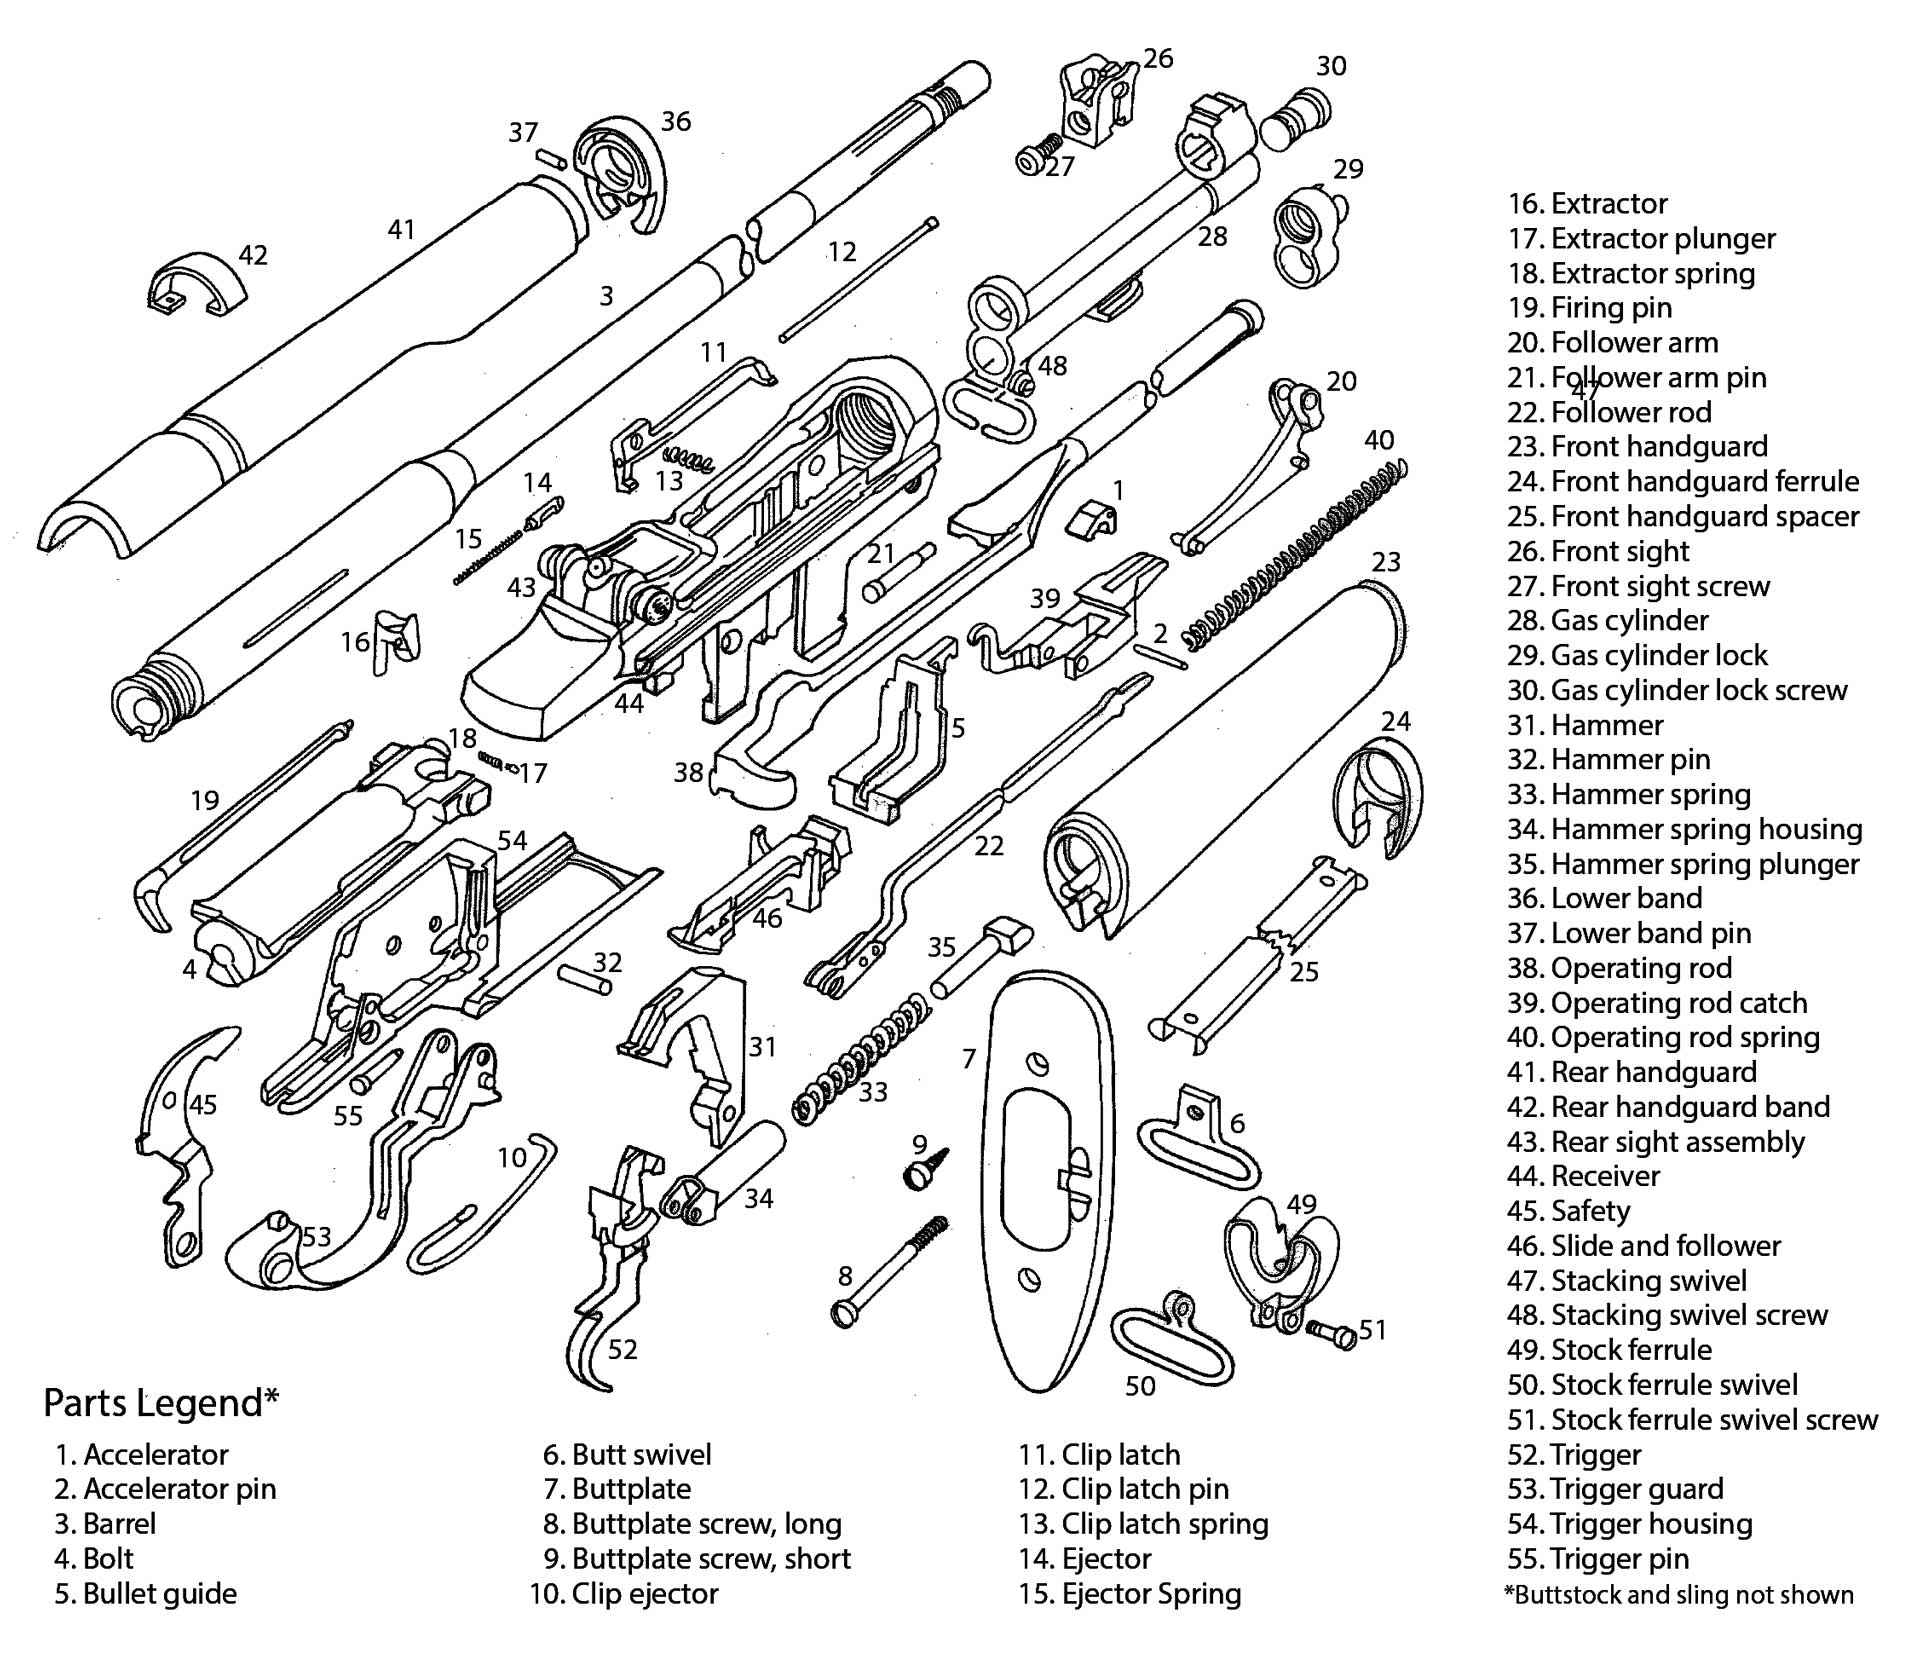
Once this is done, disassembly can begin. Pull rearward on the trigger guard (53) and then out and away from the stock. The entire trigger housing (54) and assembly will separate from the rifle (Fig. 1). Lift the receiver (44) and assembly away from the stock.

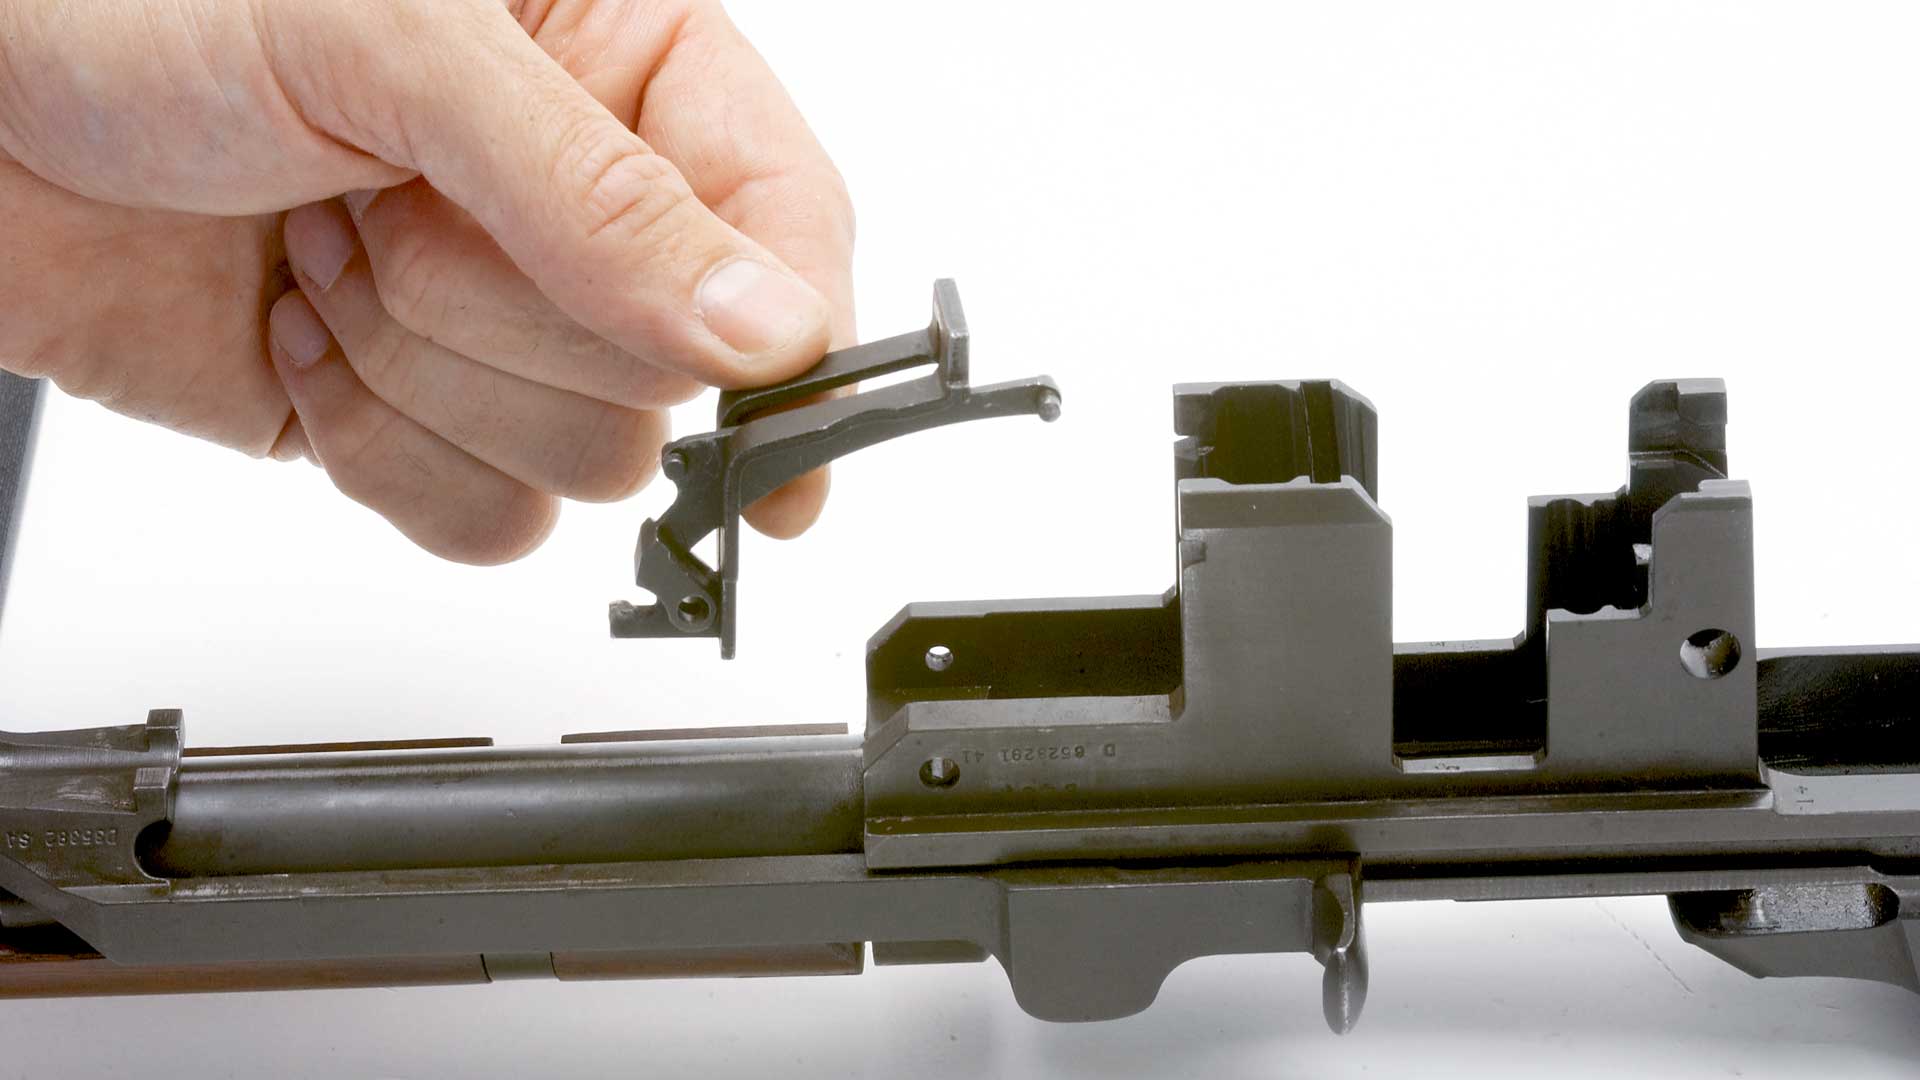
Disengage the follower rod (22) from the follower arm (20) by moving the rod toward the muzzle. Remove the rod and operating rod spring (40). Next, push out the follower arm pin (21) from the receiver’s left side. Then lift away the bullet guide (5),

follower arm and operating rod catch (39) (Fig. 2). Reach down into the receiver and lift out the slide and follower (46).

Fig. 2

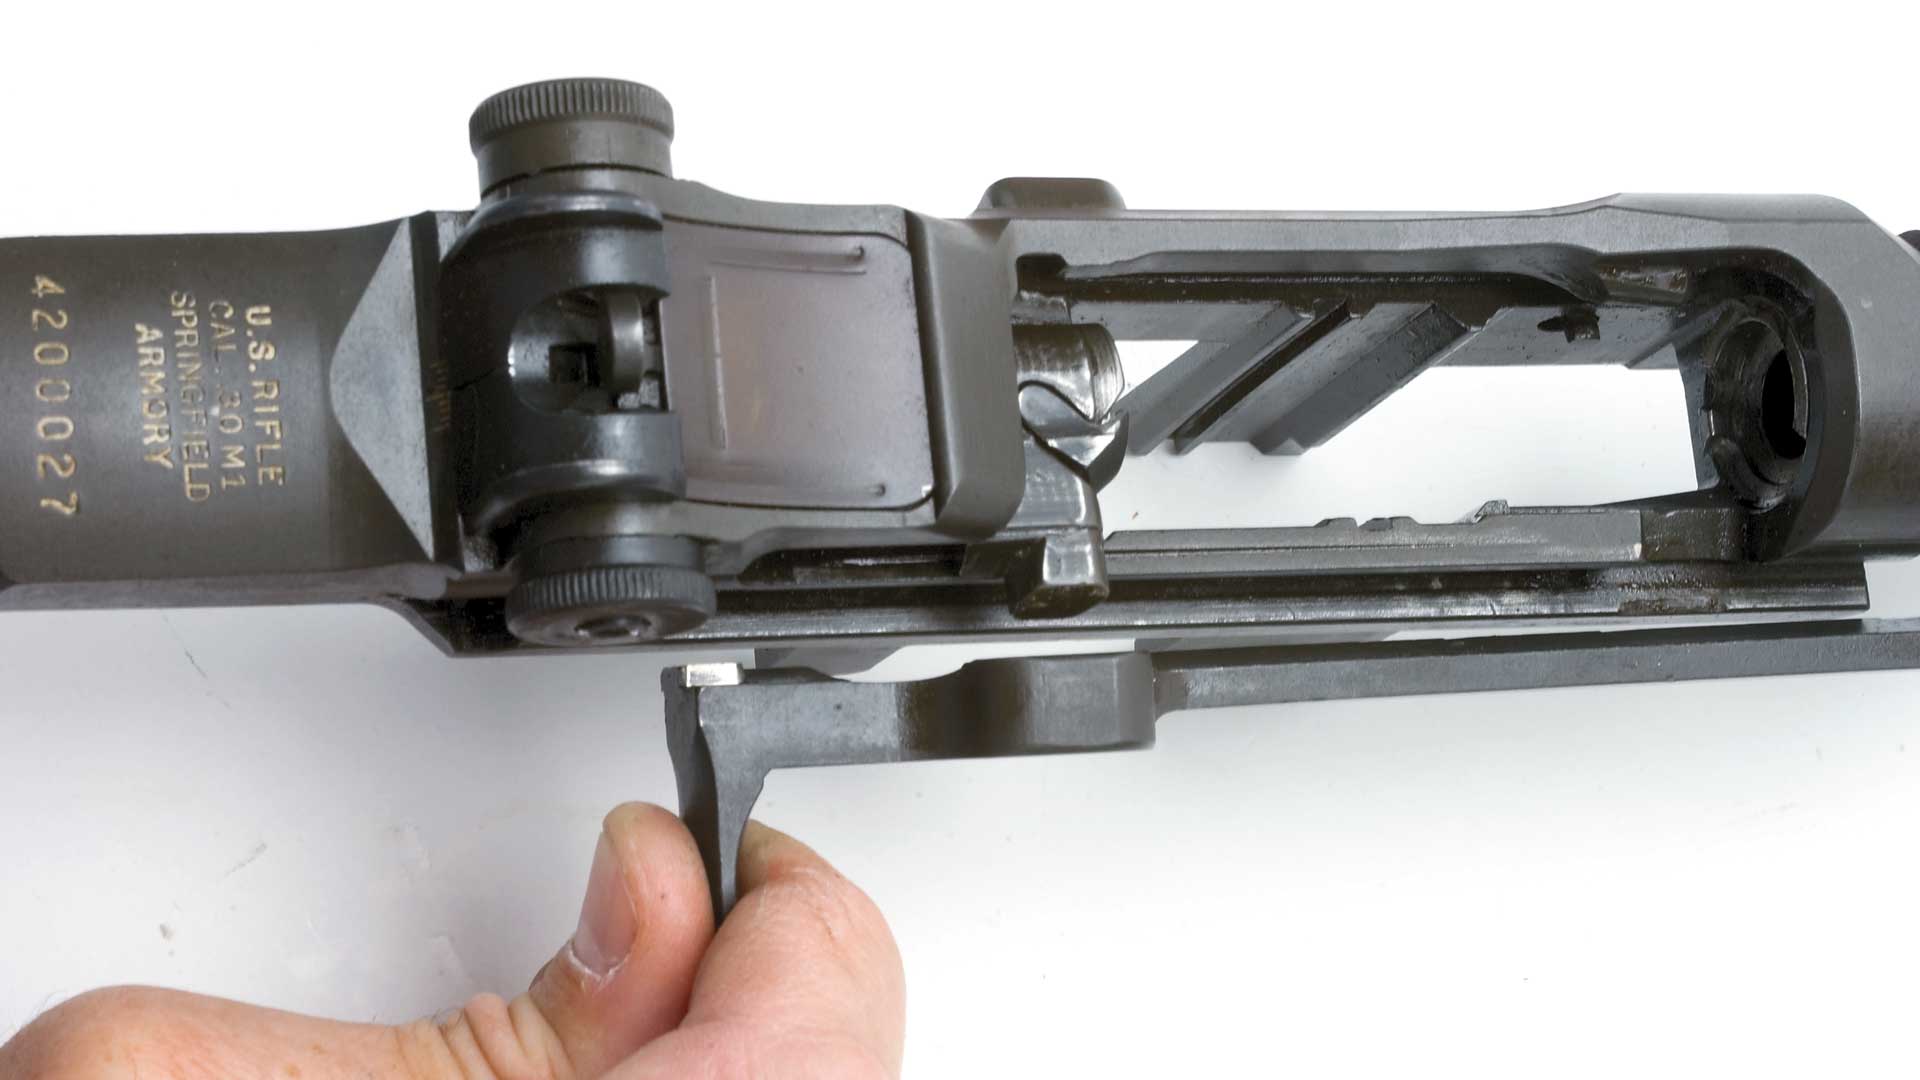
Continue disassembly by pulling the operating rod (38) rearward until the rear surface of the handle is directly under the forward edge of the windage knob on the rear sight. Disengage the guide lug on the operating rod through the dismount notch on the receiver with upward and outward pressure on the handle of the operating rod (Fig. 3). The rod should now come free from the receiver. Remove the bolt (4) by grasping it and sliding it forward while lifting upward and outward with a rotating motion (Fig. 4).

Fig. 3


With a large, blunt screwdriver, unscrew and remove the gas cylinder lock screw (30). Unscrew and remove the gas cylinder lock (29). Next, remove the gas cylinder (28) by sliding it forward and off the barrel. If the gas cylinder is tightly attached, rap on the bayonet stud with a nylon hammer or piece of soft wood to loosen it. Do not burr or damage the internal splines. The front handguard (23) may then be moved forward and off the barrel.

This is all that is needed for basic cleaning. All other bolt and trigger housing disassembly and parts replacement should be done by a competent gunsmith. Reassembly of the M1 is in the reverse order.

A few precautions: The operating rod for the M1 has a bend that is intentional, and it should never be hammered on or straightened out. The crown of the operating rod should also be kept bright by using a solvent and nylon brush. Do not scrub with a metal brush or other harsh abrasive. The tolerances within the gas operating system are quite close and nothing should be used that can affect the system.

All operating parts should have a light coat of lubrication except the inside of the gas cylinder. This should be free of carbon deposits and other fouling, but should be kept dry.

Categories
All About Guns Allies Useful Shit

1911 Cleaning

Categories
All About Guns Useful Shit

Smith & Wesson Model 29 Exploded View by NRA STAFF

An exploded view diagram of the classic Smith and Wesson Model 29 revolver, one of the first firearms chambered for the powerful .44 Magnum cartridge. Companion piece to the article with disassembly instructions

Gallery


Categories
Ammo Useful Shit

How Fast Corrosive Ammunition Ruins Guns

Categories
Ammo Useful Shit

Corrosive Ammunition + Corrosive Primers And The Real World Effects

Categories
Useful Shit

I found this and have used it. So here you go as a small present for reading my blog!

or this during an on line meeting

Categories
Useful Shit

How To Get Your Shoes Shiny – James May’s Man Lab

Categories
All About Guns Useful Shit

Watch out for these common problems before buying a Browning Superposed.

Categories
Useful Shit War

The Polish Invention That Changed WW2