The ongoing Syrian civil war, which began in March 2011, is of course dominated by Cold War-era (and even 21st century) weapons, however, there is an astonishing mix of WWII gear – both Axis and Allied – in use. Some of these weapons had previously not seen combat for decades.

(Syrian rebel with a WWII German StG-44 assault rifle.)

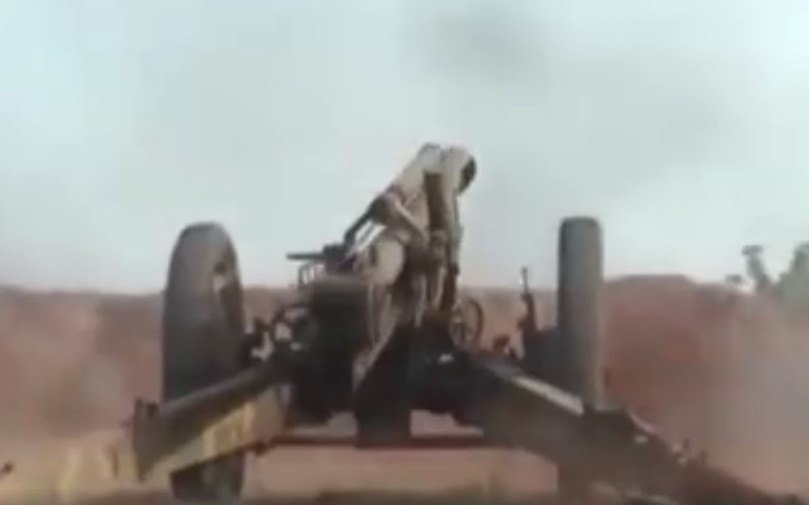
(Yugoslav-made M18/43F, a copy of the WWII German leFH 18M howitzer, in action with Jaish al-Fatah rebels.)

Advertisements
REPORT THIS AD
(A Syrian rebel with a WWII Mosin-Nagant 91/30 – retrofitted with a modern scope – takes aim in 2014.)

(Rebels of the Free Syrian Army (FSA) distribute WWII French MAS-36 rifles.)
(Syrian government soldier with a WWII Soviet 61-K anti-aircraft gun in October 2015.)
the Syrian Civil War at a glance
Unlike the civil wars of the USA (1861-1865), Spain (1936-1939), or Sri Lanka (1983-2009), the conflict in Syria is not an “us vs them” situation. There are multiple factions trying to achieve different things.
Advertisements
REPORT THIS AD
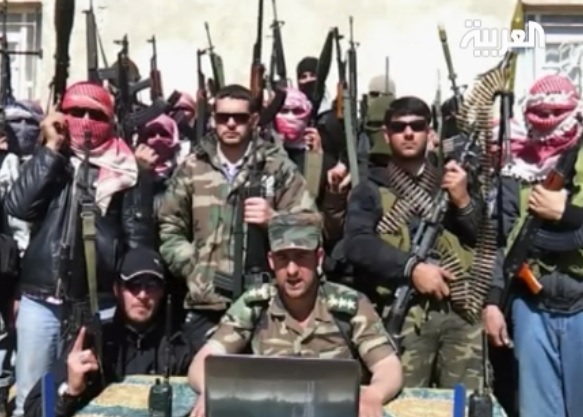
The current regime is trying to remain in power and eventually regain control over the whole of Syria. The largest rebel group is the Free Syrian Army (FSA) which is often incorrectly used as a synonym for the conflict overall. The FSA is in fact a complex structure, with it’s own de jure forces plus an “umbrella” of smaller allied groups, of varying loyalty. Next there are the islamist jihadi factions such as Jaish al-Islam and al-Nusra (themselves partially “umbrellas” for smaller jihadi factions); they are also seeking the overthrow of the current regime but have different postwar objectives than the FSA. ISIS, which straddles the east of Syria and north of Iraq, has no clear objective other than endless war and is fighting all the other factions. Finally the Kurds in Syria’s far north seek separation from all the above.

(The quartermaster of Jaish al-Islam in his office during 2016. A WWII Mosin-Nagant is visible in the upper left corner and behind him, a broomhandle C/96 Mauser. All of the other weaponry is modern, with the exception of what appears to be a Model 1878 Zig-Zag revolver above the chromed AK.)
The rebels goals do not coincide with each other. Some want to retain Syria as a secular government. Others want an Iranian-style islamic republic, while others want a theocracy modeled on the 1990s Taliban in Afghanistan. ISIS wants to put the whole region under it’s control. Even if one or more factions were knocked out of the war, the fighting would thus continue.

Advertisements
REPORT THIS AD
(Publicity photo from the Jabhat Ansar al-Islam faction. This salute is actually not rare in the 21st century middle east; Hezbollah in Lebanon and Hamas in the Gaza Strip also use it. Jabhat Ansar al-Islam is a hardline sunni group in Syria’s southwest. In 2016, the administration of President Obama decreed it as a “vetted” group eligible to receive BGM-71 TOW missiles. In 2017, the administration of President Trump suspended this decision.)
A vexing issue is that all of the factions are potentially weak enough to face possible defeat, but, none is strong enough to achieve victory.
brief overview of Syrian arms after WWII
WWII weapons to Syria from France
As the former colonial power, Syria’s first generation of weapons came both from those left behind by the former Vichy regime’s Levant Army, and from several major buys in 1948 and 1949.
East German arms sales to Syria after WWII
Syria was one of East Germany’s main weapons export recipients. East German’s effort was limited by it’s peculiar circumstances: It only regained sovereignty in 1949, and, it’s military (the Volksarmee) was first formed in 1956, from units of the Volkspolizei created during the Soviet occupation. Any Third Reich-era military industry which survived WWII was looted by the USSR, so both from an organizational and industrial viewpoint, East Germany “started from zero” as far as weapons exports.
Finally there was a political side, East Germany’s national mythology portrayed it’s army as “defensive-only”, and peddling guns to autocratic regimes abroad did not fit that storyline. For all these reasons, East Germany was a latecomer to the Syrian market.
East Germany’s interest in Syria started in the early 1960s. The Volksarmee, initially equipped with WWII castoffs, began transitioning to the SKS in 1958 and the AK-47 in 1960. For the first time, East Germany had surplus weapons. In 1964, Gen. Heinz Hoffman negotiated the nation’s first arms export deal with Syria.

(Generals Heinz Hoffman and Mustafa Tlass, architects of weapon transfers from East Germany to Syria. Gen. Hoffman passed away in 1985. Gen. Tlass fled Syria when the civil war started.)
Advertisements
REPORT THIS AD

(East German Volkspolizei with Third Reich-era StG-44s. Thousands of these assault rifles later ended up in Syria.) (Bundesarchiv photo)
The deal was for 4,500 WWII small arms (including the StG-44) and reboxed WWII ammunition. This was followed a year later by several hundred MP-40s. Following Syria’s 1967 defeat in the Six Day War, a huge emergency rearmament shipment was sent, including thousands of rifles and machine guns, and, for the first time, a half-dozen WWII-vintage T-34 tanks.
East Germany was vehemently hostile towards Israel and also directly armed terrorist groups in the region, including Saika and the PLO.

(Palestinian fighter with a StG-44 supplied by East Germany in Lebanon during the 1980s.)
Weapons for Syria were free of charge, a gesture East Germany’s wobbly economy probably should have avoided. Outside of the USSR the deliveries were unknown and even in East Germany’s own military, knowledge of the transfers was restricted. The scale of the effort was not fully known until October 1990 when East Germany ceased to exist. In paperwork recovered by the reunified government, many details are sparse or nonsensical, likely indicating that the effort was micro-managed as it went.
As part of a second large tranche after the Six Day War, several thousand PPSh-41s were sent, but this was the end of the road for WWII-era gear. The rest of this deal was post-WWII SKS and AK-47 rifles, missiles, and MiG-17 jet fighters. Thereafter all East German aid to Syria was modern gear.
Advertisements
REPORT THIS AD
Czechoslovak arms sales to Syria after WWII
Czechoslovakia was briefly a weapons supplier to Syria’s arch-rival Israel. In 1954, the country switched sides and began selling to Syria. The timing was ideal, as the Czechoslovak army was starting to purge WWII equipment. Weapons for Syria shipped under the euphemism “speciální materiály” (special materials).
In 1956 the first weapons to Syria shipped. The most interesting thing was ex-Wehrmacht Panzer IV tanks and StuG III assault guns. Other assets were sent as well, including various calibers of ammunition, small arms, and military sundries. The Czechoslovaks also sent a team of pavement engineers to Syria to resurface WWII-era French airfields for use with modern Soviet jets. Czechoslovakia demanded payment in “hard” currency, at that time the British pound. The value of the whole deal was £254,644 (£5,833,000 or $7,433,226 in 2017 money). This was an exceptional outlay for a poor country like Syria on old gear. Czechoslovakia required 20% at shipment and the balance on revolving credit. These terms held true for the rest of the Cold War era.
In 1957 Syria tendered a second buy, including 10,000 “self-loading rifles”, likely a mix of WWII StG-44s and postwar SKSs. Also included for the first time was modern post-WWII equipment, namely RO-21 Liben battlefield radios. Finally an astonishing 50,000,000 rounds of ammunition in all calibers was delivered.
(The honor guard at a postwar state funeral in Czechoslovakia is armed with WWII German StG-44s. Just like in East Germany, some of these ended up in Syria.)
By 1958, Syria had already run up about $22,000,000 in arrears. None the less, sales continued.
In 1962, a mega-deal for £3,200,000 (£62,600,000 / $80,000,000 in 2017 money) was signed. This included WWII-era T-34 tanks. From then onwards, Syria became the main recipient of Czechoslovakia’s T-34s as they were replaced by T-54/55s. The size of the deal required Czechoslovakia to raise Syria’s debt ceiling by several million pounds.
After the 1967 Six-Day War all the Warsaw Pact nations participated in an emergency rebuilding of the Syrian military. As part of this, about $750,000 worth of gear (Czechoslovakia had switched to the US dollar as it’s preferred “hard currency”) was donated, the rest put on credit. Significant numbers of T-34s were shipped; but this deal marked the end of the “WWII era” in weapons. Thereafter, sales were all Cold War-era equipment.
By 1990, Syria’s line-of-credit arrears had reached an astronomical $900,000,000 ($1.95 billion in 2017 dollars), some of which was undoubtedly still from long-retired WWII gear. During the 1992 split into Slovakia and the Czech Republic, this balance due divided proportionally between the two new nations. Given the state of Syria in 2017, it’s unlikely either will ever see their money.
Soviet arms sales to Syria after WWII
The USSR was the largest military aid provider to Syria, starting in the early 1950s and continuing until the collapse of the Soviet Union in 1991. Like the situations described above, early aid was a mix of WWII-legacy gear and newer equipment, with the latter becoming prevalent in the late 1960s.

(WWII Soviet F1 hand grenade, one of the many WWII weapons the Soviet Union supplied to Syria. F1s are still in use in the current civil war.)
The scope of Soviet military aid was enormous, for example after the 1967 Six Day War, the Soviets provided $200 million ($1.56 billion in 2017 dollars) worth of equipment, including 4,000 tons which was airlifted at great expense to Damascus.
the unusual Croatian connection
Some of these WWII-era weapons, or derivatives thereof, came from Croatia. Late in December 2012, Saudi Arabia purchased a large number of weapons (both obsolescent and current) from Croatia and delivered them to Syrian rebels. This was completely secret on both ends at the time. The scheme was uncovered in February 2013, when military observers worldwide noticed a modern RAK-12 rocket launcher in use with the FSA. This late-1990s Croatian weapon has no other source and throughout 2013, other pieces of the puzzle were uncovered.
(Modern RAK-12 as used by the Syrian rebels.)
The 1995 Erdut treaty and the Dayton Accords, which ended Croatia’s part in the Yugoslav civil war, mandated a listing of available weapons to each side. Croatia maintained an off-the-books reserve in violation of this. After Croatia joined NATO in 2009, this became a headache and the government in Zagreb looked for a way to quietly get rid of this stockpile. Saudi cash in 2012 was the answer they were looking for. The Croatian weapons (WWII-era, Cold War-vintage, and modern) were flown from Europe to an airstrip near Jeddah, Saudi Arabia, then shipped by sea to Jordan and finally overland to Syria.
RIFLES
the Mosin-Nagant

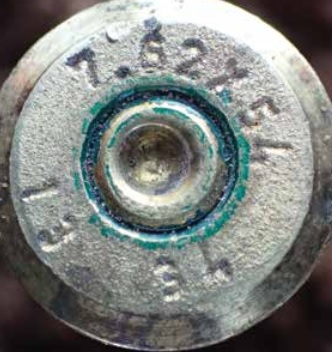
The standard rifle of the Soviet army in WWII, the bolt-action Mosin-Nagant came in several versions, all of which fired the 7.62x54mm(R) cartridge (2,838fps muzzle velocity) from a 5-round stripper-loaded internal magazine.
In June 1967, East Germany provided Syria with 360 of the M44 carbine version. Beyond that, trying to pinpoint who gave what quantity to Syria when, is probably hopeless. The Mosin-Nagant was a staple of East Bloc arms transfers in the 1950s and 1960s, and well past that was a fixture on the worldwide black market. The Mosin-Nagants in Syria today in 2017 could have passed through any number of hands.
Advertisements
REPORT THIS AD
(A fighter of the Liwa al-Islam faction with a Mosin-Nagant. This was probably early in the civil war as this faction later merged into Jaish al-Islam and no longer exists.)

(Most of these rebels, likely of al-Nusra, have AK-platform weapons but one has a Mosin-Nagant 91/30.)

(This FSA fighter in 2014 has one of the carbine versions, either the M44 or Bulgarian 91/59, both of which were imported into Syria.)
Mosin-Nagants have been seen since the fighting started, most often as sniper weapons. On 91/30 versions originally set up for sniping, the WWII-era Soviet PU sight is usually replaced by modern civilian hunting optics. Other 91/30s and even some M44s have had the optics added.

(This sniper of the Moataz Billah faction has put a modern scope onto the flat part of the WWII mount for the Mosin-Nagant 91/30’s PU scope.)

(This FSA fighter in 2013 has an elaborate sniping kit with modern optics on a new mount, which would require retapping the 91/30’s receiver.)

(The 15 June 2013 issue of the New York Times showed a FSA sniper in Aleppo with a 91/30 fitted with modern optics.)
In addition to importing ammunition for these rifles from Bulgaria, Egypt, Czechoslovakia, East Germany, and the USSR; Syria also manufactured it domestically.

(1962-headstamped Syrian 7.62x54mm(R) cartridge.)

(Box of Syrian-made 7.62x54mm(R) ammunition. Three 5-round strippers are in the box; the clips and rimmed cartridges requiring the wedge shape.)
As the civil war started, additional ammunition for these rifles came in from outside the country.
(This 7.62x54mm cartridge is headstamped by AMIG of Iran. The Iranians support the current Syrian regime.)

“Wolf” is a trademarked brand of the American trade company SSI, which imports Russian ammunition for civilian use inside the USA. The CIA also buys Wolf ammunition when it quickly needs Soviet calibers and doesn’t care about it being known as coming from the United States. Wolf headstamped 7.62x54mm(R) rounds have been recovered in Syria in 2014 and again in 2016, as above.

(Empty box of a different caliber (for AK-47s) of Wolf ammunition found laying on the ground in Kobanî, Syria after a 2015 battle between ISIS and Kurdish forces.)
The Syrian government and ISIS do not use Mosin-Nagants, but just about every other faction does, and they will probably remain a fixture for some time to come.

(Rebels with a rescoped WWII Mosin-Nagant 91/30 and it’s Cold War replacement as the standard Soviet sniper rifle, the Dragunov SVD.)
the 98K / M48B

The most-produced German firearm of WWII, the bolt-action 98k was 3’7″ long and weighed 9 lbs. It fired the 7.92x57mm Mauser cartridge from a stripper-loaded 5-round internal magazine. It had iron sights and was accurate out to roughly 550 yards. Syria’s 98ks were a mixture of WWII German and postwar Yugoslav production.

(Early-Cold War East German Volkspolizei with 98k rifles and a StG-44, both WWII captures reissued by the Soviets, and both later exported to Syria by East Germany.)
In 1965, 2,000 98ks were delivered to Syria by East Germany, followed by another 1,000 in June 1967 with 90,000 rounds of 7.92mm Mauser ammunition. This was all WWII-vintage, having been reissued to East Germany by the USSR. Czechoslovakia also provided some, likely also refurbished WWII German production.
Syria also used the Yugoslav M48B and M48BO, clones made from 1956 to 1965. The M48 was an exact reproduction of the WWII German original, and the M48B differed only in using cheaper metal parts, as Yugoslavia intended them for export only. The stock was also changed from walnut to a cheaper elm or beech; also; the carved recess in the stock was omitted and instead the bolt’s turndown angle was lessened and the knob flattened on the back. The M48BO (a Serbian acronym for ‘without markings)’ was the same version, but as might be inferred, the customers (Syria, Burma, Egypt, Indonesia, and Iraq) had the option to have them shipped unmarked. In some cases they didn’t have the option if Yugoslavia didn’t want to be associated with the recipient regime. The entire M48BO run was originally done for Egypt just prior to the Suez Crisis but not delivered at that time. They were later mixed in with normal M48Bs.

Most of Syria’s M48Bs have the national crest on the receiver. Syria’s M48Bs came with a blued steel Yugoslav M44 bayonet manufactured by Zastava; this has a barrel ring not on the German WWII design. The serial numbers are in the Sxxxx series indicating fewer than 9,999 made; however there are some in the Vxxxxx (it’s unknown what the V stands for; one theory is that it is the Serbian abbreviation for ‘military’ and were built on speculation before a buyer was found.) As part of this export program, Yugoslavia also mixed in M98/48(n) rifles; these were WWII ex-Wehrmacht 98ks reconditioned with the cheaper parts. In the same token, M48B orders were delivered with a mix of reboxed WWII ammunition, and, a specific Yugoslav version of the 7.97 Mauser round which used a 168 grain spitzer bullet and was also available in tracer.
Syrian M48Bs are not rare either inside or outside of the country. After the Syrian army retired them in the 1970s following a very brief service life, some were shipped to proxy forces in Lebanon during the 1980s (and may be making their way home now in the 2010s), while others were passed to Ba’ath militias, rural tribes, or civilian police. Prior to the civil war starting, the 98k was classified as legal for civilian ownership in Syria, and some were sold off by that route.
Meanwhile Israel captured some in 1967 and released them to the American civilian market.
Besides the M48Bs & M48BOs bought in the late 1950s and 1960s, there may be some other basic M48s floating around Syria today in 2017. These were common during the 1990s Balkan wars and may have been mixed in with the Croatian arms shipments.

In August 2012, a cache of warehoused WWII German 98ks was seized by the FSA and put into action. None the less, the 98k is a minor player in the Syrian conflict due to it’s obsolescence.
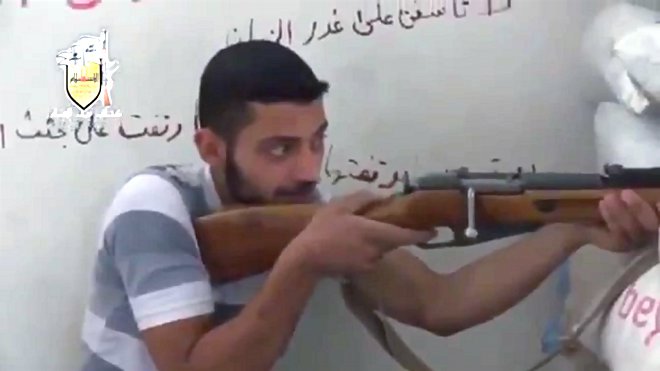
the MAS-36

The MAS-36 was France’s newest battle rifle when WWII started in 1939. This bolt-action rifle was 3’4″ long and weighed 8¼ lbs. It fired the 7.5x54mm (mod.1929) cartridge from an internal 5-round stripper-loaded magazine.
The origin of these rifles is no mystery. The MAS-36 was the standard-issue longarm of the Syrian army between 1945-1948, and remained in secondary issue until the 1960s. By then, the MAS-36 was obsolete and used for training or placed into reserve storage.
The first big “boon” for the MAS-36 during the civil war was in 2012, when a raided armory warehouse yielded some. In July 2013, the FSA captured a huge stockpile and paraded them around Aleppo in a convoy of civilian pickup trucks, cargo beds overflowing with crates of MAS-36s.

Advertisements
REPORT THIS AD
(Some of the MAS-36s seized by the FSA in July 2013.)

(The FSA distributed the MAS-36s to it’s fighters in the Aleppo region.)
Later that year and in to 2014, further MAS-36s were obtained by other rebel groups. The combined numbers with all rebel groups are not at all small, by best estimate between 4,500 to 6,000 are or were in use.

(A cache of MAS-36 rifles used by the al-Tawhid Brigade, another rebel faction in Aleppo. al-Tawhid disintegrated after it’s leader was killed, with it’s fighters (and presumably their MAS-36 rifles) migrating to Shams al-Shamal or other islamist groups.)

(Syrian rebel with a MAS-36 in 2013.)
Ammunition for the MAS-36s in Syria is not as scarce as might be imagined. Syria inherited WWII-vintage 7.5mm French ammunition when the last French forces pulled out in 1946. Syria itself manufactured the round during the 1950s.

 (7.5x54mm ammunition made by Establishment of Defense Factories in Syria during the 1950s. They were boxed 15rds each.)
In 1964, there was still apparently enough interest in the caliber to make a foreign buy; Syria was part of a 3-country contract with FN in Belgium for this ammunition.

(A Lebanese 7.5x54mm round with the 1960s FN headstamp. The FN headstamp for Syria is identical less the star, while the Moroccan has additional information.)
After the turn of the millennium, and shortly before the civil war started, the Syrian army started to sell as surplus it’s 7.5x54mm stockpile, now badly aged. This was obviously halted when the conflict started. There was probably still a decent amount floating around the country in 2011. Beyond this however, little to none will be forthcoming. The last known military production run was in February 1985, when Issy les Moulineaux made a lot for Ivory Coast. France sold the last of it’s reserve in the 1990s. The only current production is low-scale for hobby civilian shooters.

MAS-36s were not uncommon during the first stage of the Syrian civil war. Throughout 2015, they steadily faded, most likely as the ammunition supply was depleted. By the summer of 2017 they are only sporadically seen.

the StG-44
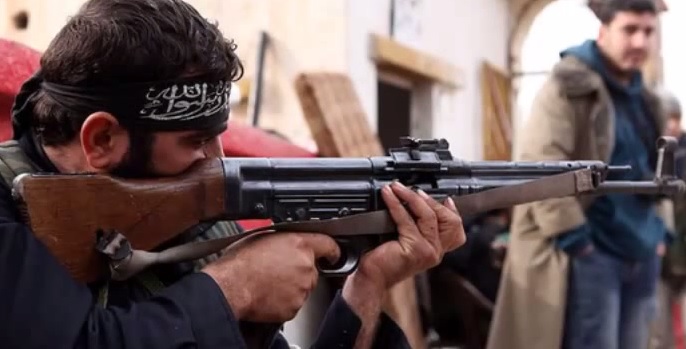
Military historians consider the WWII German StG-44 (Sturmgewehr, or assault rifle) to be the world’s first successful assault rifle. The selective-fire StG-44 fired the 7.92x33mm Kurz round (2,247fps muzzle velocity) from a 30-round box magazine. It was 3’1″ long and weighed 10 lbs with a full magazine. In full-auto, the rate of fire was 550rpm. The StG-44 had iron sights and was accurate to 300 yards in typical combat. A total of 426,000 were made during WWII. This excellent gun simply came too late and in too few numbers to help Germany’s WWII situation.
Despite the small production, an inordinate percentage of StG-44s still existing in May 1945 were retained by Allied forces that secured them due to their advanced nature. The USSR alone still had 102,000 StG-44s in inventory three years after WWII’s end.
The USSR did not desire the StG-44 as a long-term asset and transferred most to allies, mainly Czechoslovakia (which also already had some left behind on it’s territory in 1945), but also East Germany and North Vietnam. Hungary also received a small (4,000) batch, and Yugoslavia had a large allotment; both from Soviet transfers and partisan captures during WWII. (Yugoslavia later sold it’s whole inventory to Libya, and none went to Syria).
Syria’s total receipts of StG-44s is thought to be between 6,100 to 7,500 guns, of which half were ex-East German (2,200 in the 1964 weapons transfer); with the balance coming from Czechoslovakia (several thousand in 1957, mixed with SKSs), and a small quantity from the USSR.
Czechoslovakia was also the main source of Syria’s Kurz ammo after WWII. Besides it’s significant stockpile of WWII German manufactured rounds, Czechoslovakia ran it’s own production. Czechoslovakia also controlled the East Bloc’s Kurz ammunition repackaging effort after WWII. Sellier & Bellot was heavily involved in this work, reboxing ex-German rounds ranging from truckloads to opened cases to loose individual rounds.

(15-round boxes of Czechoslovak-reboxed Kurz ammo. The labels state it was from “N” (Nemecko, or Germany), made in 1945, reboxed in 1955, and should be used within 6 years.)
In East Germany, MW Königswartha made Kurz ammo from 1958-1962. In typical inept fashion for East Germany’s planned economy, first a large import order was placed with Czechoslovakia, quickly followed by the domestic production seemingly duplicating it, which itself overlapped the end of the StG-44’s active use by East German troops. East Germany retained Kurz ammunition in reserve storage until 1969, having sent 600,000 rounds to Egypt in 1967, a smaller quantity to Syria the same year, and then whatever remained to Somalia in 1969.

(East German Kurz box, this one being from the Czechoslovak import contract.)
For certain, the appearance of the Sturmgewehr in the Syrian civil war is stunning to say the least. The last time the StG-44 had appeared in any numbers on the world’s battlefields was during the 1978 Ogaden War between Somalia and Ethiopia. By the turn of the millennium it was assumed that the StG-44 was extinct outside of museums and private collections.

On 8 August 2012, the FSA captured a storage container with roughly 5,000 StG-44s, along with small numbers of other WWII guns including 98k rifles. This container alone would be between 67% – 82% of the entire total Syria ever received, from all sources. Other than normal minor wear, all appeared to be in very good condition.

(The WWII waffenamt stamp on one of the Syrian StG-44s.)

(FSA fighter with a StG-44.)
These guns immediately were distributed and went into action. They were mainly seen with the FSA in the northwest, but occasionally popped up in the south and (rarely) on the Mediterranean coast. Some were resold on the black market.

(Jihadis in Syria with a field-stripped StG-44.)

(FSA fighter with a StG-44 in 2014.)

(Syrian rebel with a WWII StG-44 and Cold War-era AKM.)

(StG-44 in action in Syria.)

(FSA guerilla with a StG-44 in northwest Syria.)
The most common question worldwide is where the rebel groups are obtaining Kurz ammunition 70 years after WWII. Beyond the ammunition Czechoslovakia and East Germany provided during the Cold War, there is no readily apparent answer.
Spain ran some in 1949 and again in 1952-1955; these are certainly long gone. Yugoslavia is believed to have sold all of it’s Kurz ammunition to Libya in the 1980s. Today, the only major manufacturer is the Serbian company Prvi Partizan. It’s 7.92 Kurz is of high quality, and priced accordingly. Intended for a niche hobby shooter market, it is unaffordable for mass battlefield use.

It has been suggested that as part of the Saudi-Croatian transaction, ex-Yugoslav 7.92x33mm Kurz ammunition not sold to Libya and hoarded during the 1990s was included. Some StG-44s were seen in the 1990s Balkan Wars, so at least some ammunition was left behind. However it’s doubtful any remained by the 2010s.
In this instance, it appears that the simplest answer is probably correct:……there is no source, other than whatever remained in Syria when the fighting started.

(StG-44s being traded in 2015.)
In October 2016, the black market price of StG-44s in Syria suddenly fell dramatically, likely indicative that the Kurz ammo had finally been exhausted. By June 2017 the StG-44 was fading from the Syrian civil war.

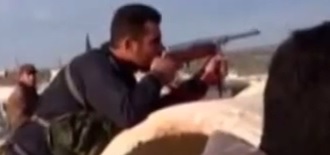
the PTRS-41
This WWII Soviet rifle was a semi-automatic successor to the single-shot PTRD. Designed by Sergei Simonov (later of Cold War SKS fame), the PTRS-41 fired 14.5x114mm ammo from a 5-round internal magazine. It had a maximum range of 1 mile and was especially effective between 400 – 875 yards. The armor-piercing 14.5mm round, simply designated BS by the Soviets, had a 6″ overall cartridge length with a lead / tungsten-carbide 994 grain bullet, and a sensational 3,300fps muzzle velocity.
The PTRS-41 was originally intended to compensate for a lack of anti-tank guns in the Soviet army. As the thickness of armor on Wehrmacht tanks increased, it became less effective. Many PTRS-41 squads were disbanded after WWII and the guns doled out overseas, including to Syria.
During the Cold War, the concept of the “anti-material rifle” was refined and firearms of this type gained new life. Here, a sniper would not target soldiers but rather objects like supply trucks, electric generators, fuel bowsers, etc. A lone sniper with an anti-material rifle could cause losses much more expensive than the gun itself. During the fighting in Beirut (1980s) and Sarajevo (1990s) they also proved devastating in urban combat, with their heavy bullets powering through walls of civilian buildings.

(A pair of anti-material riflemen of the FSA. The fighter in back has a WWII-vintage PTRS-41. The weapon in front is a Say’yad 2, a 12.7x99mm bolt-action Iranian gun of 21st century design.)
Limited numbers of PTRS-41s remain in use with both the FSA and Syrian government forces. A wide variety of more modern anti-material rifles are also in use with all factions.
others
This photo is being widely circulated as “proof” of M1 Garands in the Syrian civil war.

The photo was actually taken in Lebanon in 2012, and the fighter belongs to the al-Meqdad shi’ite militia in that country. This is not to say that for certain there are zero Garands in Syria, just not this one.
SUBMACHINE GUNS
the MP-40

The WWII German full-auto MP-40 fired the worldwide-standard 9mm Parabellum cartridge (1,312fps muzzle velocity) from a 32-round box magazine at 500rpm. It was 2’8″ long (or 2′ with the stock folded) and weighed 8¾ lbs.
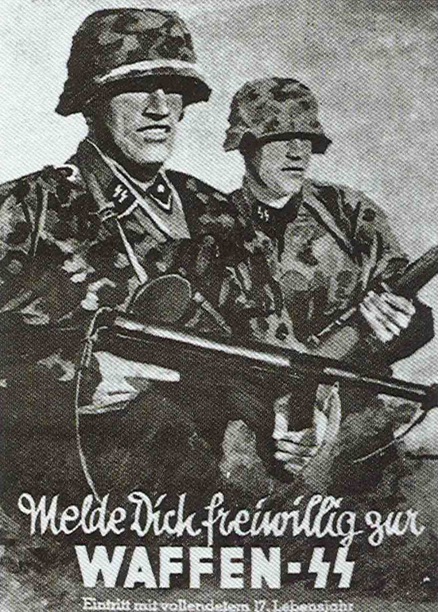
(WWII German recruitment poster showing the MP-40 and 98k, both of which are in use in Syria in 2017.)
Tens of thousands of this WWII submachine gun were still in Soviet warehouses at the start of the 1950s. Czechoslovakia and France also had smaller quantities. After East Germany remilitarized the Soviets transferred some to that country.

(Syrian soldiers engage Israeli forces during the 1948 war. The standing soldier has a MP-40 from a consignment of ex-Wehrmacht guns France donated to the Syrian army in 1945. Covering fire is provided by a Chauchat, a French light machine gun. The Chauchat is famous for all the wrong reasons; it is regarded as the worst machine gun ever designed.)
East Germany delivered a total of 3,500 MP-40s to Syria, starting with small batches (550 total) in the early 1960s and then one large tranche as part of the 1967 emergency shipments after the Six Day War. Others may have come from elsewhere in much lower numbers. In 1964, East Germany also provided 66,000 rounds of reboxed WWII Parabellum rounds.
The MP-40 was never a popular gun in Syrian service. They were already rarely seen by the 1970s. Some were probably transferred to proxy forces in Lebanon during the 1980s.

(MP-40 being used by a Syrian rebel in April 2017.)

(The MP-40 carries a Steyr maker’s mark and 1942 production date.)
Few MP-40s have been seen during the Syrian civil war, and of those that have, they appeared a year or two into the conflict. There is a decent chance that these guns were not preexisting in the country at all, but rather brought in after the fighting started. The Saudi-Croatian deal is one possibility (MP-40s were seen during the 1990s fighting in the Balkans) as is Libya, which had bought some WWII-vintage MP-40s from Yugoslavia in the 1980s.
the PPSh-41

(Russian specops soldier with WWII PPSh-41 in Palmyra, Syria during 2016.)
This iconic submachine gun served the USSR well during WWII. The PPSh-41 was 2’1″ long and weighed 8 lbs. It fired the 7.62x25mm Tokarev cartridge (1,601fps muzzle velocity) at 900rpm from a 71-round drum. It was intended for close-quarters use and is only accurate out to roughly 180 yards.
In 1968, East Germany provided 9,000 PPSh-41s to Egypt and Syria; in paperwork recovered by the reunified government during the 1990s, the exact breakdown was not specified. These WWII guns had been transferred to East Germany by the USSR during the 1940s -1950s. Smaller quantities were probably provided to Syria by Czechoslovakia, the USSR, and maybe Poland as well.

(A mobilized Syrian reservist carries a WWII PPSh-41 in Damascus during the 1973 Yom Kippur War. The Cold War-era rifle is a vz.52, one of the many weapons Czechoslovakia sold to Syria.) (photo via Hulton Archive)

Ammunition for the PPSh-41 was provided by Czechoslovakia. This round, recovered in Syria, has a Sellier & Bellot headstamp.

(An American advisor along the Syrian-Iraqi border in 2016 holds a PPSh-41 captured from an ISIS commander. It has been souped-up with a CQB sight, vertical foregrip, and Magpul nylon sling. The drum is ornately decorated in ISIS colors.)
As sufficient quantities of SKSs and AK-47s were delivered in the 1960s and early 1970s, Syria’s PPSh-41s were passed to the reserve or to tank / APC crews as dismounted emergency weapons. Some of these were still in active use as the Syrian civil war started.

(A Syrian army APC crewman with a PPSh-41 near Deir Ezzor in 2016.)
The PPSh-41 is seen with some regularity in the Syrian civil war. Whereas some of the WWII weapons, like the 98k, are considered “better-than-nothing” assets, the PPSh-41 is genuinely a highly desirable firearm, due to it’s heavy rate of fire in urban settings, and small size.

(A rebel using the nom de guerre “Abu Mohammed” in his makeshift Aleppo gun store during 2013. He is holding a WWII PPSh-41 and Cold War-era AKM. In the merchandise case are WWII Soviet F1 hand grenades.)
the Modello 38/44

Only one of this WWII Italian submachine gun has been seen during the Syrian civil war, but because of it’s uniqueness it is quite photogenic. The Beretta Modello 38 was Italy’s main submachine gun during WWII; with the Modello 38/44 being a much-simplified wartime version. This full-auto gun fired the 9mm Parabellum cartridge (1,407fps muzzle velocity) at 600rpm from a 40-round detachable box magazine.

(The forward trigger fires single shots, the rear is for full-auto.)
Syria could have obtained this gun from two sources; the first being an arms buy from Italy in 1949 of Mussolini-era gear (mainly, 30 Centauro fighter planes); or, as part of the “mixed bags” of WWII Axis weapons France delivered in the same time frame.
The example seen in 2013-2014 is heavily modified with a chromed finish, cutts-type compensator, and buttstock changed to pistol grip. It’s possible that it was once some sort of VIP gift from Italy along with the aircraft.
MACHINE GUNS
the DP

This Soviet light machine gun of WWII weighed 25 lbs loaded and was 4’2″ long. It fired the 7.62x54mm(R) cartridge at 550rpm from a 47-round pan magazine.
In post-WWII terms, the DP wasn’t exactly great. The steel mainspring was sited under the barrel and as the gun aged, heat from the barrel would draw out it’s temper. The overhead pan magazine (necessary because of the cartridge’s shape) was time-consuming to refill.
East Germany provided Syria with 430 of these machine guns in 1967. Probably about that many again were provided by the Warsaw Pact countries during the emergency rearmament of Syria after the Six Day War.

(DP machine gun used by the Martyrs Of Islam rebel faction.)
A small number of these machine guns have been seen in action during the Syrian civil war. Compared to the Cold War-era RPD and RPK, they are a poor option but when nothing else is available they are a way to deliver sustained automatic fire.
the MG-34
This excellent machine gun was the predecessor of the MG-42. Germany started WWII with it in 1939, and as MG-42 production lagged behind demand, MG-34s served the Wehrmacht until the final May 1945 surrender. The MG-34 was 4′ long and weighed 27 lbs. It fired the 7.92x57mm Mauser cartridge (2,510fps muzzle velocity) from either a 50-round drum or 250-round belts at 850rpm. It had adjustable sights and had a maximum range of about 1 mile.
East Germany gave Syria 55 of these machine guns in 1967, with perhaps another larger batch during the emergency rearmament of Syria after the Six Day War. (Curiously, the Soviets reissued ex-Wehrmacht MG-34s to their East German puppets, but, never MG-42s.) Similar lots to Syria came previously from France in the late 1940s, and Czechoslovakia in the early 1950s. The USSR may have provided some in the late 1950s as well.

(A Syrian army display of gear recaptured from the rebels. A WWII MG-34 (center) is flanked by two Cold War-era weapons; a SKS rifle and RPG-7 rocket launcher.)
Considering the limited amount in Syrian service at it’s peak, the MG-34 has been fairly well represented during the civil war. It was one of the first machine gun types looted from Syrian army warehouses when the fighting started.
(FSA fighters in Latakia, Syria in April 2012, near the beginning of the civil war. The fighter with crossed bandoliers has a MG-34.)

(This photo was taken at a Jordanian police station and shows a MG-34 along with other confiscated firearms. Even as Jordan assists the USA and Saudi Arabia with arming the Syrian rebels, it is trying to curb other cross-border arms traffic.)
the MG-42 / MG3
Certainly the best light machine gun of WWII, and maybe of all time, the MG-42 had a 423,600 production run in WWII Germany. It fired the 7.92x57mm Mauser cartridge (2,428fps muzzle velocity) at 1,200rpm from 250-round belts. The MG-42 was 4′ long and weighed 26 lbs.

(A member of ISIS with a MG-42 or MG3 in 2015.)

(FSA fighter with a MG-42 or MG3 in 2014.)
There are several generations of the MG-42, which tie in as to how they ended up in Syria. The WWII German original is obviously the MG-42, which was redesignated MG1 by West Germany after it rearmed, and M53/42 by Yugoslavia which inherited some on it’s territory in 1945. Yugoslavia also produced a MG-42 clone, the Zastava M53 Šarac, during the Cold War.
In 1959, West German production switched to the MG3, which is basically the MG-42 rechambered to 7.62 NATO and compatible with American belts. The MG3 is known as the MGA3 in Iran and Karar in Sudan. Finally, Beretta made a version called the MG-42/59 for the Italian army during the Cold War which also uses 7.62 NATO but has a lower (800rpm) rate of fire.

(FSA fighter with a MG3, likely provided by Saudi Arabia, in Aleppo during 2016.)
Syria obtained low numbers of WWII original MG-42s from France and Czechoslovakia in the late 1940s and early 1950s. Another small lot may have come from the USSR.
Most of the MG-42s currently in use in Syria, and there are many, are of the Cold War versions. Saudi Arabia’s army uses the MG3 as it’s standard GPMG and has shipped many to the rebels, mainly the islamist factions. Iran has delivered MGA3s to the Syrian regime, while Sudan has allegedly sold Karars to ISIS. The Kurds received 40 MG3s from Germany, most of which have by now been lost, including a batch captured by ISIS and used against Iraqi troops near Tikrit. ISIS also has a small number of MG-42/59s of unknown origin. Turkish troops operating on Syria’s northern border against the Kurds use the MG3 (which is built under license in Turkey) and some of these have been captured. Mauser-chambered M53 Šaracs have popped up in rebel use, possibly part of the Croatian shipments. Finally, there may still be a few Mauser-chambered MG-42s of WWII German vintage in use.

(MG-42 or MG3 being used by Division 16, a FSA-affiliated faction, in Aleppo.)

(Both the WWII-version MG-42 and Cold War MG3 have a pop-up anti-aircraft sight.)

(This gun being used by an ISIS fighter was described both as a MG-42/59 and as a MG3.)

(ISIS fighter with MG-42 or MG3 along the Syria-Iraq border in 2016.)
By any of the fighting factions, the 7.62 NATO-chambered MG3 is considered the best machine gun currently in use in the civil war. It is an excellent weapon in all regards.
others
There is at least one American-made M1919 in use. This WWII machine gun fired the .30-06 Springfield cartridge at 500rpm from 250-round belts. It’s unclear how it ended up in Syria, as the M1919 was never a standard Syrian weapon. It’s possible it was taken off a disabled Israeli vehicle during the Yom Kippur War or the 1980s fighting in Lebanon. The M1919, which was seen with the FSA near Idlib in northwest Syria, appears to have a pintle socket which may indicate it at one time had been aboard a tank or half-track.

There have been reports of M1910 water-cooled machine guns in the Syrian civil war. This Soviet weapon fired the 7.62x54mm(R) cartridge at 600rpm. For certain, East Germany included some of these in it’s June 1967 arms transfer to Syria, and the USSR may have supplied some directly in the 1950s. So far there are no known photos or video of M1910s in the civil war.

ANTI-AIRCRAFT GUNS
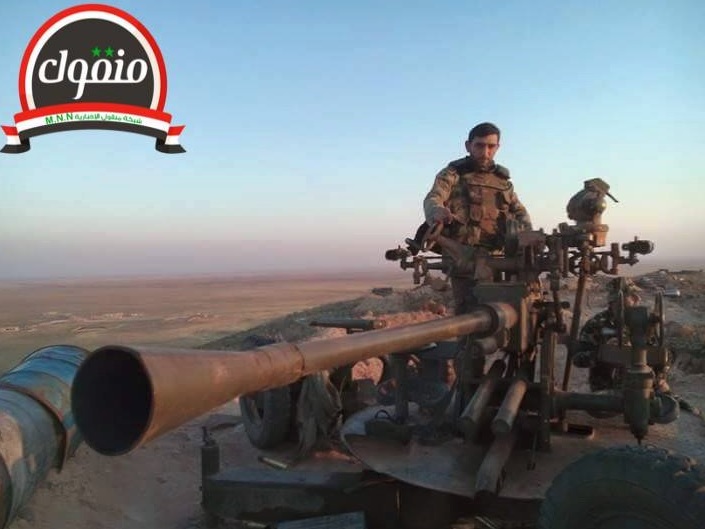
the 61-K

(A 61-K captured by Nawa Front, a FSA-affiliated faction, being test-fired. This gun is still on it’s original ZU-7 four-wheeled carriage from WWII.)
The towed 61-K was crewed by eight men. It fired a 37×250(R) cartridge from 5-round clips. The slant range was 2,733 yards with an absolute altitude ceiling of 5,380′. The entire set-up weighed 2½ tons. On paved roads the maximum tow speed was 31mph, off-road much less. In transit, the barrel was traversed 180° and held by a travel lock. For use, the whole carriage was jacked up on four footpads. Aiming was by a simple iron sight, and both elevation and traverse were by manual handwheels. The latter would likely be problematic today, as the handwheel traverses 19°/second at best, making it hard to keep up with a fast jet.

(Swing-wing MiG-23 “Flogger” fighter of the Syrian AF bombing rebel positions.)
The listed rate of fire is 160rpm however a clip was exhausted in about 4 seconds, and factoring in the time to feed a new one, the realistic rate of fire was about 45rpm, or 60rpm with a very good crew. Forty 5-round clips can be stored on the gun, if it is on it’s original WWII carriage.
About 20,000 of these guns were made during WWII. The first ones were delivered to Syria in 1955. About 300 in total were delivered between 1955-1968, with some replacing guns destroyed in combat. Poland made spare parts during the Cold War and likely sold some to Syria after the Soviet logistics system stopped supporting the 61-K. These guns saw active Syrian use in the 1967 Six Day War, the 1973 Yom Kippur War, and the 1982 Bekaa Valley air engagements.
During the 1980s Syria placed it’s remaining 61-Ks into storage. However when the civil war started, these were reactivated as the combination of major caliber (the OR-167 ammunition has a 1½ lbs projectile with 2,887fps muzzle velocity) with high rate of burst fire made them ideal for urban ground-to-ground combat.
During WWII, the Soviet army calculated that the 61-K had a 0.11% chance of a hit from any given round fired (these very low odds were comparable to similar German, French, and Japanese AA guns). Against a modern jet fighter the odds would be worse yet. None the less, before adequate numbers of shoulder-fired SAMs became available, this was all many of the rebel groups had in the way of air defense.

The FSA in particular has taken these guns off their carriage and put them onto the beds of civilian trucks. The one above was dueling with a Syrian AF Su-22 “Fitter” jet above Aleppo in February 2016.

This FSA contraption is quite bizarre. The truck is a GAZ Sadko, the civilian version of the GAZ-3308. On the bed is the elevation & traverse housing of a 61-K, but, with the actual WWII 37mm gun replaced by a Cold War-era 2A7 23mm autocannon, apparently salvaged from a destroyed ZSU-23-4 air defense vehicle.

Not to be outdone, the Syrian army mounted a 61-K on this BREM-2 with an improvised gunshield. The BREM-2 is a Cold War-era repair vehicle based on the BMP-1 armored personnel carrier. It is normally unarmed, but as the Syrian army is in need of fighting vehicles, it was modified as above.

This vehicle was used in a government offensive against Jaish al-Islam near Mleha in July 2014.
ARTILLERY
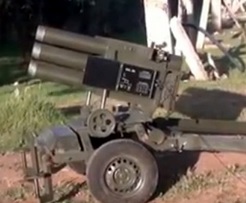
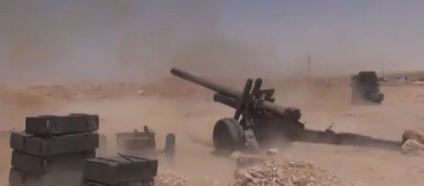
the leFH 18M / M18/43F

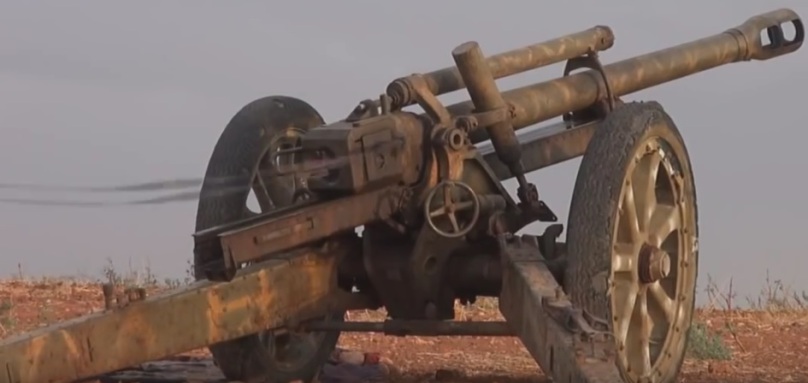
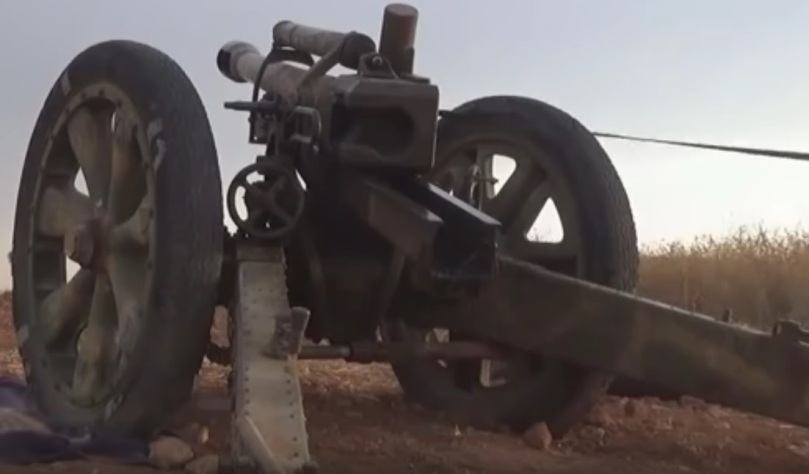
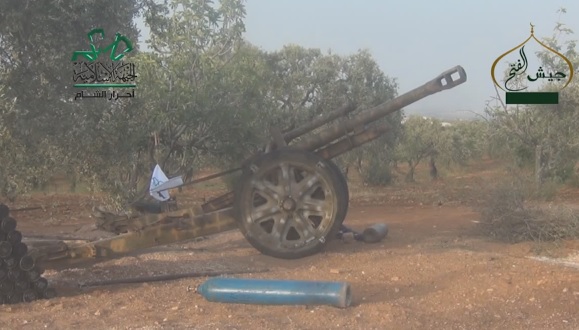
(Rebels of the Ahar al-Sham faction using a leFH 18M / M1843F in August 2015.)
Besides the StG-44s, these howitzers are the most surprising WWII weapons in the Syrian civil war. The leFH 18 family was the Wehrmacht’s standard divisional-level howitzer throughout WWII. This towed 105mm howitzer weighed 3¾ tons and had a 6-man crew. It fired a 33 lbs shell out to 7½ miles.

There were three versions: the wooden-wheeled leFH 18 which Germany started WWII with, the leFH 18M which added a muzzle brake and metal wheels with solid rubber tires, and the leFH 18/40 with a lightweight carriage.

The first appearance of this howitzer during the Syrian civil war was in July 2013, and then again during 2015 and 2016. Most (or all) of the guns seen are not WWII German leFH 18Ms but rather a postwar Yugoslav near-clone, the M18/43F.
Surrendered ex-Wehrmacht leFH 18M howitzers were simply designated M18 in the post-WWII Yugoslav military. The M18/43F was a Yugoslav project that modernized the leFH 18M carriage and also modified the breechblock assembly to make it compatible with American 105mm shells (it could continue to use WWII German ammunition) and the Soviet PG-1 sight (likewise, it could use a German sight). There is little else changed on the actual weapon, and 95%+ of a M18/43F’s parts are compatible with a WWII German leFH 18M.
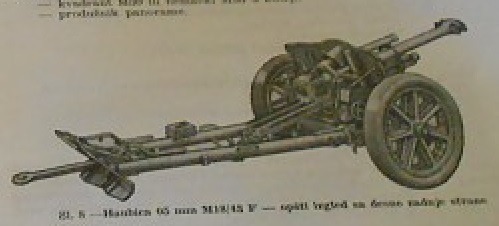
(Illustration of the M18/43F from a 1969 Federal Yugoslav Army guidebook.)
The M18/43F was one of three post-WWII Yugoslav leFH 18M projects; the others being the M18/61 which had a new carriage with a high-speed axle and pneumatic tires; and the M18/40 which had the German carriage but with heavier trails and spades. In turn all these concepts were used in the M56, a later Cold War-era howitzer still loosely based on the leFH 18M.
During the 1990s breakup of Yugoslavia, HVO (Croatian Defense Council, ethnic Croat forces inside Bosnia-Herzegovina) got their hands on some long-warehoused howitzers. As part of the 1995 Dayton Accords, artillery of this caliber was turned over to the national Bosnian army. In the late 1990s this lot was auctioned to a metal recycler in Turkey. It was supposed to be “demilled” (barrels cut off, etc) prior to leaving Bosnia-Herzegovina but quite obviously that didn’t happen. Somehow, Syrian rebels ended up with some from the Turkish scrapyard.

(leFH 18M or M18/43F howitzer of Jaish al-Fatah in recoil.)
There are certainly three, probably four or five, and maybe six of these howitzers active in Syria, although never together at the same time. They can be visually kept apart by their camouflage, rot patterns on the rubber tires, and absence/presence of optics.
(Howitzer belonging to Ahar al-Sham firing.)
(Howitzer of Ahar al-Sham bombarding the shi’ite town of Fu’ah, Syria, in 2015. The firing lanyard is visible.)

(A different gun of Ahar al-Sham (note the different camouflage on the slide and newer right tire) being fired. The faction’s flag is visible.)
(The same gun as above, during the 2015 Fu’ah bombardment, showing detail of the breechblock and handwheels. The on-mount optics are missing.)

(Rebel howitzer active during the 2015 Fu’ah bombardment. Note the civilian car being used as support vehicle.)
Ammunition is surprisingly not a problem. Manufacturers in Russia, Europe, Canada, and Indonesia offer still shells for these guns, as the relatively modern M56 is backwards-compatible with it’s rounds. The Soviets used ex-German leFH 18Ms into the 1950s and manufactured reverse-engineered rounds as well, some of these were still in storage in the early 1990s and may still be today.

(Cyrillic writing on leFH 18M ammunition being used by the Syrian rebels.)

(An example of modern ammunition compatible with the M18/43F. The rounds on either end are base bleeds; these expel a small amount of gas inflight which eliminates a low-pressure drag zone behind the shell. It can add between 25%-30% to the range.)

(This howitzer was used by Jaish al-Fatah (logo on the right), a sub-faction of Ahar al-Sham (logo on the left), an umbrella group of islamist jihadis which refuse to join the FSA. It appears well-stocked with ammunition.)
Often a cylinder is pictured nearby (as above), this is not a fire extinguisher or IED as is sometimes stated. It is an industrial flask of nitrogen to service the howitzer’s recuperator, the pressurized piston atop the barrel which returns the gun to battery position after firing.

(The weapon at maximum recoil, showing the recuperator’s piston.)
In online videos of these howitzers posted by the rebels, the guns sometimes appear sluggish when recovering from recoil. Regardless of whether they are WWII German or early post-WWII Yugoslav, the gaskets on the recuperator are no doubt old.

(This gun, being manned by Jaish al-Fatah in 2015, has on-mount optics present.)
There is anecdotal evidence that Syria previously operated actual ex-German leFH 18Ms, and possibly, that one of the current howitzers is one. The Damascus Military Museum had one ex-Wehrmacht leFH 18M in it’s collection prior to the civil war. It was not stated if the gun was a donation from the Syrian army, or, if it had been purchased abroad specifically for display.
In 1949, France sold Yugoslavia 90 ex-German leFH 18Ms in various states of repair; these were used as skeletons for the M18/40, /43F, and /61 projects. At the same time, France was making a large sale of ex-Wehrmacht gear to Syria including Panzer IV tanks and PaK-40 artillery pieces, so it would be reasonable that the French directly sold Syria some leFH 18Ms as well. The USSR also could have also been a source in the mid-1950s; as the Soviet army used ex-German artillery into the early 1950s.

(An older Syrian man adjusts the optics of a leFH 18M or M18/43F.)
A grainy cell phone video shot by a rebel group operating one of these howitzers shows old men in their 60s or 70s discussing the gun’s parts with much younger fighters. It’s possible that these men had been leFH 18M crewmen in the Syrian army decades ago.
Of note is the device pictured below, which is sometimes incorrectly described as the leFH 18M’s WWII German sight.

It is actually a Selbstfahrlafetten-Zielfernrohr (Sfl.Z.F.1a), part of the optics kit of Syria’s long-gone StuG III fleet. This forgotten one was apparently salvaged by the rebels from a spare parts warehouse. It is indeed of WWII German manufacture. During the 2015 bombardment of Fu’ah, rebels used it as a makeshift off-mount sight.

The rebels rigged up a digital camera to the Sfl.Z.F.1a. Here, the minaret is being used as a reference bearing for the howitzer. The target is the building in the center, which the rebels said was being used by the shi’ite militia guarding the town.

Regardless of whether the howitzers were actual WWII German leFH 18Ms or early postwar Yugoslav copies; these old guns dealt out major punishment on Fu’ah.
the PaK-40

This was a standard German anti-tank gun in WWII from 1942 onwards, with 23,303 being built during WWII. The PaK-40 weighed 3,142 lbs and fired a 75x714mm round. It had a range of 1,820 yards against tanks and could also be used as a howitzer out to 3¾ miles. Even after WWII, the PaK-40 was still decently effective, and could take out the T-34 or M4 Sherman under the right circumstances.

(One of the two PaK-40s which are, or were, at the Damascus Military Museum.) (photo via milinme website)
A few of these guns were included in a muddled hodge-podge of WWII weapons which France sold to Syria in 1948-1949. The USSR sold a small lot of PaK-40s to North Vietnam in 1955 (the Soviet army itself was still using captured examples as late s 1954) and possibly dealt some to Syria in the same timeframe. Along with the North Vietnamese sale was a mixture of ammunition from WWII German manufacture and postwar Soviet production, so it would stand to reason that Syria received a similar blend.
Czechoslovakia may have been another source. After WWII Czechoslovakia refurbished and reissued ex-Wehrmacht artillery on it’s territory. This included intact guns surrendered in May 1945 and weapons reassembled from pieces of wrecked artillery. By Christmas 1949, a total of 227 PaK-40s had been reissued. Czechoslovakia’s PaK-40 inventory peaked in January 1951, when 302 guns were in active duty. By the start of 1960, this had fallen to 102. The PaK-40 was discarded from Czechoslovak reserve storage in January 1968.

(Czechoslovak army Tatra T-128 trucks towing WWII PaK-40 guns during a Warsaw Pact military exercise.)
Whatever the source, for certain Syria had PaK-40s in use by 1955, when some were observed in a parade, and in 1967 when they made a brief (and futile) showing during the Six Day War. In the Syrian army, the PaK-40 was assigned to a brigade-level anti-tank platoon. The PaK-40 was withdrawn from active Syrian use in the late 1960s. As recently as 2011 there were two on display at the Damascus Military Museum, and there may have been more in the army’s warehouse storage.

(Syrian PaK-40 captured by Israel.)

(Syrian PaK-40 in the Golan Heights destroyed by Israel. Local scrappers have cut off the barrel and trails. The area is still rife with UXO making a tow of the remains too dangerous.)
In 2013 it was repeatedly reported that the rebels were using a PaK-40 in western Syria however there was no clear photo of it. In 2015 one was again reported to be in use. Nothing has been said of it since.
the ZiS-2

The “big brother” of the more famous ZiS-3, the ZiS-2 was an anti-tank gun of the WWII Soviet army. A product of the Grabin design bureau, this towed 57mm gun weighed just 1¼ tons but was immensely powerful for it’s caliber, with the 57x480mm(R) cartridge’s 7 lbs hardened penetrator having a sizzling 3,282fps muzzle velocity. Until 1942, the ZiS-2 could penetrate any Wehrmacht tank at any range. The tradeoff for this was that the ZiS-2 was much more expensive than the ZiS-3, and at the height of the German invasion, production was halted. It resumed later in WWII and eventually a total of 10,016 were made before production ended in 1945.
Everything about the ZiS-2 was good. It had a loading assist that automatically closed the breech and put the gun into battery when a round was chambered. The gun could traverse 56º without having to reposition the mount.
Syria received an unknown quantity from the USSR in November 1955. For certain they were used in the Golan Heights during the 1967 fighting, as the Israelis destroyed several and captured one. During the late 1980s, they were finally replaced by wire-guided anti-tank missiles and placed into long-term layup.

The FSA captured one from a Syrian army warehouse and removed the carriage’s trails and wheels. It was mounted on the bed of a Cold War-era GAZ-3308 truck, inside a makeshift armored gunhouse.
In July 2016, this vehicle was observed fighting in Aleppo. It operated alongside a Cold War-era ZU-23-2 anti-aircraft gun sat on a civilian pickup, with the ZiS-2 targeting fortified buildings and the AA gun then raking the area with automatic fire.
the A-19
This big (7¼ tons, 28’8″ total length) towed howitzer served the Soviet army throughout WWII. A total of 2,244 were made during WWII plus 206 after the war. The 122mm A-19 had a crew of 9 and a maximum range of 12½ miles. During WWII, it was generally regarded as a success, however afterwards it was not popular. It had a sluggish 3rpm rate of fire, and needed a strong vehicle (usually the tracked Ya-12) to tow it.
The USSR provided Syria with about 100 (based on Warsaw Pact organization, probably actually 96) A-19s during the 1950s, and probably a small replacement batch after the Six Day War. In Syrian use, they were organized into 12-gun batteries controlled at the corps level.

These guns were placed into storage around the turn of the millennium. One was captured from an arsenal warehouse by the FSA and has been used by them. On the other side, the Syrian army reactivated several and used them against both ISIS and al-Nusra forces, most recently in late 2016.
the M-30

During WWII, the M-30 was a standard divisional-level artillery piece of the Soviet army, with 19,266 made. The towed 122mm M-30 weighed 3½ tons with a 8-man crew. It fired 45 lbs shells out to 7¼ miles. Besides WWII ammunition, the Petrov bureau designed the M-30 to be backwards-compatible with First World War 122mm ammo, and “future-proofed” to accommodate rounds not yet invented. As such, ammunition supply is still no problem, even in the 21st century.
SIPRI quotes Syria as receiving 200 M-30s from the USSR between 1955-1957 however this is almost certainly on the low end, and may be the total in simultaneous service at any given time. Throughout the 1950s and 1960s, this WWII gun was a staple in Soviet arms sales in the middle east, and was a “go-to” weapon in Arab armies. By best estimate, about 150 were still in Syrian army use at the turn of the millennium.

The M-30 is one of the most common of the dwindling number of WWII weapons still in use in the 2010s. Two dozen armies have it on active duty or first-tier reserve, including Syria. The Soviet army itself was still using WWII M-30s during the 1980s war in Afghanistan. At the end of the Cold War, it was stated that 4,000 were still in Soviet army storage.
Since Syria’s civil war started, M-30s are in use with multiple factions: the Syrian army, the FSA, ISIS, and the Kurds. The Syrian army has enough in service to field WWII-style batteries, which it did near the city of Homs in February 2017.

(Syrian army M-30s in action in 2017.)
The M-30 achieved mainstream press in 2017, when the Russian Federation announced it was shipping 21 to Syria. Now 72 years past WWII, it was astonishing that the Russian army still had some of these guns in storage and many military observers felt it was either a translation error or bad reporting. In fact, these were WWII-vintage M-30s. They arrived via a Russian merchant ship in early May 2017.
the ML-20

Designed by the Petrov bureau, this towed Soviet 152mm “heavy-hitter” of WWII weighed 8 tons and fired 108 lbs HE shells out to 10½ miles, with a 4rpm average rate of fire. A total of 6,873 were made during WWII and another 15 shortly after the war ended.
Syria received 200 of these big guns from the USSR as part of the emergency rearmament after the 1967 Six Day War defeat, with the last arriving in late 1968. Some of these were no doubt lost during the 1973 Yom Kippur War. In 2008, the Israeli army estimated that 70 remained in Syria.
The Syrian government forces are the only faction known to be using the ML-20, not surprising considering the gun’s weight as well as the logistics needed to keep them fed with heavy shells. They are in sporadic use, mainly in the country’s east against ISIS.
(Syrian ML-20 in use during September 2016.)
TANKS
The WWII legend T-34 was the item of that era military observers thought would make a reappearance during the Syrian civil war. Surprisingly, it has not.

(Czechoslovak-supplied T-34s in Syria.)
Syria began importing T-34s from the USSR in 1955 (with 100 delivered in the first batch), from Czechoslovakia in 1962, and from East Germany in 1967. In July 1956, Czechoslovakia set up a T-34 training facility in Syria. During the Six Day War the T-34 was by far the most common Syrian tank and it was still in use during the Yom Kippur War.

(One of the two T-34s filmed by Southern Front, an FSA-affiliated faction.)
These two T-34s are in Quneitra province, which lies west of Damascus inbetween the capital and the Israeli border in the Golan Heights. During the 1973 Yom Kippur War, it briefly looked as if the Israelis might threaten Damascus itself. These T-34s were set up in westward-facing defensive dugouts, and apparently just left there after the war.
Due to a strange sequence of events, Quneitra province is now an isolated exclave of rebel-held Syria, sandwiched between Israel and government-held territory. It is held by a shaky coalition of the FSA’s Southern Front and two islamist groups. These three have themselves occasionally fought each other.

(This T-34 is certainly not going anywhere, as the armored transmission cover is open and empty.)
The photos were taken in early 2016. As far as is known, the Southern Front forces did not attempt to resurrect the two T-34s, but did use their hulks as cover for infantry. This is the only photographed appearance at all of any T-34s during the civil war. As of 2017, one can only believe that if a usable T-34 remained in Syria, somebody would have tried to use it by now.