Category: War
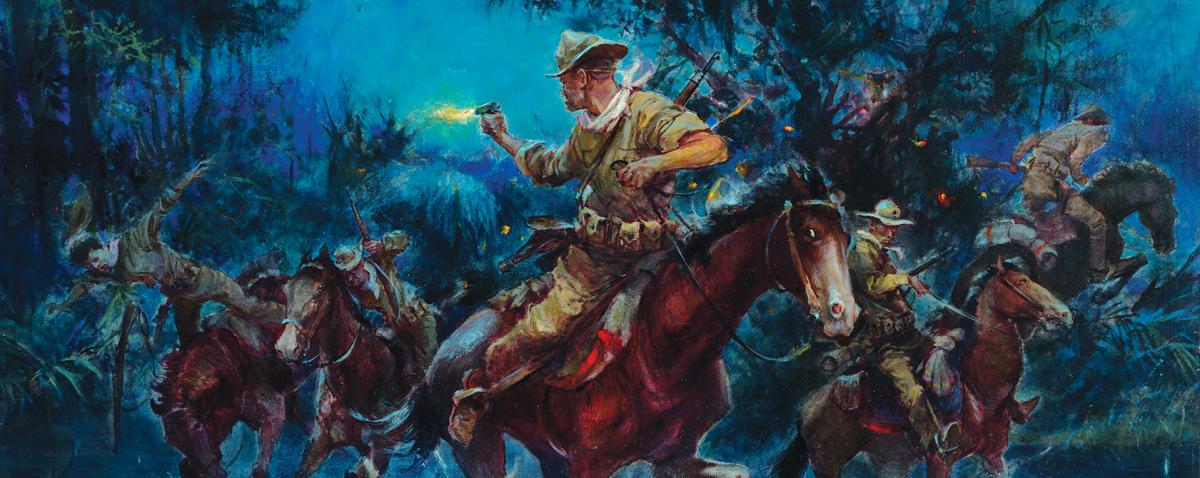
24 October 1915: Gunnery Sergeant Daniel J. Daly and his detachment are ambushed by 400 Cacos near Fort-Liberté, Haiti. The Marines will fight their way to a defendable position and counterattack the next morning, garnering Daly his second Medal of Honor (one of only seven Marines ever to have been so honored twice).
CHARLES WATERHOUSE, DAN DALY AT THE RIVER AMBUSH, U.S. MARINE CORPS HISTORY DIVISION
The United States’ early 20th-century military interventions in Asia and the Caribbean are important because they have us reckon with questions about the use of military/naval power abroad. These questions pertain to U.S. motivations to intervene as well as the effectiveness, cost, and consequences of intervention on the peoples and military institutions involved.
This historical drama played out in the Philippines, China, Cuba, Hispaniola, and Central America between 1898 and 1934. Although the U.S. Army played the leading role throughout much of the early interventions, it was the U.S. Marines who effectively took over these tasks in the early 1910s through the early 1930s. Doing so led them to develop their own “small wars” doctrine that ultimately enhanced the service’s flexibility. These interventions also imbued the Corps with a robust history of counterinsurgency operations that informs much of its institutional identity.

New Wars for an Expansionist Century
After the Spanish-American War, the United States became an empire in all but name. Americans’ history of westward expansion across North America culminated with the closing of the frontier in 1890. That expansionist impulse then spilled overseas to places such as Hawaii and the Philippines. Missionaries and politicians wanted to spread civilization, build roads and schools, and uplift the lives of natives in these exotic locales. U.S. produce and energy companies, however, wanted access to the natural resources of these places and native labor to extract and process them. American banks funded these ventures, even going so far as to become creditors to foreign treasuries.1
Security was a major concern, too. During the 1890s and 1910s, the empires of Great Britain, Germany, France, and Russia seized lands in Africa and Asia without much consideration to the sovereignty or wishes of native peoples. The U.S. defeat of Spain created a political vacuum in its former possessions that many Americans believed would be filled by some other power if those territories were granted full autonomy. Therefore, the McKinley administration chose to stay on in such places as the Philippines, Cuba, and Puerto Rico after the war.2
Once the United States became a power with global interests, the Navy and Marine Corps expanded. Newly acquired Pacific islands such as Hawaii, Samoa, Guam, and Wake could serve as advanced bases for coaling stations and ports that allowed the U.S. Navy to project power globally and protect maritime communications and commerce. The Marine Corps began down a path with two lanes. One was advanced base seizure and defense, the operational and conceptual antecedent for the 1934 Tentative Manual for Landing Operations. Small wars, contingency operations, and counterinsurgencies comprised the other. Although early 20th-century Marines’ intellectual predilections shifted toward the former lane, they mostly operated in the latter.
Manifest Pacific Destiny?
Soon after the McKinley administration annexed the Philippines, the U.S. Army found itself embroiled in a deadly counterinsurgency. Filipino revolutionaries fought too long against Spain to trade one colonial overlord for another. Led by Emilio Aguinaldo, the resistance first waged a conventional war in early 1899 against the Army VIII Corps operating out of Manila.3 A regiment of Marines soon arrived on Luzon to aid the Army in putting down the revolt. The most notable action for the Marines involved a battalion assault of the fortified garrison at Novaleta, southwest of Cavite, in October. Soldiers and Marines soon defeated Aguinaldo’s forces in conventional operations, and the conflict morphed into a guerrilla war.
The Marines learned from the Army’s senior leaders, who had counterinsurgency experience dating back to the Civil War and Indian wars of the frontier. By 1900, the Army had developed de facto counter-guerrilla methods that balanced violent coercion with peaceful encouragement, a “carrot and stick” approach.
By 1902, it had become evident that although waging counterinsurgencies proved a great learning experience for Marines, it certainly was not a rewarding one. Marines had learned from the Army that attraction and chastisement measures needed to be wielded in proportions dictated by the situation; the situation in the Philippines was terrible. Harsh U.S. treatment of Filipinos drew condemnation from the American press. “Forgery, deception, the violation of the laws of hospitality . . . the wanton slaughter of troops drawn up under false representations of peaceful intention, all these things, we are assured, are manly in the eyes of a soldier,” wrote one critic.4 This would not be the last time U.S. troops, Marines included, would get lambasted in the press while waging small wars overseas.
TR’s Beefed-Up Monroe Doctrine
President Theodore Roosevelt considered the Gulf of Mexico and the Caribbean Sea vital to U.S. security for several reasons. Many Caribbean countries held substantial debts to European creditors. The Roosevelt administration believed that civil unrest, often fueled by political and economic strain caused by those debts, invited European intervention. This was unacceptable to TR because it violated the Monroe Doctrine that proclaimed unilaterally an end to European colonization of the Western Hemisphere.
European naval and military presence in the Caribbean threatened the isthmian canal under construction in Panama. Once completed, the canal would give maritime and naval vessels the ability to bypass the Magellan Strait. Any threat to the canal equated to a threat to trade and the U.S. Navy’s ability to concentrate its fleets in either hemisphere. Therefore, TR promulgated a “corollary” to the Monroe Doctrine that asserted the right of the United States to intervene in Latin American countries to preclude powers such as Germany from establishing bases in the region.
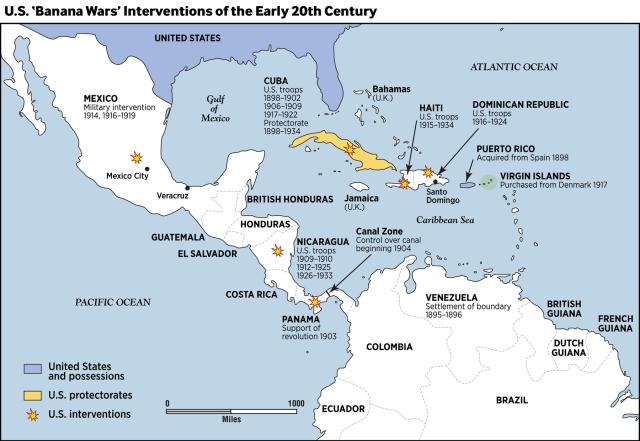
Under these auspices, the Navy landed Marines all over the region to protect American business and quell civil/political strife. Before U.S. entry into World War I, Marines deployed to Cuba in 1906, 1912, and 1917; the Dominican Republic in 1903, 1904, and 1916; Panama in 1903 and 1904; Nicaragua in 1912; Mexico in 1914; and Haiti in 1914 and 1915.
By 1910, the Army wanted nothing more to do with chasing insurgents in insalubrious climes. Guerrilla wars and nation-building in places such as Cuba and the Philippines had been lackluster affairs despite some successes. The Army tried to get out of intervening in Cuba in 1906 and argued against sending soldiers to China in 1911 and later to Nicaragua in 1912. Generals and chiefs of staff such as General Leonard Wood argued that sending smaller units of Marines was a more appropriate response to troubled areas in the Caribbean than sending large Army formations.5
The success the Army had in getting away from small wars stemmed from an institutional strength the Marines lacked. The Corps’ place in the defense establishment was tenuous in the early 1900s. Despite being assigned the advanced base mission in 1900 and growing from 3,000 to nearly 10,000 men between 1899 and 1912, the Marines experienced several attempts to legislate them out of existence. The Navy attempted to remove them from its ships in 1906, and General Wood suggested the Corps be handed over to the Army. Marines regained their places on board naval vessels by 1909, but institutional vigilance remained high. Eager to prove their worth in the face of seemingly continuous threats to their existence, Marines took over the constabulary mission without any objections from the Army.
In a way, this made sense, because the Marine Corps’ size and fluid force structure made it ideal for small-scale interventions on short notice. Its organization stemmed from the Navy and U.S. government tasking Marines to guard naval yards, serve as ships’ detachments, and form a mobile force for advanced base operation and expeditionary duty while only allotting funding for 341 officers and 9,988 enlisted personnel.6 Up to 1912, Marine regiments and battalions were provisional, organized hastily when necessary and disbanded quickly afterward. Marine Corps headquarters did this by pulling Marines from various barracks and ship detachments, appointing a command staff, and designating them a temporary unit number.7
This amorphous structure confused many outsiders, but it created a fluidity that allowed the Marines to respond to their varied missions quickly. It came in handy when Marines deployed hastily to Nicaragua in 1912 and Vera Cruz, Mexico, in 1914. These were high-profile interventions, especially Vera Cruz, for which Congress awarded nine Medals of Honor to Marines, including Smedley Butler, and 47 to the Army and Navy. Except for a small force of Marines that remained in Managua, Nicaragua, to guard the legation, neither intervention necessitated long occupations.
Guns to Hispaniola
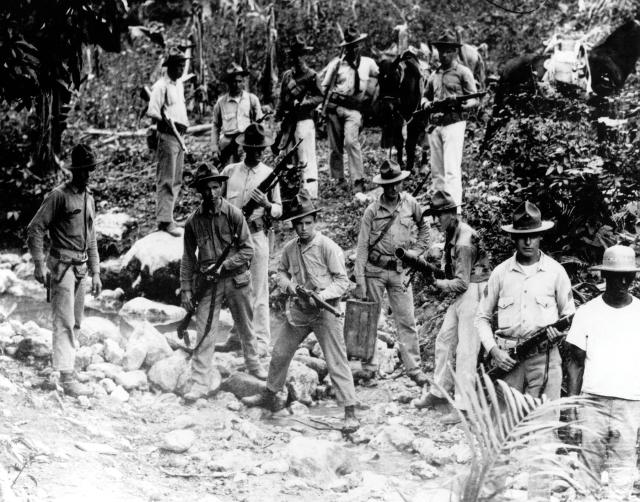
Marines landed at Port-au-Prince in July 1915 after armed rebels assassinated the Haitian president and took over the government. By August, the First Provisional Brigade arrived, commanded by Colonel L. W. T. Waller along with Major Smedley Butler. Marines then went about pursuing insurgents (known colloquially as Cacos) and pacifying as much of the country as they could. Butler’s assault on Fort Rivière in November was the most dramatic combat action, ending with more than 50 insurgents killed. Marine companies soon occupied 16 Haitian towns and settled in for a long occupation.8
Marines then landed in the Dominican Republic in May 1916 after rival political factions wrested government control from President Juan Isidro Jimenes. Colonel Joseph Pendleton organized Marine units from Haiti, Cuba, and Admiral William Caperton’s warships into an expeditionary force that defeated armed Dominicans at Las Trencheras and Guayacanas and eventually took the city of Santiago. Rear Admiral Harry S. Knapp became the military governor of the country, while Pendleton and his Marines set about pacifying the countryside.
Although Haiti and the Dominican Republic were separate campaigns, Marines in both occupations drew upon what they had learned in Cuba and Panama and from working with the Army in the Philippines.9 They established native constabularies, the Gendarmerie d’Haiti and the Guardia Nacional Dominicana, with enlisted Marines serving as temporary officers. Marines used civil programs such as improving sanitation, providing basic security and medical care, and building roads as methods of attraction. Chastisement measures often took the form of combat patrols, early morning raids, the confiscation of property, and the killing of livestock.
Soon after the United States entered the Great War, Marines began using more coercive measures on Hispaniola. By the summer of 1918, insurgent activity had intensified in both Haiti and the Dominican Republic. To send as many experienced troops to France as possible, Commandant George Barnett pulled Marine companies out of Hispaniola and replaced only some of them with brand new volunteers who had joined to fight the Germans, not Haitians or Dominicans. One commander in Haiti reported in April 1917 that the “reduction of the number of Marines in Haiti by two companies is, in my opinion, a serious mistake . . . it is necessary in my mind that we increase our influence in this Island and not weaken it.”10
In Haiti, Marines revived the old corvée labor system whereby Haitians who could not afford to pay taxes for road construction paid with their own labor. While overseeing road construction in northern Haiti in January 1919, Major Clarke H. Wells allegedly ordered illegal executions of 19 Haitian prisoners.11 This event fanned the flames of an insurgency led by Charlemagne Péralte, whom the Marines assassinated nine months later.
In the Dominican Republic, cuadillos in the eastern provinces led a grassroots resistance against foreign invasion and economic exploitation.12 Bending under the pressure, the Marines brought back the odious concentration tactics they learned from the Army by relocating Dominicans from the countryside into urban centers to separate them from insurgents. One Dominican witness to the camps described them as people being “locked up like pigs in stockades.”13 In August and September 1918, Captain Charles F. Merkel tortured and killed Dominicans found outside the concentration areas in Seibo Province. After being arrested, Merkel, to protect the Corps’ reputation, committed suicide in his cell with a smuggled pistol.14
Marines then experienced several years of acrimony after American journalists got wind of “indiscriminate killings” in the fall of 1919. Accusations in the newspapers prompted several investigations conducted by the Navy, the Marine Corps, and the U.S. Senate, all of which found only a few substantiated instances of wrongdoing. But journals such as The Nation and papers such as the Cleveland Gazette painted the Corps as a racist institution motivated by white supremacy.15 Indeed, many Marines held overt racist attitudes against Haitians and Dominicans, which caused them to underestimate their enemy and misunderstand the causes of both insurgencies.16
Hunting the Sandinistas
Amid shifting U.S. opinions on interventions, Nicaragua would be the last of the Corps’ pre-World War II counterinsurgency operations. A Marine legation had stayed in Managua since 1912 but left in 1925. Soon after its departure, conservative-leaning General Emiliano Chamarro Vargas led a revolt against the government and precipitated a civil war. The United States supported an interim government led by Adolfo Diaz, but Mexico and Honduras supported the former liberal Vice President Juan Sacasa. An army led by liberal José Maria Moncado wreaked havoc down Nicaragua’s east coast, attacking and seizing U.S. commercial property as it went.
Marines reactivated the 2nd Marine Brigade and sent it to Nicaragua under the command of Logan Feland. While the U.S. State Department brokered a peace deal between the two factions, Marines went to work again providing security for new elections and building a Nicaraguan national guard (See “A U.S. Marine in the Guardia Nacional,” pp. 20–25.).17
Liberal political and military leader Augusto César Sandino fought the Marines for five years. Soon-to-be-famous Marines such as Majors Samuel M. Harrington and Harold H. Utley, Captain Merritt A. Edson, First Lieutenant Hermann Hanneken (the Marine who had killed Charlemagne Péralte in Haiti), and First Lieutenant Lewis B. “Chesty” Puller pursued “Sandinistas” through the countryside with Thompson submachine guns and close-air support. They garrisoned numerous posts around the country to pacify the surrounding areas, guarded U.S. commercial property, and continued to train and develop the Guardia Nacional. Air support, first introduced on Hispaniola, played a crucial role in reconnaissance, resupply, and direct combat support, an important precursor to the eventual Marine air-ground task force. Marine pilots used dive-bombing tactics on the Sandinistas, a methodology that would come in handy in major U.S. wars to come.
Like the Hispaniola occupations, the Nicaraguan campaign became unpopular in the United States. After the Great War, American public opinion shifted decidedly against military interventions. The Republican administrations of Warren G. Harding (1921–23), Calvin Coolidge (1923–29) and Herbert Hoover (1929–33) tended to favor restraint over further entanglements in Latin America.18 The Coolidge administration pulled Marines out of the Dominican Republic in 1924. They continued to pacify Haiti and Nicaragua until 1933 and were effectively pulled out by 1934. The Marines never caught Sandino.
‘A Perilous and Thankless Job’
The early to mid-1930s was an intellectual crossroads for the Corps. A fervent debate took place within the halls of Marine Corps schools as to the identity and future of the institution: Would it continue as a constabulary force or as an advanced base force? It became a mixture of the two—although the intellectual effort and force structuring that took place during this time reflected a clear predilection for the latter.
Many Marines wanted to get away from contingency operations. They learned all too well that waging small wars was a perilous and thankless job. In addition, with the occupations of Nicaragua and Haiti concluded, the Corps had manpower and brain power free to focus on what many wanted to be their future raison d’etre: advanced base seizure and defense. Even acting Commandant Lieutenant General John H. Russell, who commanded Marines in Haiti and the Dominican Republic, wanted to sideline the small wars mission in favor of the advanced base one.
The Navy accepted Russell’s proposal to restructure the Corps as an arm of the fleet by issuing General Order 241 in December 1933; the Fleet Marine Force was born. Russell then canceled the 1933–34 academic term at Marine Corps schools in Quantico so the faculty and students could write the Tentative Manual for Landing Operations.19
Enough proponents of small wars doctrine existed, however, to complete a draft of the Small Wars Manual in 1935. The text reflected the entire corpus of Marine knowledge on counterinsurgency and contingency operations. It long stood as the single most comprehensive text devoted solely to small wars in the U.S. military. But courses on the subject never took up more than 15 percent of students’ instruction at Quantico.20 While the Fleet Marine Force conducted fleet landing exercises throughout the late 1930s, a small group of Marines, including Utley and Harrington, worked on and published a revised version in 1940—on the eve of U.S. entry into another world war.
Small Wars Then, Small Wars Again
The United States’ fortunes spent nation-building and fighting insurgencies in the early 20th century had mixed results.21 Soldiers and Marines oversaw the construction of thousands of miles of roads and telephone lines and many airfields, hospitals, clinics, and schools. They organized and trained indigenous security forces and provided security for elections. More than 4,000 U.S. troops died fighting in the Philippines, while 47 Marines died in Nicaragua and 26 were killed in Hispaniola.22 Many thousands more Filipinos, Haitians, Dominicans, and Nicaraguans died as a direct result of the occupations.
Although the Caribbean interventions succeeded in keeping European competitors out of the region (a major strategic goal), they also left a troubled legacy for the United States. Haiti would fall victim once again to internal political strife and suffer through a series of brutal dictatorships. In the Dominican Republic, Marine-trained Rafael Trujillo used the Guardia Nacional in 1930 to seize and keep power until 1961. One historian has argued that the U.S. occupation of Cuba, in which Marines played a significant role, helped push Cubans toward communism and an alliance with the Soviet Union that precipitated the Bay of Pigs fiasco in 1961 and the Cuban Missile Crisis the following year.23
These wars’ immediate impact on the Corps was ambiguous as well. Most Marines embraced amphibious operations as the Corps’ future over counterinsurgencies and contingency missions. Promotion boards in the 1920s favored officers who fought in France over those who had not.24 Officers most associated with the “Banana Wars”—Waller, Butler, Pendleton—never became commandants. After retirement, Butler became a staunch antiwar advocate and authored War Is a Racket, a dark critique of U.S. foreign policy.25 On the other hand, the valuable experience in jungle fighting and close air support Marines gained would prove invaluable in many Pacific campaigns. Despite the Corps’ penchant for amphibious assault missions and training, once the transports left the beach the Tentative Manual for Landing Operations was of little use. Marines relied on small war veterans like Merritt Edson, “Chesty” Puller, and Hermann Hanneken, all of whom drew on their experiences in Nicaragua and Hispaniola to lead them successfully in vicious jungle fighting in the Pacific.26
For the past 70 years, counterinsurgency and contingency missions have dominated the Corps’ history.27 The Vietnam War, the numerous contingency operations of the 1980s and ’90s, and the two decades–long war on terrorism bear this out. Marines and soldiers have relearned over and over how difficult and unpopular these wars are. Once again, the services are moving away from counterinsurgency operations. But if the United States remains a world power, Marines will have to be ready for small wars missions in the future.
1. Jackson Lears, Rebirth of a Nation: The Making of Modern America, 1877–1920 (New York: Harper Collins, 2009), 279; Lester D. Langley, The Banana Wars: United States Intervention in the Caribbean, 1898–1934 (Wilmington, DE: Scholarly Resources Inc, 2002), xv.
2. Allan R. Millett, Peter Maslowski, and William B. Feis, For the Common Defense: A Military History of the United States from 1607 to 2012, 3d ed., (New York: Free Press, 2012), 282–83.
3. Andrew J. Birtle, U.S. Army Counterinsurgency and Contingency Operations Doctrine, 1860–1941 (Washington, DC: Center of Military History, 2009), 108.
4. Edward H. Crosby, “The Military Idea of Manliness,” The Independent, April 1901, 833.
5. Birtle, Counterinsurgency Doctrine, 181–82.
6. Annual Report of the Secretary of the Navy, 1914 (Washington, DC: Government Printing Office, 1915), 462.
7. Gordon L. Rottman, U.S. Marine Corps World War II Order of Battle: Ground and Air Units in the Pacific War, 1939–1945 (West Port CT: Greenwood Press, 2002), 15.
8. Hans Schmidt, The United States Occupation of Haiti, 1915–1934 (New Brunswick, NJ: Rutgers University Press, 1995), 64–65; Mary A. Renda, Taking Haiti: Military Occupation and the Culture of U.S. Imperialism, 1915–1940 (Chapel Hill, NC: University of North Carolina Press, 2001), 29–31.
9. Allan R. Millett, Semper Fidelis: The History of the United States Marine Corps (New York: Free Press, 1991), 192. Bruce J. Calder, The Impact of Intervention: The Dominican Republic During the U.S. Occupation of 1916–1924 (Princeton, NJ: Markus Wiener Publishers, 2006), 8–10; Keith B. Bickel, Mars Learning: The Marine Corps Development of Small Wars Doctrine, 1915–1940 (Boulder CO: Westview Press, 2001), 58–59.
10. Quoted report from an unnamed brigade commander in Brigadier-General George Barnett to the Secretary of Navy, Report on Affair in the Republic of Haiti, June 1915 to June 30, 1920, U.S. Marine Corps History Division (USMC HD), Quantico, VA.
11. Major Thomas C. Turner, “Report of investigation of certain irregularities alleged to have been committed by officers and enlisted men in the Republic of Haiti,” 3 November 1919, Haitian Geographic Files, USMC HD.
12. Bruce Calder, “Caudillos and Gavilleros versus the United States Marines: Guerrilla Insurgency During the Dominican Intervention, 1916–1924,” The Hispanic American Historical Review 58, no. 4 (November 1978): 656; see also Millett, Semper Fidelis, 196.
13. Calder, The Impact of Intervention, 149; Hearings before a Select Committee of Haiti and Santo Domingo, 2 vols., 67th Cong., 1st and 2d sess., 1922, 1119; Langley, The Banana Wars, 146.
14. Charles F. Merkel to Russell W. Duck, 2 October 1918, Charles Merkel Personnel File, National Personnel Records Center, St. Louis, MO; Mark R. Folse, “The Tiger of Seibo: Charles Merkel, George C. Thorpe, and the Dark Side of Marine Corps History,” Marine Corps History 1, no. 2 (Winter 2016): 4–18.
15. Breanne Robertson, “Rebellion, Repression, and Reform: U.S. Marines in the Dominican Republic,” Marine Corps History 2, no. 1 (Summer 2016): 47–50.
16. Col L. W. T. Waller to Col S. D. Butler, 13 July 1916, Butler Papers, Marine Corps Archives (MCA), Quantico, VA; Millett, Semper Fidelis, 187.
17. BGen Edwin Howard Simmons, USMC (Ret.), The United States Marines: A History (Annapolis, MD: Naval Institute Press, 2002), 112–14.
18. Jeffrey W. Meiser, Power and Restraint: The Rise of the United States 1898–1941 (Washington, DC: Georgetown University Press, 2015), 195.
19. Bickel, Mars Learning, 211–13; Millett, Semper Fidelis, 330–32.
20. Bickel, Mars Learning, 222.
21. Alan McPherson, The Invaded: How Latin Americans and Their Allies Fought and Ended U.S. Occupations (New York: Oxford University Press, 2014), 262.
22. For Philippine numbers, see Timothy K. Deady, “Lessons from a Successful Counterinsurgency: The Philippines, 1899–1902,” Parameters 35, no. 1 (June 2005): 53–68. For Hispaniola and Nicaragua, see Simmons, The United States Marines, 117; Max Boot, Savage Wars of Peace: Small Wars and the Rise of American Power (New York: Basic Books, 2003), 180.
23. Aaron O’Connell, “Defending Imperial Interests in Asia and the Caribbean, 1898–1941,” in America, Sea Power, and the World, James Bradford, ed. (Malden, MA: Wiley-Blackwell and Sons, 2016), 161.
24. Oral history transcript, Brigadier General Victor F. Bleasdale, interviewed by Benis M. Frank, 4 December 1979 (Washington, DC: History and Museums Division, Headquarters, U.S. Marine Corps, 1984), 160; Millett, Semper Fidelis, 323.
25. Smedley D. Butler, War Is a Racket, Adam Parfrey, ed. (Los Angeles: Feral House, 2003), 24.
26. Bickel, Mars Learning, 250.
27. Jeannie L. Johnson, The Marines Counterinsurgency and Strategic Culture: Lessons Learned and Lost in America’s Wars (Washington, DC: Georgetown University Press, 2018) 6–7.
Categories
The Korean War in 60 Seconds #shorts
