John McAdams with a doe his father shot during his first deer season at age 3.
When I was 3 years old, my family purchased 160 acres of land in East Texas. We spent a great deal of time camping there that spring and summer, and I had the time of my young life out in the woods with my father and grandfather. During that time, they had several discussions with me explaining that they were going deer hunting there during the fall and winter and that I wouldn’t be able to come with them.
However, when my grandfather came by the house early in the morning during opening weekend to pick up my father, I met them at the top of the stairs. I asked them “Are you going to the property?”
When they answered in the affirmative, I responded, “I’ll be right back.” Since neither of them had the heart to tell me that I couldn’t go, I got to go deer hunting with them then and every year thereafter.
I can’t remember many details of that deer season, only that it was a lot of fun and the start of many hunting trips for me. The downside of this is that my grandfather has not gotten a deer since I started accompanying them on hunts.
However, the joy of being with my father and grandfather out in the woods and the excitement of seeing deer made me a lifelong hunter. Even though he hasn’t shot a deer personally in the past few decades, my grandfather has shared in all of my hunting successes (and failures) since I joined their ranks, and I’m sure he considers that a fair trade.
Though it is a cliche, kids really are the future, and this is especially true with hunting. My grandfather was quite the sportsman in his day, but he is getting on in years and rarely hunts anymore. The fire inside him that burned with love for the outdoors would die with him if he did not pass that torch on for my father and me to carry.
John McAdams, his brother and grandfather pose with a little buck John shot while in eighth grade.
In addition to his love of the outdoors and his many great stories, my grandfather possesses a wealth of knowledge gained from hard-earned experience that would also go to waste without someone to share it with. Fortunately, he has been able to share most of these things with my father and me to continue the tradition.
Along with the sentimental reasons listed above, there are also practical reasons to introduce a kid to hunting. If you turn them on to the sport, not only will you have a potential hunting buddy for years, but they also will be among those who fund conservation efforts through their purchases of hunting gear and licenses as adults.
They are also more likely to vote for public officials and policies that support the continued access to hunting in the future. In short, continuing to expand the ranks of hunters is vital to allow future generations of Americans to enjoy the outdoors.
Yes, it is often times inconvenient to take a kid hunting. They generally have a shorter attention span than adults, and it is much more difficult for them to keep quiet and sit still for an extended period of time. For these reasons and others, having a kid with you makes it much more difficult to seriously hunt for a trophy deer.
However, it might be useful to take a different view of the situation. A kid generally does not get upset about shooting a doe or a young buck instead of a trophy deer. They enjoy hunting because of the pure, unbridled joy of spending time with “the boys” and enjoying the beauty of the outdoors.
They do not get caught up in whether they shot the biggest deer or if they are properly practicing quality deer management. A kid would probably be just as happy, or maybe even happier, after shooting a doe or a four-point buck as many adults would be after shooting a nice 10-pointer.
We would do well to follow their lead and stop getting caught up in all of the other distractions that often accompany the sport and start remembering why we started hunting in the first place: because it’s fun.
I am the hunter I am today because of the experiences I had as a kid while hunting with my father and grandfather. One day, I look forward to introducing my son or daughter to the outdoors and to hunting. Hopefully, they will gain the same appreciation for nature and wildlife that I have, and this may well be one of the biggest lasting contributions that I make as a sportsman.
Keep this in mind the next time you have an opportunity to take a kid hunting, and consider making an investment of your time now for the future of the sport.
I ran across this description of the battle of the JAVA Sea, and how roughly the Allies were handled by the Japanese. After Reading this, I can see why. And Our torpedo’s really sucked and I keep wondering how those turds were ever foisted on the Naval services, both the Submarines, Planes and Ship torpedo’s were garbage, now the Japanese Torpedo’s worked exceedingly well. I now know more about the battle of the Java Sea.
The ships left just before sunset on February 26, 1942, passing out of a harbor jammed with wreckage, battered docks, fires, the stench of burning oil, and Dutch women, children, and old men—most of them relatives of the crews heading out—waving their men goodbye and good luck. On the outgoing ships, there were answers back, American sailors cheering, Dutch sailors playing bugles, British and Australian warships hoisting their immense battle White Ensigns fore and aft, the heavy cruiser HMS Exeter’s loudspeaker system blaring a familiar song: “A-Hunting We Will Go.”
A combined force of American, Australian, British, and Dutch warships was heading out to sea from Surabaya Harbor in the Dutch East Indies to stop a massive Japanese force from invading the capital island of the 300-year-old Dutch possession. On this motley collection of warships stood all hope of stopping the Japanese advance.
Since the outbreak of war in the Pacific, Japan’s forces had proved virtually invincible. From Hawaii to Singapore, the emperor’s men had crushed all their opponents, conquering Hong Kong, Malaya, Wake Island, Guam, and most of the Philippines.
Now, like a giant octopus, their tentacles were spreading to surround Java, the administrative headquarters of the Dutch East Indies, their primary target in the invasion of Southeast Asia. Two prongs of Japanese warships, transports loaded with seasoned soldiers and powerful aircraft, were headed for Java’s opposing ends.
As Japan’s swords swung down on Java, the Allies had created their first joint command, called ABDA, for the American, British, Dutch, and Australian forces involved.
This attempt at a unified command turned out to be a disaster from the start because of its improvised nature, the lack of Allied forces, and the onrushing Japanese.
British Field Marshal Sir Archibald Wavell, commanding ABDA from Java, could only helplessly watch Japanese troops storm into Singapore, Sumatra, the Celebes, Borneo, and Timor before admitting that the idea was a failure. He fled to Ceylon, leaving Dutch Admiral C.E.L. Helfrich in charge of a dwindling and poorly equipped band of British, Dutch, American, and Australian troops, airmen, and sailors.
There were good reasons for that. The Dutch troops in the Indies were among their best, the King’s Netherlands Indies Legion, a veteran force that had policed the colony for centuries, battling native uprisings. And while the Dutch airmen flew poor aircraft like Brewster F2A Buffalo fighters that were easy meat for Japan’s nimble Mitsubishi Zero fighters, their long-service sailors manned modern destroyers, highly effective submarines with torpedoes that worked (unlike their American counterparts), and two tough light cruisers, the East Indies fleet flagship De Ruyter and her older sister Java.
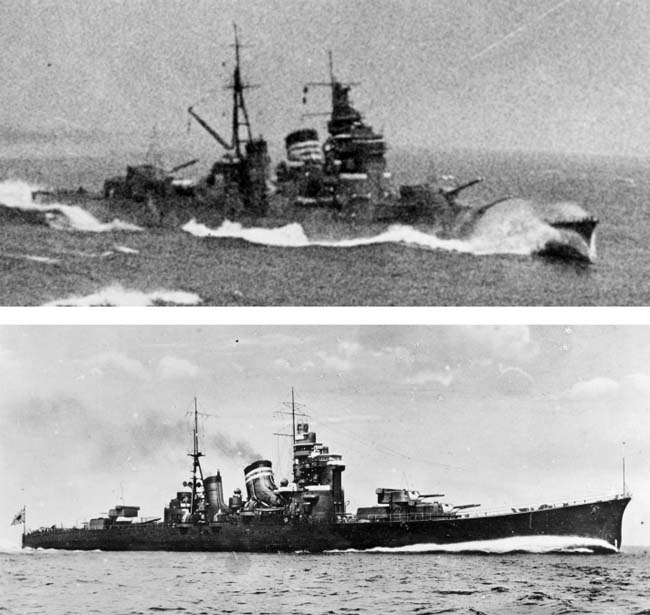
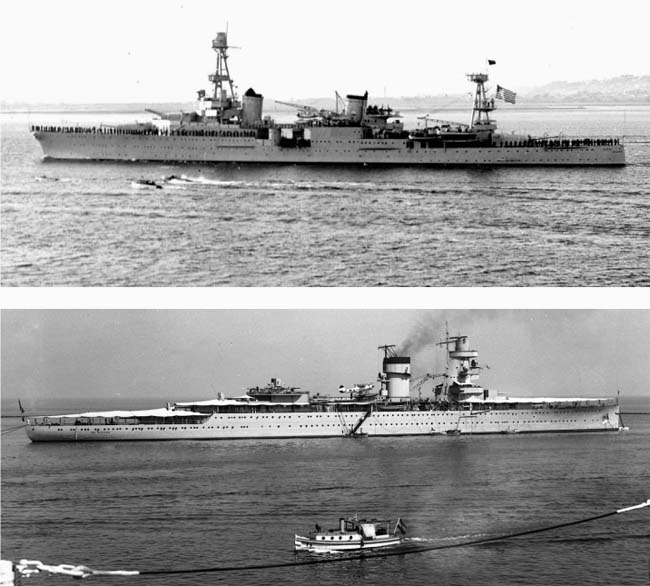
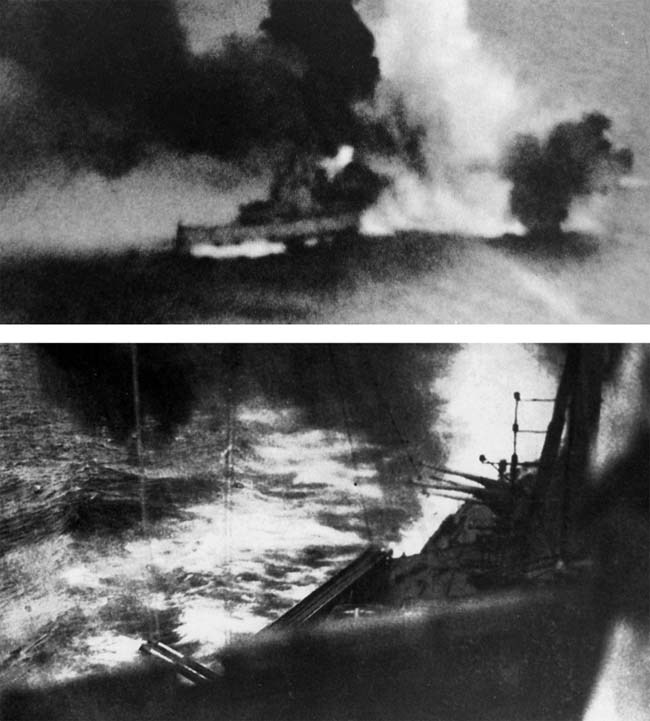
TOP: The Japanese heavy cruiser Haguro steams at high speed. Haguro was one of the cruisers engaged at the Battle of the Java Sea guarding transports and firing its heavy guns and torpedoes. ABOVE: The Japanese heavy cruiser Nachi was heavily engaged at the Battle of the Java Sea as the Imperial Japanese Navy inflicted a stinging defeat on ABDA naval forces.
Equipped with two seaplanes, depth charge launchers, torpedoes, and the sophisticated Hazemeyer fire control system for her seven 5.9-inch guns and her 10 40mm antiaircraft guns, De Ruyter was built specifically for East Indies service. Now De Ruyter’s hour had come. She would not be the only defense of Java. The surviving ships of Britain’s Far Eastern Fleet, Australian warships, and the U.S. Asiatic Fleet had been
ordered under Dutch command into “ABDA Float,” which created additional punch.
Among the ships was the heavy cruiser USS Houston, the Asiatic Fleet’s longtime flagship, distinctive by her tall foremast, and HMS Exeter, which had run the German pocket battleship Graf Spee into Montevideo in 1939.
The British provided the light cruisers Danae, Dragon, and Durban, Australia the more modern light cruisers Hobart and Perth, and the Americans the old light cruiser Marblehead and new Boise. The British, Americans, and Dutch also offered a collection of destroyers.
But there were still numerous weaknesses. The British and Dutch destroyers were fairly modern ships. The three elderly British light cruisers were withdrawn. USS Boise ran aground on an uncharted reef, tore up her keel, and had to be sent home, taking her radar with her. Marblehead endured numerous bomb hits and had to depart as well.
When the Japanese attacked Houston with medium bombers, the American cruiser’s crewmen discovered that most of her antiaircraft shells were duds. Before Boise headed for stateside yards, she handed over all her AA ammunition to Houston.
The Australian cruiser HMAS Perth was a survivor of the disaster at the Battle of the Java Sea but was lost in action at the Battle of Sunda Strait a month later.
The heavy cruiser badly needed it—she had seen endless action in the weeks since Pearl Harbor. Worse, a Japanese bomb had slammed through her quarterdeck and exploded in the base of her aft 8-inch turret. Quick work by a veteran crew prevented a fire that would have sunk the ship, but the three aft 8-inch guns were put out of action, and Java lacked any facilities to repair them.
To make matters worse for the four navies concerned, they had no common ammunition, language, communications, or procedures. While the British and Australians shared the same procedures, and the Americans, Australians, and British the same language, there were still great differences.
Rear Admiral Karel Doorman, who commanded the surface naval forces of ABDA, had to use simple flag or radio signals to communicate with his ships’ captains. Doorman could signal by blinker light in plain English, but in battle, with smoke and confusion, that was dangerous. He would then relay his orders by high-frequency radio to Houston, where a Dutch liaison officer would translate them to Houston’s skipper, Captain Albert Rooks.
He in turn could relay them by American “Talk-Between Ships” short-range radio to other American vessels, but that did not help the British or Australians, whose flag signals were different from those of the Dutch and the Americans. An American officer called the communications situation “farcical.”
Lieutenant Harold Hamlin of Houston put it bluntly: “Everyone knows you cannot assemble 11 football players who have never seen each other before and go out and beat Notre Dame. Two hours after it assembled, it was out on patrol.”
But that was all the Allies had, and they defied Japanese strength and odds. In January, four ancient American four-stack destroyers swooped in on a collection of Japanese transports anchored off Balikpapan and sank three of them, a morale-boosting victory. American and Dutch submarines knocked off the occasional freighter, and Admiral Doorman himself led a night strike in Badung Strait on Japanese shipping on February 19.
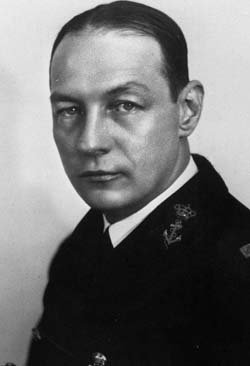
Doorman, 53, a Utrecht native, had been a naval officer since 1910 and a pilot since 1915; he was one of the Dutch Navy’s first flying instructors. In 1938, he headed the Dutch Navy’s air arm. In 1940, he was promoted to rear admiral and assigned to command the fleet forces in the East Indies.
An experienced deck sailor, he had a logical and sound approach to problems and understood the value and impact of airpower in the modern age.
He led his ships to Badung Strait in three packets, relying on darkness to cover his advance, attack, and retreat. Chaos reigned from the start. A Dutch destroyer ran aground. The three packets could not communicate with each other. Allies and Japanese hurled broadsides and torpedoes back and forth, but the only result was the damaging of a Japanese destroyer, the same to the American destroyer Stewart, and the sinking of the Dutch destroyer Piet Hein.
Doorman took his ships home to Java’s main naval base, Tjilatjap, and Stewart was placed in a 15,000-ton floating drydock where she promptly rolled over on her port side, taking the destroyer and the drydock out of the game. The Japanese captured Stewart after conquering Java and use her for the rest of the war as a patrol ship.
TOP: The cruiser USS Houston sustained damage at the Battle of the Java Sea but was later sunk at Sunda Strait. ABOVE: The Dutch cruiser De Ruyter was a casualty of the Battle of the Java Sea, sunk by enemy gunfire and effective Long Lance torpedoes.
The remaining vessels prepared for the next round, but it was difficult. American destroyers’ numbers were being whittled down: Stewart was gone, Whipple was out of action from a collision, Pillsbury and Parrott were out of torpedoes and needed overhaul, and Pope had developed feed-water leaks—she was losing more water from her condensers than they could take in.
The Americans could only marshal four destroyers, all “flush-deckers” from the 1920s: Ford, Edwards, Alden, and Paul Jones. They lacked an elevated forecastle, so they could not fire their forward 4-inch gun in rough seas or at top speed. On Houston, engineers shoved the wrecked after 8-inch turret into normal position and slapped a steel roof over it, hoping to fool the Japanese into believing it was operational.
Meanwhile, the Japanese forces descended on Java. From the west came 56 transports and freighters guarded by four heavy cruisers, two light cruisers, and a light aircraft carrier. From the east came 41 transports covered by two heavy cruisers, one light cruiser, and seven destroyers, under Rear Admiral Takeo Takagi, a fairly routine officer by Japanese standards.
Behind this power, as deep cover, was even more power: the mighty carriers that had shattered the American battle line at Pearl Harbor, a battleship, and nine more heavy cruisers.
Takagi’s force got down to business on February 26, forming a two-column convoy with ships a mile apart, the convoy 20 miles long. The merchant ships were handled poorly by ill-trained civilian crews, and Japanese destroyers struggled to keep order.
Dutch Admiral Karel Doorman, photographed in 1930, was killed in action while commanding ABDA naval forces at the Battle of the Java Sea.
Among the tin cans shepherding these vessels was the Amatsukaze, under Commander Tameichi Hara, who was annoyed at the merchant vessels’ lack of discipline. They emitted huge clouds of black smoke, ignored blackout regulations, and defied rules on radio silence.
“The weather was beautiful; sparkling sun by day, and bright moonlight silvered the sea every night. Even at night, trained eyes could span the length of the entire force. Five Allied submarines had been observed by our reconnaissance planes, but none menaced our ships. To this day, I do not understand why enemy submarines failed to come out,” Hara wrote later.
Actually, there was a good reason. The American submarines’ torpedoes stubbornly refused to work, so the sub skippers were reduced to reporting on the Japanese movements, which were confirmed by British codebreaking teams operating in Ceylon and London.
With this information in hand, Doorman could prepare. He recalled Exeter, Perth, and three destroyers from Tandjong Priok in western Java to Surabaya, and crewmen on Pope, watching the Anglo-Australian ships steam in, their White Ensigns flying, let out hearty cheers.
When Exeter tied up and shifted colors, her skipper, Captain Oliver Gordon, was summoned with his Perth counterpart, Captain Hector “Hec” Waller, to meet with Doorman and the other senior officers at Dutch naval headquarters, the requisitioned Netherlands Indies Electricity company building. All hands showed up in proper uniform, befitting long-service officers.
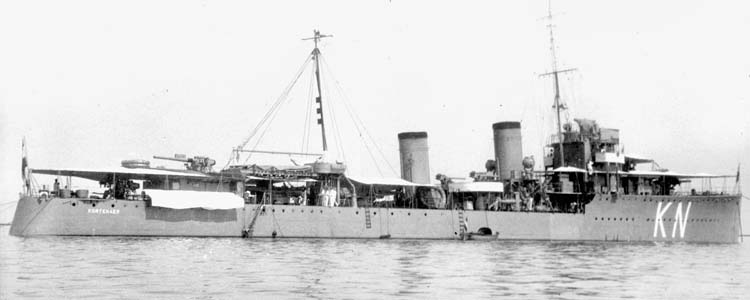
Doorman shook hands with every ship captain. He gave the briefing in English, but there was not much to say. He intended to leave harbor and attack the enemy convoy southwest of the Celebes. With Houston’s after gun turret knocked out, she would not be the last ship in line. With the Dutch destroyer Kortenaer suffering leaking boilers, the whole fleet’s top speed would be 25 knots.
On the evening of the 26th, Doorman’s Combined Striking Force sailed from Surabaya, battle flags streaming. Chaos reigned again as De Ruyter collided with a tug and water barge in the harbor, sinking both, but doing no damage to the flagship. They found no enemy forces, and by noon the destroyers were short of fuel. He headed back to Surabaya to refuel, dodging Japanese bomber aircraft on the way home. Houston’s new AA gun load helped fend off the Japanese.
When Doorman reached port, there were messages from Helfrich ordering him back to sea as soon as fueling could be completed. The Japanese were definitely on their way.
Doorman signaled back: “This day the personnel reached the limit of endurance. Tomorrow the limit will be exceeded.” But at 2:27 pm on February 27, the Combined Striking Force headed for sea once again, following a contact report that put the Japanese convoy just 90 miles to the north. Doorman signaled his ships in a plain English semaphore: “Am proceeding to intercept enemy unit, follow me, details later.”
The Striking Force formed up into two columns—one led by Doorman on De Ruyter, with Exeter, Houston, Perth, and Java trailing. The British destroyers steamed ahead of De Ruyter as a screening force, while the American and Dutch destroyers were a separate column on the cruisers’ rear and port quarter, held back by their older engines and kept back because of their weak armor, which made them susceptible to enemy fire.
The American four-pipe destroyers coughed up black smoke.
On the other side, Japanese reconnaissance planes were hard at work searching for Doorman’s force. Takagi had issues of his own. His combat group consisted of heavy cruisers Nachi and Haguro, the light cruiser Jintsu, and eight destroyers, including Hara’s Amatsukaze. The two forces were evenly matched, but Takagi had the burden of escorting 41 transports and freighters.
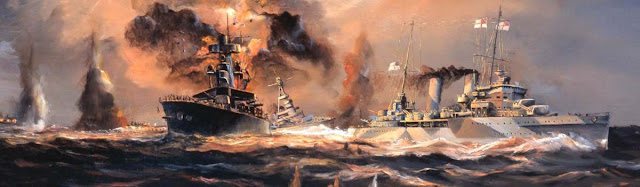
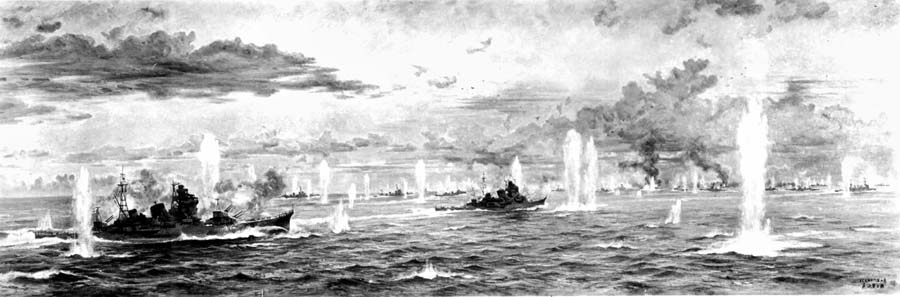
A depiction of the action at the Battle of the Java Sea
Takagi followed Doorman’s movements closely, mystified by his slow advance (12 knots) and odd courses.
There was reason for that. As the afternoon wore on and the Allies lost touch with the Japanese, Doorman was concerned that his battered ships and exhausted men might simply get ambushed. He decided to head back yet again for Surabaya and refuel and take on more ammunition.
At 3 pm, Doorman stood on his flagship’s bridge, heading into Surabaya’s outer harbor. At that moment, he received a signal from Helfrich. The Japanese Eastern Force had been sighted north of Surabaya near Bawean Island. Helfrich was ordering Doorman to attack immediately.
Despite his fatigue and that of everyone else in the fleet Doorman followed orders, signaling, “Follow me. The enemy is 90 miles away.” The ships turned back into the preset formation and shuffled north without refueling.
As Doorman’s ships headed north, the Japanese had their eye on them. One of Nachi’s scout planes reported to Takagi: “The enemy fleet has turned around again. The double column formation is now shifting to single column. The enemy is gaining speed and is headed on a course of 20 degrees.” A signal 10 minutes later confirmed the Allied speed: 22 knots.
Takagi reacted immediately. He shot off his cruisers’ remaining observation planes, ordered his minesweepers and patrol craft to herd the transports into order and away from the Allied fleet, and formed battle line: Rear Admiral Raizo Tanaka’s light cruiser Jintsu heading the eight destroyers, behind that another flotilla headed by the light cruiser Naka with six more destroyers under Rear Admiral Shoji Nishimura, Nachi and Haguro behind them.
Next, the human preparations: sailors put on working uniforms and helmets, officers white dress uniforms; many men went to their ship’s shrines for a quick prayer and to don hachimaki headbands, and finally, immense Rising Sun battle ensigns were broken from every masthead.
At 3:30 pm, the visibility was perfect, the sea was calm, and the two forces pounded toward each other, heading into the biggest surface action since the Battle of Jutland in 1916.
At first the officers on Exeter thought they had spotted the invasion convoy and not its screen, but then Electra reported at 4:12 pm: “One cruiser, unknown number large destroyers bearing 330 degrees, speed 18, course 220 degrees.” Electra had spotted Jintsu and Amatsukaze.
On Amatsukaze, Warrant Officer Shigeru Iwata, one of Hara’s top lookouts, yelled “Enemy ship!” and everyone trained their binoculars to the south. Hara recognized the lead cruiser from his recognition books as De Ruyter, and Iwata confirmed it: “De Ruyter is 28,000 meters [20 miles]. Closing rapidly.”
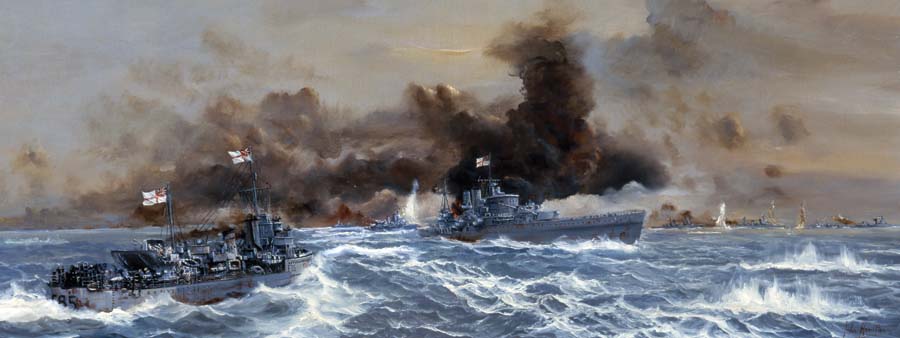
In defense of the damaged cruiser HMS Exeter, the British destroyers Encounter, Jupiter, and Electra dash toward the enemy amid a smokescreen at the Battle of the Java Sea. Painting by John Hamilton.
Hara yelled, “Gunners and torpedomen, get ready. Our target is the lead cruiser in the enemy column!” Hara realized he was heading into his first major sea battle.
At 4:14 Electra reported: “Two battleships, one cruiser, six destroyers.” Before the various officers had time to react, Electra amended the report: “Two heavy cruisers.”
Heavy cruisers they were. At that moment, Nachi and Haguro entered gun range, and at 4:16 pm both cruisers opened a full broadside with a combined 20 8-inch guns at a range of 28,000 yards. The Allied ships answered back, with Houston’s after turret silenced by damage and Exeter’s simply unable to train on the Japanese, who were trying to cross Doorman’s “T,” the oldest naval maneuver to gain tactical supremacy since the invention of gunpowder.
Now the problems of communication came in. In the Royal Navy, ships did not open fire until the senior officer gave the word, and Doorman had not done so yet. On Exeter, Gordon puzzled over what to do. “Had we been in company with a British Senior Officer, I could and probably would, have hoisted a very brief flag signal—if I had received no order—asking permission to open fire but in this case I knew the limitations of inter-ship communication.”
The first Japanese 8-inch shells fell short at 30,000 yards. The Japanese gunners were too excited. This was their first surface action.
Doorman ordered course 20 degrees left to parallel the Japanese ships, putting the three leading British destroyers on the cruisers’ starboard bow. The Japanese hurled shells at Electra, and Doorman ordered the destroyers to head to the Allied column’s port side to await their moment with their torpedoes. He also sent a radio message to Surabaya for air support, but the few bombers the Dutch and Americans had on Java headed straight for the transports.
Now Doorman gave the order, and the two Allied heavy cruisers opened fire. Houston’s shells had a crimson dye to assist spotting, and the blood-red geysers of her first short shots frightened some Japanese officers on Nachi. The concussion of Houston’s guns opening fire hurled Winslow against a bulkhead and ripped his “soup-bowl” steel helmet from his head. Winslow, shaking with excitement, recovered his tin hat and realized that his tension of waiting for battle had ended.
On the Japanese side, Jintsu led her column directly toward Electra. At 18,000 yards, her group opened fire and straddled the British destroyer. Electra and Jupiter opened up at 16,000 yards and straddled the Japanese.
The last ship to open fire was Perth, at the tail of the Allied line, equipped with 6-inch guns. Captain Waller told an officer on the bridge that waiting for his moment to open fire in a surface engagement was more terrifying than enduring the Luftwaffe’s bombing in the Mediterranean.
After eight minutes, Doorman changed course at 4:29 pm to 248 degrees, so that both columns were parallel and the Allied light cruisers could open fire. All of the ships were being straddled. Nobody was scoring any hits yet.
At 4:31, the Japanese scored a hit; an 8-inch shell slammed into De Ruyter’s armored deck and down into her auxiliary engine room where it failed to explode. Four minutes later, Doorman closed the range on a course of 267 degrees, at which point Nishimura, aboard the light cruiser Naka, ordered his seven destroyers forward to unleash 43 “Long Lance” torpedoes at the enemy. The rest of the fleet joined in as well, except Nachi, whose crew had left the stop valve on their compressed oxygen system open too long by accident.
Houston had a reputation as one of the U.S. Navy’s best gunnery ships, but her rangefinders were outdated by World War II’s rapidly advancing standards. She lacked radar and remote-control servo motors to enable crews to train and elevate guns without using sweat and muscle. Ranges were triangulated visually. In the overheated gun houses in the dim red light, 70 gunners cranked wheels to train guns, open breeches, and stuff shells and powder bags.
On the fifth salvo, a fuse box was jarred loose from the Turret One bulkhead, disabling the electro-hydraulic ramming mechanism. The crew now had to load and ram the breech by hand, an almost impossible task in peacetime. But they accomplished it in wartime, almost keeping pace with Turret Two, for 65 salvos until repairs were accomplished.
Up above, Lieutenant Winslow watched the shellfire and saw the dull red glow of exploding shells. Convinced Houston had beaten up the enemy, he yelled down a voice-tube into the turrets, “We’ve just kicked hell out of a 10-gun Jap cruiser.” The men cheered back. One of the enemy cruisers seemed to withdraw.
But then, a frayed electrical lead in the forward main gun director, abetted by the whipping back and forth of the towering foremast housing, caused problems with gunnery deflection adjustments. Houston’s rangefinders and gunners no longer knew where their shells would land.
While this went on, a Japanese shell hit Houston’s main deck aft of the anchor windlass, zoomed through the second deck, and out the starboard side above the waterline without exploding. Another hit ruptured an oil tank on Houston’s port side after, but it failed to explode. The Americans wondered if the Japanese suffered from dud shells, too.
“Salvo after salvo exploded into the sea around us,” Lieutenant Winslow wrote. “I was mesmerized by the savage flashes of enemy guns, and the sigh of their deadly shells flying toward us like giant blackbirds.”
The Dutch destroyer Kortenaer was among the ABDA ships sunk in a hail of Japanese shells and torpedoes during the night Battle of the Java Sea in February 1942.
Meanwhile, Exeter took 12 salvos to get a straddle. Then Gordon saw the orange flash of a shell bursting on a cruiser’s superstructure. He yelled, “That’s a hit!” It sure looked like one to everyone, but it wasn’t … the Japanese cruisers suffered no damage in the action. The destroyer Asagumo did—an Allied shell hit her, killing five and wounding 19, disabling her engine.
Exeter, on the other hand, did take hits. At 5:07 pm, a shell passed through the S2 4-inch gun shield and killed the four members of the gun crew. The shell kept going and entered the No. 1 boiler room ventilator and exploded in the boiler room, killing all 10 of its crewmen. Steam vented through the waste pipe, and Exeter began losing speed. It felt like “a mighty can-opener being driven into the ship.”
Six of Exeter’s eight boilers were put out of action. Electrical power failed, and the cruiser’s speed fell to 11 knots. Damage control parties moved in, but the great heat from the explosion and superheated steam made it impossible to enter the boiler room until the next day.
Gordon realized his ship could not hold its place in line at 11 knots, and he altered course to port to get out of the battle line and avoid collision. Unfortunately, the shellfire and concussion had knocked out Houston’s TBS radio and damaged her signal lights. Heavy smoke obscured her alphabet flags and halyards, as well as the Aldis lamps used for signaling. Commander Henry E. Eccles, skipper of the destroyer Edwards, wrote, “From then on, all communication was by flashing lights obscured by gun smoke, smoke screens, and hampered by rapid movements.”
Not knowing what was going on, thinking he had missed an order from Doorman, Rooks followed Exeter in column, turning to port. As Houston turned, the ship had to check fire. On Perth, Waller, seeing the two cruisers ahead of him maneuver and Exeter blow off steam, headed in a counterclockwise loop to the north to cover the heavy cruisers’ retreat with a 30-foot wall of smoke that gave them a reprieve, while Java followed Houston.
Doorman, sailing off without a column behind him, heeled De Ruyter over to port and closed Exeter, signaling, “What is your damage?”
Gordon flagged back: “Hit in one boiler room. Maximum speed 15 knots.” Doorman ordered Exeter to head for Surabaya and reformed the other cruisers on a northeasterly course.
Before anyone had much time to react, smoke, squalls, and fog came down on the action. Doorman retired at 5:20, trying to regroup. Nobody on the Allied side seemed to know what was going on. Eccles wrote later, “The crystal ball was our only method of anticipating the intention of Commander Combined Striking Force.”
Tanaka, however, took advantage of the squalls and Allied confusion, ordering eight destroyers to “to close and charge the enemy” behind his cruiser Jintsu to hurl torpedoes and shells at the nearest Allied ships, the American destroyers.
The Allied ships opened fire at 7,000 meters, and in seconds everybody was covered in smoke—American smoke screens on their side, missed Allied shells on the Japanese side. The Japanese closed to 6,000 meters, then 5,000 meters, and a tense Hara gripped the rail of his bridge, sweat streaming down his face, his knees trembling.
At 5:27, Tanaka ordered his ships to open fire. Hara yelled “Fire torpedoes!” As the Long Lances swished through the water, the Allied ships turned to the west.
The Japanese torpedo salvo finally closed its targets, and at least one smacked home, blasting the Dutch destroyer Kortenaer. The 1928-built destroyer jackknifed in two and sank almost immediately, scattering survivors—including her skipper—across the water. It was the first time the Allies had met up with the Japanese Long Lance torpedo in a surface action, and all hands were stunned.
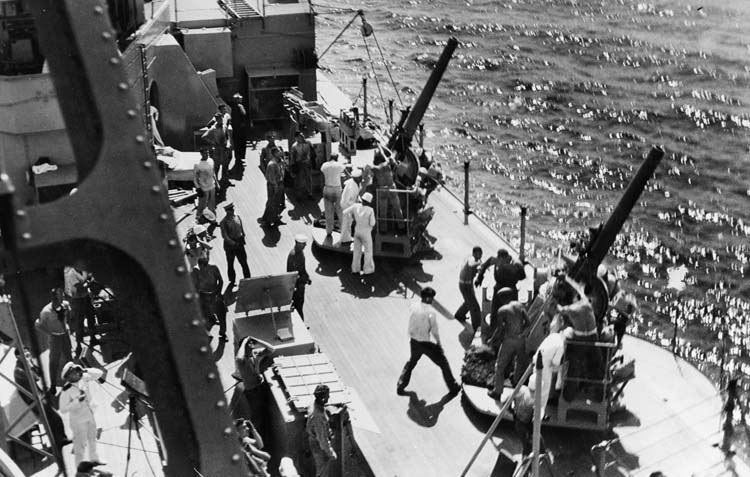
The 5-inch antiaircraft gun crews of the cruiser USS Houston dash to their posts during a firing exercise. The Houston was reported sunk several times before the ship was actually lost at Sunda Strait.
On Houston, Ensign Smith watched Kortenaer’s two split sections slide into the water, looking like the twin towers of a cathedral.“There was only 15 or 20 feet separating her bow from the stern,” he said later. Another seaman next to Winslow yelled, “Jesus Christ, look at that!” Winslow saw a tremendous geyser of water rising 100 feet into the air.
Lieutenant Commander A. Kroese, commanding Kortenaer, reported later, “On the stern the doctor was sitting, dressed in a khaki suit, life belt and steel helmet. As a result of the explosion, the smoke apparatus had begun to work and heavy white clouds were rising from the ship. The doctor sat in the midst of it all like some kind of fire-god.
“After a short time the stern turned over on its side, and those who were still clinging to it jumped hastily into the sea. Soon half of the Kortenaer sank from sight, but the bows of the ship floated for a long time sticking straight up in the air.
“After the ship had gone down, a number of rafts, sufficient to support all the survivors, began to float up. The Commander gave orders to tie the rafts together so that we would form a group easily visible to a rescuer…. Our situation was far from comfortable, for much of the surface of the water was covered with a heavy film of black fuel oil from the ship’s bunkers.”
With Kortenaer sunk and Exeter severely damaged, Doorman’s battle plan and fleet were in serious trouble, even though the Japanese had scored only one hit out of 64 torpedoes launched. Doorman turned his flagship to join his other ships and regroup. Everybody on the Allied ships wondered how they could have been torpedoed at such an incredible distance from the Japanese warships. Not knowing about the Long Lance, the Allied skippers presumed there were Japanese submarines in the neighborhood.
Splashes from Japanese shells bracket the Dutch cruiser Java during the Battle of the Java Sea. The ship fell victim to enemy torpedoes and sank during the February 1942 fight.
On the other side, Nishimura’s 4th Destroyer Flotilla maneuvered to port to link back up with Tanaka’s ships for another attack. Doorman responded by ordering his ships to follow him southeast and then northeast, spewing smoke to cover his moves, to put his main force between the enemy and the battered Exeter, giving that cruiser a chance to escape.
As the Japanese regrouped, Doorman realized he had to strike first, sending in his three British destroyers, Electra, Encounter, and Jupiter, to make independent attacks. After doing so, they would join the Dutch destroyer Witte de With and escort Exeter to Surabaya.
On Electra, Commander C.W. May told his men on the main loudspeaker at 5:25, “The Japanese are mounting a strong torpedo attack against the Exeter. So we are going through the smoke to counterattack.” While this went on, Exeter’s crew restored power to the guns and steam to 15 knots. With that, her guns opened fire on Jintsu, which made smoke and maneuvered away from Exeter’s 8-inch shells.
Electra, ahead of her sisters, sprinted forward to the northwest, into the smoke, and emerged through the murk and gloom to find the pagoda-like superstructure and bulbous funnel tops of Jintsu leading six destroyers toward her. Gunner Cain felt naked to the enemy.
The Japanese opened up with dozens of shells, most of which were near misses that rocked the destroyer. Electra returned the fire, gun crews doing so with veteran experience. But a Jintsu shell hit below the bridge, followed by more that broke the after boiler room mains, and Electra slowed to a halt. A Japanese destroyer blazed away at the immobile British ship, but Electra fired torpedoes back—to no avail. All of them missed.
Jintsu poured more shells into Electra, and Gunner Cain fired his turret under local control. Soon the guns were out: A Turret knocked out … B Turret evacuated when a fire started beneath it … the searchlight platforms demolished … a fire started aft that blocked ammunition supply to the X and Y Turrets … the ship’s whaler and motor boat smashed. Commander May ordered “Abandon ship.”
Electra’s self-sacrifice saved Exeter and scored a single hit on Jintsu that killed one man and injured four, and also bought time for Encounter and Jupiter to pop through the smoke and hurl torpedoes at the Japanese.
Encounter’s skipper, Lt. Cmdr. Morgan, saw the hordes of Japanese ships and heeled his destroyer hard over after launching torpedoes, followed by Jupiter and Witte de With. The three tin cans formed up around Exeter to escort the battered cruiser out of harm’s way. On the way, Witte de With was damaged when one of her depth charges broke loose in the maneuvering, fell overboard, exploded abaft, and shook the ship like a hammer blow.
Up on De Ruyter’s flag bridge, Doorman faced more impending disaster. As Exeter steamed off, she took six 8-inch guns, half of Doorman’s such armament. With Electra and Kortenaer sunk, Doorman was down to six destroyers.
Doorman reformed his line to find himself on the Japanese side of the smoke screen, parallel to the heavy cruisers Nachi and Haguro. The Japanese cruisers closed the range and opened fire, aiming at Houston.
Now it was the American ship’s turn to be in trouble, as she was running short on ammunition. Houston had sortied without time to rebunker her magazines, and now had fired off 303 rounds per turret, leaving only 50 rounds per gun.
Most importantly, the remaining shells were in the aft magazine for the useless No. 3 Turret. Chief Petty Officer Otto Schwarz and his shipmates hauled greasy shells out of storage racks abaft and hand carried the 260-pound projectiles in slings through the narrow passageways and up ladders, across decks, and into the two forward handling rooms.
In addition, the life of an 8-inch gun of the time was about 30 rounds. That level had been exceeded, and the liners of the gun barrels had crept out of the guns an inch or more. The gun casings were so hot it would be hours before they could be touched.
Doorman would not give up. Neither would the Japanese. The Japanese ordered their transports to turn south and head for Java’s beaches while the combatant ships polished off the Allied Striking Force.
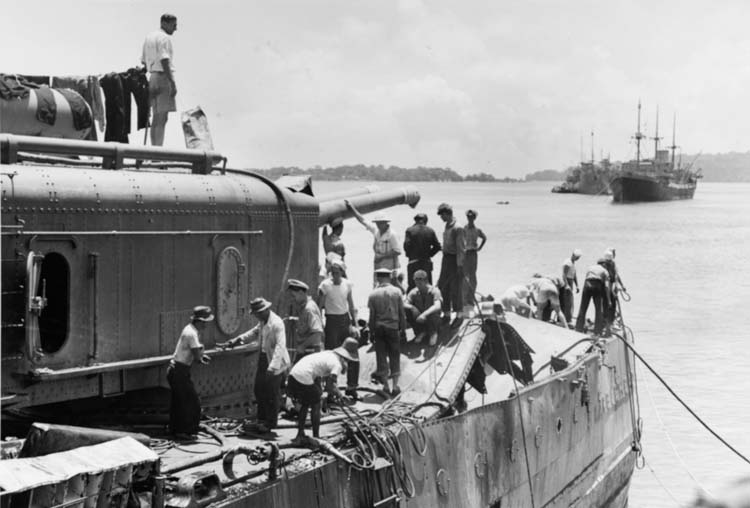
Crewmen of the cruiser USS Marblehead view damage from a Japanese bomb hit. Marblehead managed to limp into port after sustaining the damage.
At 6 pm De Ruyter’s after port lookouts spotted Jintsu. The Dutch cruiser opened fire, but the gathering dusk and smoke obscured the Japanese. The Japanese closed to 4,400 yards of the Allied ships and launched torpedoes. The Japanese ships heeled over to avoid the shells that their officers knew would be returned. Doorman, realizing the danger, ordered his ships to turn south, and the torpedoes shot harmlessly past his ships.
At 6:21, the sun set on the battle, but the fighting went on through twilight. In the dark, Allied communications worsened—signal lights were broken from shellfire damage, and flags were useless. At 6:06, De Ruyter signaled Edwards with her signal lamps to “Counterattack.” Moments after Edwards acknowledged the order, De Ruyter flashed “Cancel counterattack,” followed by “Make smoke.”
Commander Binford of Edwards was baffled. As leader of the American destroyers, he had taken them on the requested counterattack course. Then came a last signal: “Cover my retirement.” Binford was even more puzzled. Did that mean make smoke? Steam protectively across Java’s stern as it turned away? Binford decided that the only way to cover a cruiser column’s retirement was with the greatest U.S. Navy tradition: attack, even though his ships were 32 years old.
Binford’s tin cans charged toward two ships visible in the dusk to the northwest—the cruisers Nachi and Haguro, which were guarding the invading transports. On the U.S. destroyer Alden’s bridge, a sailor said, “I always knew these old four-pipers would have to go in and save the day.”
Up on Nachi’s bridge, Takagi saw the American destroyers advance. He could also see Surabaya’s lighthouse in the distance, its glass windows reflecting in the sunset.
Binford ordered his destroyers by flag signal to make a torpedo attack. The tin cans raced through the smoke, nearly colliding. They sprinted through and cracked on top speed, set up for broadside torpedo attack on the Japanese cruisers to starboard, and Binford ordered the fusillade of fish. Then Binford’s destroyers changed course 180 degrees, maintaining full speed to fire their port tubes at the Japanese.
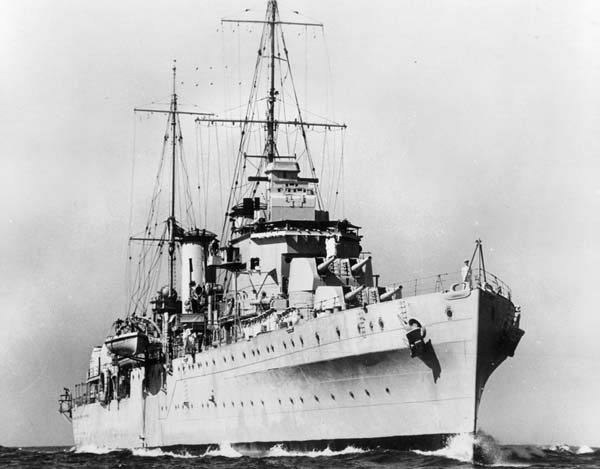
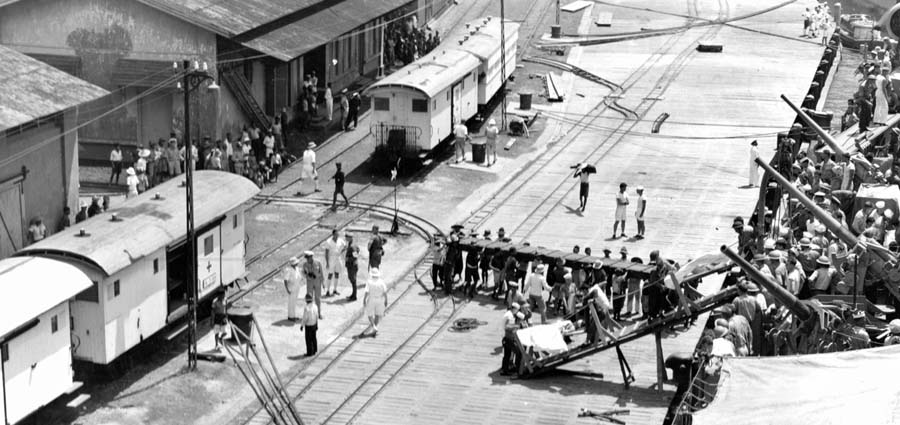
Wounded crewmen of the cruiser USS Marblehead are removed from the ship after coming into port in Java. The elderly Marblehead was an obsolete design at the beginning of World War II.
Incredibly, all the American torpedoes missed. The Japanese changed course to “comb” the American torpedo tracks and avoided damage.
Binford ordered his ships to full speed to clear the area, steaming off at 32 knots into the darkness toward Doorman. As the destroyers closed with Doorman, Binford saw a new signal from the Dutch admiral: “Follow me.”
Binford was happy to comply but wondered what was going on now.
The American torpedo attack had accomplished little materially but put a little fear into Takagi. The American counterthrust had not damaged any of his ships but showed that they were still fighting and could inflict more damage. They were not routed.
Takagi tried to figure out what Doorman would do next: he might break off and head for Surabaya for fuel and ammunition or head around to the north and attack the transports. Worrying about the latter possibility, Takagi broke off the action and turned away to guard his transports.
Doorman saw Nachi and Haguro turn back and at 6:30 radioed Helfrich at Lembang: “Enemy retreating west. Where is convoy?” Helfrich radioed that he had no current information.
Across the water, the Japanese were confused, too. Amatsukaze’s skipper, Tameichi Hara, wrote, “Almost every man in Tanaka’s Destroyer Squadron 2 was disgruntled at the order to break off action. Our ships had not expended as much ammunition as the others and I also felt that we had forfeited a chance of giving hot pursuit and finishing off the enemy.”
Even so, Takagi took advantage of the break to recover his five seaplanes—a difficult task in peacetime, let alone wartime—which left them nearly immobile when Doorman’s force reappeared.
At first, Takagi and his crews thought the approaching ships were the Japanese battleships Haruna and Kirishima of Battleship Division 3, which had been in the Indian Ocean only two days before. It was unlikely such ships, no matter how powerful their engines, could have reached the Java Sea in such time.
On Nachi’s bridge, an officer asked that very question, and Commander Ishikawa screamed in rage, “Damn! Those are enemy ships, and four of them are heading toward us. They are only 12,000 meters away.”
Takagi’s men were no longer at action stations, and it took him three minutes to realize the situation. Biting his lip, Takagi ordered his men back to action stations. Bugles and loudspeakers gave the order, warship engines cranked up to battle speed, and the heavy cruisers made smoke to hide their movements. It took three minutes for the fleet to haul in the last seaplane and power its engines up. With only two cruisers against four Allied cruisers, Takagi knew he was outnumbered. And the enemy might be headed for his transports.
Doorman had set off to the northeast, then to the northwest, groping in the dark to find the enemy. He had no idea Takagi’s ships were sitting there, recovering aircraft. He was down to four cruisers and the British destroyer Jupiter in column; Exeter and her two escorts were headed for Surabaya. The four American destroyers were in a separate column, trying to keep up, lacking torpedoes and running short of fuel.
The new skirmish broke out when Jintsu dropped a flare to illuminate the target. At 7:33 PM, Perth and Houston opened fire, but their shells fell short.
The Japanese hit back with star shells to further illuminate their target. On Perth, Waller saw the flashes in the enemy column and assumed they were torpedoes. He ordered a harsh turn to starboard, and all the Allied ships did the same. Both sides checked fire. On Houston, Winslow and his shipmates saw the flares burst over their heads with an eerie, greenish light. “Helpless as pinioned ducks in a shooting gallery, we stood by, fearful that the enemy was closing in for the kill,” he wrote later.
Doorman, it is thought, was influenced by his lack of information about the location of the Japanese convoy, so he feared that the convoy would head southward and make landfall. He chose to reverse course and head for the Java coast to be in a better position to intercept the convoy.
At 7:55, the Allied force swung south to the coast of Java amid increasing moonlight. At about 9 pm, the force turned to starboard to parallel the coast. Behind Doorman’s column of cruisers, Binford’s four American destroyers puffed along, gulping fuel. Binford told the officer of the deck on Edwards, “I’m not going in there after Doorman. That Dutchman has more guts than brains.” He ordered his ships to head for Surabaya to refuel and reload ammunition. Unable to contact Doorman directly, he radioed the shore bases and asked them to relay the message to Doorman. They didn’t. So Doorman steamed along, unaware that four of his destroyers were no longer under his command.
With that going on, the night was rent at 9:25 pm when a gigantic explosion tore into the hull of Jupiter, the destroyer at the tail of Doorman’s column, sending fire and smoke into the air. Jupiter’s skipper signaled: “I am torpedoed.” Actually, Jupiter wasn’t. The destroyer had smacked into a stray Dutch mine, part of a field laid only that day, which had blasted open her forward bulkhead in the engine room and sent water gushing in. Damage control parties kept the destroyer afloat for four hours. That enabled Jupiter’s crew to abandon ship properly, using lifeboat davits and Carley floats. Some 78 members of her crew survived the sinking and piloted their boats to the nearby Java coast.
TOP: HMS Exeter is fatally struck by the guns of four Japanese cruisers on March 1, 1942. Exeter was a veteran of the sinking of the German pocket battleship Graf Spee. ABOVE: The Japanese heavy cruiser Myoko fires on the cruiser HMS Exeter at the Second Battle of the Java Sea on March 1, 1942.
Doorman received this latest piece of bad news and altered course north, entering an area littered with life rafts from the earlier losses at 10:17. On Houston, Winslow had been relieved as officer of the deck and had gone to the forward AA director tower in the mainmast to take a few minutes’ nap before the next stage of the battle. He had just closed his eyes when he heard shrill whistles and shouting to starboard. He leaped to his feet and saw groups of men in the drink, yelling in Dutch.
Doorman ordered Encounter to release itself from escorting Exeter and race back to the scene to pick up survivors. Houston fired off flares to mark the area, and Encounter found 113 survivors of Kortenaer, including their commanding officer, Lt. Cmdr. A. Kroese.
Back in Surabaya, Exeter and Witte de With arrived by 11 pm and began repairs and refueling. Binford and his four ships were about to enter the harbor when he received a message from Doorman through the complex communications chain to head for Tanjong Priok to refuel and rearm. Binford turned about and then realized the futility of such action. He conferred with his other skippers, and they agreed that racing to Batavia in the face of Japanese ships and planes without ammunition and fuel would lead to disaster. He ordered his ships into Surabaya to refuel and rebunker and then head south out of the Java Sea.
Back on De Ruyter, Doorman was headed for the last and most dramatic hour of the battle and his life. Lacking destroyer protection, short on ships and ammunition, the Allied force was steaming north on a slight zigzag course. Headed on a slightly converging course but southerly direction was Takagi, still trying to keep between the Allied ships and the transports. Nobody knew where the other side was, as both sides lacked radar and reconnaissance planes.
At 11 pm, both sides sighted each other, with Nachi and Haguro heading south, De Ruyter, Perth, Houston, and Java headed north, in order. Bright moonlight illuminated the battle, and both sides opened fire at extreme range. After a full afternoon of combat action and steaming, neither side’s gun crews were effective. Both sides closed the range to 8,000 yards.
At 11:22 pm, Nachi launched eight torpedoes and Haguro hurled four at the Allied column. One of them hit De Ruyter a few minutes after 11:30 pm and set off an explosion that enveloped the flagship’s stern in a sea of flame. The fire hit the pyrotechnics locker and sent flares and rockets flying into the night sky in a garish and ghastly fireworks display. De Ruyter’s crew raced to their ship’s bow to flee the explosion.
De Ruyter “blew up with an appalling explosion and settled aft, heavily afire,” Waller observed. “It happened with the suddenness and completeness that one sees in the functioning of a good cigarette lighter—a snap and a burst of flame.” A Perth sailor said, “I thought it would fry us. It was so close you could smell burning paint and a horrible stink like burning bodies.”
On Perth, behind De Ruyter, Paymaster Commander Owen watched the fire before him and thought it was the most fearsome thing he had ever seen. On Perth’s bridge, Waller threw his cruiser into a tight turn to avoid colliding with De Ruyter, which threw Owen off his feet. Perth barely missed smacking into the flagship. On Houston, Rooks took evasive action as well.
As the two cruisers maneuvered, another Japanese torpedo hit Java, setting off a massive fire in the other Dutch cruiser. Crewmen on Perth felt the heat.
Java slid to a halt, and Captain P.B.M. Van Staelen ordered his men to abandon ship. Water flooded Java’s compartments, and the cruiser rose up almost vertically. Dutch sailors scrambled and leaped over the sides and into the water as the cruiser went to the bottom.
More than 500 sailors survived Java’s sinking and the oil-soaked waters, giving three cheers for their ship and Queen Wilhelmina.
On De Ruyter another massive explosion rocked the cruiser, and the ship’s distinctive superstructure vanished. The ship’s 40mm antiaircraft ammunition started exploding, and a senior officer ordered the crew to abandon ship.
As De Ruyter sank, Doorman sent off one last signal: all ships were not to stand by but to leave survivors and make for Batavia. Admiral Karel Doorman then joined 344 officers and men of the Royal Netherlands Navy and U.S. Navy Lieutenant Otto F. Kolb of his staff at the bottom of the Java Sea. Another American sailor was luckier. Signalman First Class Marvin E. Sholar slid into the water and was pulled from the drink by the U.S. submarine S-37, which was returning from a patrol.
On Perth Waller realized he was now senior officer present afloat and in the best traditions of the Royal and Royal Australian Navies took decisive action. He ordered Perth and Houston to break off action, feint southeast, and then steam at high speed to Tanjong Priok for fuel, ammunition, and orders.
Winslow wrote, “The Houston and Perth raced on into the night. Behind us blazed the funeral pyres of our comrades-in-arms, whom we deeply mourned.”
The Battle of the Java Sea, the biggest surface naval battle since Jutland, was over. The Japanese had won easily; their invasion of Java had been delayed by exactly one day. And now there was no longer any Allied naval force capable of contesting the Japanese invasion of Java.
Soon there would no longer be any Allied naval force. With ammunition and fuel running short, leadership gone, and two cruisers badly damaged, it was time to flee.
Perth and Houston left first, fueling at Tandjong Priok on February 28 and heading out that afternoon, trying to slip through the Sunda Strait by darkness. Instead they met up with a Japanese force invading Java from the west and blazed away in a doomed “Fireaway-Flanagan” for nearly two hours.
The Allied cruisers damaged three destroyers while sinking a minesweeper and a transport and forcing three transports to beach themselves. But a broadside of Japanese guns and torpedoes tore apart Perth and Houston, sinking both. A total of 307 Perth men and 368 Houston men survived to endure the horror of Japanese POW camps.
At Surabaya, Exeter refueled and repaired. Joined by Encounter and Pope, which still had a full torpedo load, having missed the Java Sea battle, Exeter sailed late on February 28. She headed northeast and then west, hoping also slip through Sunda Strait. The three ships never got there. Four Japanese cruisers ambushed the ships and overwhelmed all three. Only 800 men survived the two British ships, and 149 men from Pope survived.
Binford’s four American destroyers had a better fate. They left Surabaya late on February 28, and sailed through the Bali Strait eastward and reached Fremantle in Australia on March 4. All four ships spent the rest of the war on convoy duties in the Pacific and Atlantic.
On the night of February 28, Japanese troops landed on Java and began moving on their objectives. Despite the best efforts of American artillery, British tanks, and Australian and Dutch troops, the defenses collapsed. On March 9, the Dutch East Indies surrendered. The Japanese had expected to conquer the oil- and resource-rich archipelago in six months. They did it in three.
Many things contributed to the failure of the Allies at the Battle of the Java Sea. Foremost was the inferiority of Allied numbers and power to the Japanese force. The Japanese vessels were modern, equipped with powerful torpedoes, and had crews well trained in using them. The Allied sailors were long-service veterans, but they had not trained or worked together for any length of time and were operating elderly ships with inefficient weapons.
The American destroyers dated back to 1916, and their torpedoes did not detonate.
Most importantly, the command structure in the Dutch East Indies was the first such attempt by the Allies to create a unified multinational force. It lacked unity, cohesion, common communications procedures, and clear chains of command and authority.
Later in the war, when multinational Allied forces invaded Sicily, Italy, France, Burma, and Germany, the command procedures were more authoritative and clear, weaponry and communications unified, tactics simplified. The multinational Allied fleet that returned to Java to bombard and shell Japanese installations and oil fields in 1944 would bear little resemblance to the fleet that went down at the Java Sea beyond the national flags that flew over the attacking warships.
A Maryland eighth grader was suspended for three weeks and did not get to graduate with his class in June. This was his punishment for appearing in the background of a friend’s video in which said friend held a disabled airsoft gun. The eighth grader also posed for a photo with the friend, who held him in a headlock with the fake gun pointing at his head. The picture was shared with 13 other friends on Snapchat.
Are you silently giving thanks that social media didn’t exist when you were a middle schooler? Me too. The 14-year-old boy later admitted he was trying to look like a “badass.”
On Monday his dad—David Bernstein, a nonprofit director—wrote a piece about the incident for The Washington Post. He said he had asked the private Silver Spring school to reconsider the punishment. After all, his son did not threaten anyone with a gun. He did not own a gun. He did not say anything about wanting to kill students, or take his own life, or do anything violent. He was, his dad wrote, just being a “knucklehead.”
But the school insisted the incident was “very, very serious” and therefore warranted suspension through the end of the year.
I’m just not sure how serious it is to be in a photo or video that is stupid but ultimately unthreatening and harmless. But anyway, in an email to me, Bernstein added that this was not the first time he was dismayed by the administration’s take on things.
“I first realized something was amiss at the school when I received a call earlier in the year about another ‘very serious’ incident,” said Bernstein. “My son had told a friend that he observed a teacher texting while driving. He was then hauled into the principal’s office and asked to apologize to the teacher, which he only did reluctantly. ‘The teacher was very hurt,’ the principal stated. ‘And [your son] didn’t seem to care.’ Confused about the ‘crime,’ I asked the principal what if my son was telling the truth. ‘That’s beside the point,’ she said. ‘He violated our community values by hurting the teacher’s feelings.'”
You don’t have to be John Grisham to sense something is a little off here. On the one hand, a child is punished for reporting an actual danger: a texting driver. On the other hand, the same child is punished for participating in a video and photo that did not represent an actual danger.
Clearly the school is very worried about feelings and not so worried about reality. It worried that the teacher accused of texting would feel hurt. And it worried that students might feel “anxiety” if they heard about or saw the video or snap.
In this way, the school is tutoring its students in safetyism—the word Jonathan Haidt and Greg Lukianoff use in The Coddling of the American Mind to describe the demand for pointless safety measures. The students are being taught to believe that they are literally unsafe when actually they are just uncomfortable—and that the administration is required to respond.
Note that responding doesn’t actually make kids any safer, because they were not in any real danger to begin with.
As for the three-week suspension, it seems to mirror the criminal justice system’s obsession with longer and longer sentences. Seems like any kid who is told to “reflect” on his actions for three days has done enough reflecting. “Indeed,” Bernstein noted in his piece, “multiple studies show that long-term suspensions make for worse, not better behavior.”
But of course, Bernstein is dealing with reality. The school is not.
Yesterday, I wrote a post about The New York Times’ praise of the Soviet space program because they launched the first woman into space, and that was more important than the fact that the Soviet Union was a mass-murdering tyrannical police state.
While everyone who reads The New York Times knows that the Soviets put the first man and first woman into space, not many of them know why the Soviets never made it to the moon.
I found an article on NPR that really illustrates, in a heartbreaking way, the reality of the Soviet space program. Cosmonaut Crashed Into Earth ‘Crying In Rage’ So there’s a cosmonaut up in space, circling the globe, convinced he will never make it back to Earth; he’s on the phone with Alexei Kosygin — then a high official of the Soviet Union — who is crying because he, too, thinks the cosmonaut will die. The space vehicle is shoddily constructed, running dangerously low on fuel; its parachutes — though no one knows this — won’t work and the cosmonaut, Vladimir Komarov, is about to, literally, crash full speed into Earth, his body turning molten on impact. As he heads to his doom, U.S. listening posts in Turkey hear him crying in rage, “cursing the people who had put him inside a botched spaceship.” In 1967, both men were assigned to the same Earth-orbiting mission, and both knew the space capsule was not safe to fly. Komarov told friends he knew he would probably die. But he wouldn’t back out because he didn’t want Gagarin to die. Gagarin would have been his replacement. The story begins around 1967, when Leonid Brezhnev, leader of the Soviet Union, decided to stage a spectacular midspace rendezvous between two Soviet spaceships. The plan was to launch a capsule, the Soyuz 1, with Komarov inside. The next day, a second vehicle would take off, with two additional cosmonauts; the two vehicles would meet, dock, Komarov would crawl from one vehicle to the other, exchanging places with a colleague, and come home in the second ship. It would be, Brezhnev hoped, a Soviet triumph on the 50th anniversary of the Communist revolution. Brezhnev made it very clear he wanted this to happen. The problem was Gagarin. Already a Soviet hero, the first man ever in space, he and some senior technicians had inspected the Soyuz 1 and had found 203 structural problems — serious problems that would make this machine dangerous to navigate in space. The mission, Gagarin suggested, should be postponed. He’ll die instead of me. We’ve got to take care of him. The question was: Who would tell Brezhnev? Gagarin wrote a 10-page memo and gave it to his best friend in the KGB, Venyamin Russayev, but nobody dared send it up the chain of command. Everyone who saw that memo, including Russayev, was demoted, fired or sent to diplomatic Siberia. With less than a month to go before the launch, Komarov realized postponement was not an option. He met with Russayev, the now-demoted KGB agent, and said, “I’m not going to make it back from this flight.” Russayev asked, Why not refuse? According to the authors, Komarov answered: “If I don’t make this flight, they’ll send the backup pilot instead.” That was Yuri Gagarin. Vladimir Komarov couldn’t do that to his friend. “That’s Yura,” the book quotes him saying, “and he’ll die instead of me. We’ve got to take care of him.” Komarov then burst into tears. Once the Soyuz began to orbit the Earth, the failures began. Antennas didn’t open properly. Power was compromised. Navigation proved difficult. The next day’s launch had to be canceled. And worse, Komarov’s chances for a safe return to Earth were dwindling fast. All the while, U.S. intelligence was listening in. The National Security Agency had a facility at an Air Force base near Istanbul. Previous reports said that U.S. listeners knew something was wrong but couldn’t make out the words. In this account, an NSA analyst, identified in the book as Perry Fellwock, described overhearing Komarov tell ground control officials he knew he was about to die. Fellwock described how Soviet premier Alexei Kosygin called on a video phone to tell him he was a hero. Komarov’s wife was also on the call to talk about what to say to their children. Kosygin was crying. When the capsule began its descent and the parachutes failed to open, the book describes how American intelligence “picked up [Komarov’s] cries of rage as he plunged to his death.”
This is the picture accompanying the article (you’ve been warned): Vladimir Komarov’s remains in an open casket
Imagine that happening in the United States under NASA.
Engineers at Kennedy finding over 200 potentially fatal defects and letting the flight go because they were afraid the FBI would arrest them because the President wanted the flight to happen.
Yes, there was a cultural issue at NASA the lead to the Challenger Disaster in 1986, but nobody the Challenger went up certain in the knowledge that they were going up to die on a poorly built deathtrap, launched to appease a politician.
A casual disregard for human life was a hallmark of Soviet design. Everything from the design of their tanks which make the crews expendable for the survivability of the weapon platform, to the submarines which occasionally sink, leak radiation, or catch fire without warning killing some or all of the crew.
The Soviets proved several times that they could strap a human being to a rocket and put him just outside the reach of the earth’s atmosphere, and usually bring him home alive. The 250,000 mile trip to the moon was a technical challenge that the Soviets were never able to surmount, and they knew it.
So when The New York Times writes “How the Soviets won the space race for equality” what the really mean is “How the Soviets also treated a woman like expendable objects to be launched into space on faulty garbage.” I guess there is equality in known that a tyrannical government treats both men and women as disposable, but I have a feeling that’s not the type of equality that most Americans like to think about.


 John McAdams, his brother and grandfather pose with a little buck John shot while in eighth grade.


 Vladimir Komarov’s remains in an open casket