Don’t inquire into a person’s past. Take the measure of a man for what he is today.
Never steal another man’s horse. A horse thief pays with his life.
Defend yourself whenever necessary.
Look out for your own.
Remove your guns before sitting at the dining table.
Never order anything weaker than whiskey.
Don’t make a threat without expecting dire consequences.
Never pass anyone on the trail without saying “Howdy”.
When approaching someone from behind, give a loud greeting before you get within shooting range.
Don’t wave at a man on a horse, as it might spook the horse. A nod is the proper greeting.
After you pass someone on the trail, don’t look back at him. It implies you don’t trust him.
Riding another man’s horse without his permission is nearly as bad as making love to his wife. Never even bother another man’s horse.
Always fill your whiskey glass to the brim.
A cowboy doesn’t talk much; he saves his breath for breathing.
No matter how weary and hungry you are after a long day in the saddle, always tend to your horse’s needs before your own, and get your horse some feed before you eat.
Cuss all you want, but only around men, horses and cows.
Complain about the cooking and you become the cook.
Cowboy Drinking
Always drink your whiskey with your gun hand, to show your friendly intentions.
Do not practice ingratitude.
A cowboy is pleasant even when out of sorts. Complaining is what quitters do, and cowboys hate quitters.
Always be courageous. Cowards aren’t tolerated in any outfit worth its salt.
A cowboy always helps someone in need, even a stranger or an enemy.
Never try on another man’s hat.
Be hospitable to strangers. Anyone who wanders in, including an enemy, is welcome at the dinner table. The same was true for riders who joined cowboys on the range.
Give your enemy a fighting chance.
Never wake another man by shaking or touching him, as he might wake suddenly and shoot you.
Real cowboys are modest. A braggert who is “all gurgle and no guts” is not tolerated.
Be there for a friend when he needs you.
Drinking on duty is grounds for instant dismissal and blacklisting.
A cowboy is loyal to his “brand,” to his friends, and those he rides with.
Never shoot an unarmed or unwarned enemy. This was also known as “the rattlesnake code”: always warn before you strike. However, if a man was being stalked, this could be ignored.
Never shoot a woman no matter what.
Consideration for others is central to the code, such as: Don’t stir up dust around the chuck wagon, don’t wake up the wrong man for herd duty, etc.
Respect the land and the environment by not smoking in hazardous fire areas, disfiguring rocks, trees, or other natural areas.
Honesty is absolute – your word is your bond, a handshake is more binding than a contract.
If you’ve read the first parts of this land navigation manual, you should now know how to read a topographic map, find your bearings, and orient yourself with a map and compass.
You’re ready to start doing some serious land navigation. With the aid of modern technology at the outset, you can get a whole lot more specific with your land nav; rather than just finding your way to a major landmark, you can locate a little stake in the ground.
To do that, you plot MGRS (military grid reference system) coordinates on your map before you head out. Why would you want to employ this old/new method of land nav?
So you can be antifragile. Two is one, and one is none; which is to say, technology fails, and you need to have a contingency plan for when it does. Soldiers are required to know how to plot MGRS coordinates on a map with nothing but a military protractor, and how to find those coordinates in the field with a map and compass. That way, if GPS fails on a mission, they can still make it to their intended waypoints – even if they’re small and specific; with MGRS coordinates and a military protractor, you can plot a point on a map within 10 meters of accuracy.
For civilians, knowing how to plot MGRS coordinates by hand and navigate to them can be useful for active outdoorsmen. Let’s say you’re planning a weeklong hunting trip out in the wild. Part of your prep work should be knowing the MGRS coordinates for your start point and your secluded hunting cabin out in the woods. You can plot those points on your map and you’ll have a backup navigation tool in case you lose your GPS device or if it fails.
Besides the practical uses of knowing how to plot coordinate points and navigate to them, it’s just plain fun to do.
Prep Work
Before we learn how to use MGRS coordinates and get out into the field, we’re going to do some prep work to make sure that we have all the information we need to navigate.
Plotting Your Coordinates on the Map
Using a GPS or an online tool, you can acquire 8-digit MGRS coordinates for the various spots you’re targeting during your trek in the wilderness. You’ll then need to plot those points on your map, using a military coordinate protractor.
I’ll walk you through how to do that, using for an example the eight-digit coordinate number: 30469530
We’re going to split that up for easier reading:
3046 (this is our easting coordinate — the vertical lines that run north/south on your map).
9530 (this is our northing coordinate — the horizontal lines that run east/west on your map).
When reading and plotting MGRS coordinates, follow the rule of “right and up.” I’ll show you what is meant by this by continuing our example.
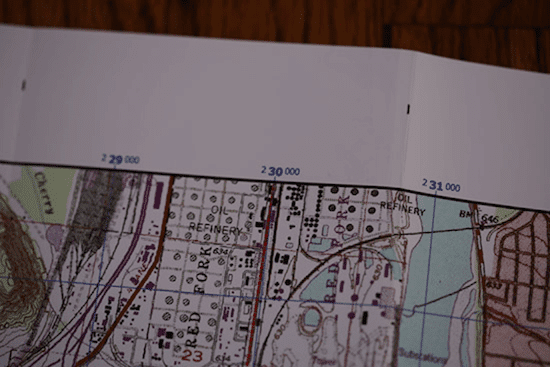
First, we need to find what square in our map we’re working with. To find that, we’re going to look at the first two digits in both the easting and northing coordinates. So our easting number is 30; our northing coordinate is 95.
Look at the top of your map at the easting numbers, and move right until you find the 30 grid line.
Look at the side of your map at the northing number and move up until you find the 95 grid line.
Follow the lines to where they intersect. That is the bottom left corner of the grid square that we’ll be working with.
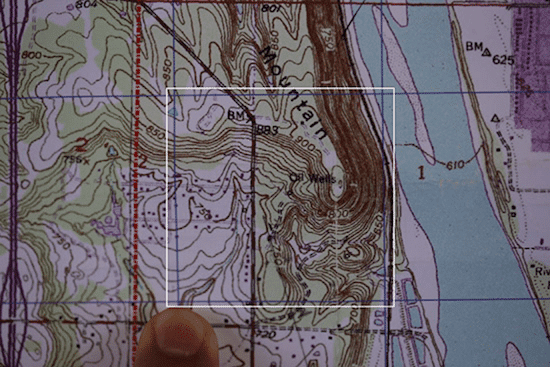
So we’re in this general area. Time to get more specific. With the next two digits in both our easting and northing coordinates, we’ll be able to get within 10 meters of our spot. To do this, we need to bust out our military protractor.
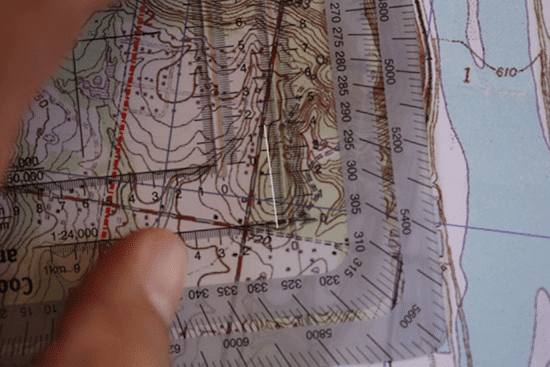
Your protractor will likely have different scale grids. Make sure you use the one that matches your map’s scale, or else you’re going to be way off on your plotting. The map I’m using is a 1:24,000 scale so I’m going to use the 1:24,000 scale grid on my protractor. The horizontal numbers on your grid are for measuring your easting co-ordinates; the vertical numbers are for measuring your northing coordinates.
1. Line up 0/0 on the bottom left corner of your grid.
The first step is to line up 0/0 on your protractor with the bottom left corner of the grid you’re working with.
2. Move protractor right until easting grid line is lined up with second two digits of your easting coordinate.
Let’s take a look at our easting coordinate again: 3046. We’re focusing on those last two digits right now — 46. That tells us our easting coordinate is 460 meters east from the 30 grid line. We want to move our protractor right until our vertical easting line is lined up with 4.6 on our protractor (4.6 represents kilometers=460 meters).
3. Move up on the slot on your protractor using the second two digits of your northing coordinate.
Take a look at our northing coordinate: 9530. We’re going to focus on the last two digits. The 30 tells us that our northing coordinate is 300 meters north of the 95 grid line. We want to move our pencil up until it lines up with 3.0. Place a dot there with your pencil.
Congratulations! You just plotted your first point using an 8-digit MGRS coordinate.
Continue the same process for any other points that you may have. I recommend putting a small number next to each dot to remind yourself of the order of your plots. You can see in the pic above, I wrote a “1” next to my plot.
Getting Your Bearings
Now that we have our coordinates plotted on the map, we need to determine the bearings from each coordinate to the next. We could use our compass as a protractor, but we’ll just use our military protractor because, well, it’s a protractor.
An easy way to do it is to simply draw a line from your first plot through the plot that you’re measuring a bearing on, like so:
Draw it lightly with your pencil (we’re going to erase it), and make sure it extends pretty far past your second plot.
Place your protractor on your map. In the middle of the protractor, you’ll see a little hole. Place that directly over your first plot.
Make sure 0° is in line with north on your map.
Look where the line you just drew on your map lines up on your protractor hashmarks. In this case, it hits the 165° mark.
So from point 1 to point 2, there’s a bearing of 165°.
In a notebook, write your bearing next to the coordinate for your first plot to remind yourself that when you’re at point 1, you’ll shoot a bearing of 165° on your compass to get to point 2.
So it would look like this:
30469530 165°
Now move to point 2 and repeat the same process to get the bearing for point 3. Write that bearing down in your notebook next to your coordinate for point 2 to remind yourself when you get to point 2, you’ll need to shoot that bearing on your compass to get to point 3.
Repeat the process until you’ve gotten bearings for all of your known MGRS coordinate points.
Measuring Distance
With our bearings, we know what direction we’ll need to walk to get to our various points, but how do we know how far we have to travel?
If your protractor has a distance scale, use it. Just make sure you’re using the scale that matches your map. In this case, our map has a scale of 1:24,000, so I’ll use that scale. Keep in mind that each number on it represents 100 meters.
Measure from point 1 to point 2. In the example above, the distance is 400 meters. Write down the distance next to your first coordinate. That helps me remember that when I’m at point 1, I’ll need to travel that distance to get to point 2.
So it would look like this in my notebook:
30469530 165° 400m
Measure distance from point 2 to point 3. Write it down next to point 2.
Repeat until you’ve gotten your measurements all the way to the end point.
Out in the Field
We’ve got our points plotted on our map and our bearings and distances written down. It’s time to start trekking.
Shoot Your First Bearing
We look down at our notes and see that next to our starting coordinate, we have a bearing of 165° to get to point 2. The distance to point 2 is 400 meters.
Get out your compass, and index your bearing to 165° and move your body until the needle is inside the box. Congratulations, you now know which direction you have to walk to get to point 2.
Start Walking and Track Your Distance
Because of the map work we did earlier, we know how far we need to go to get from point 1 to point 2. But how do we track how far we’ve gone when we’re out there walking?
Enter pace counting.
First, we need to figure out how many paces it takes for us to cover 100 meters. You can go to a high school track or use a measuring wheel to stake out your own 100-meter line.
Start with both feet at the start line and step off with your left foot and walk the 100 meters using your normal stride. Every time your left foot touches the ground, count it. When you get to the end, remember what your pace count was.
To make sure we have it keyed in, we’re going to walk back and count again to see if the second time is about the same as the first go round. For a man who’s about 6 feet tall, your pace count for 100 meters will be around 65-70.
So if you need to travel 400 meters and your pace count for 100 meters is 65, you’ll know that it will take about 260 paces to traverse that distance (400/100 = 4; 4X65 = 260). If you need to go 50 meters, you’ll know you need to go about 32 paces (65/2 = 32.5).
Keep in mind that uneven terrain and other environmental factors will effect your pace count. For example, if you’re going up or down a hill, you’ll likely take more steps to traverse 100 meters. Pace count won’t give you an exact measurement of distance, just a rough one.
If you don’t want to lose track of your pace count in your head, consider utilizing “ranger beads” or “pace count beads.” It’s a way for you to offload remembering your pace count to an external device. The folks at ITS Tactical have a great article and video on how to make your own pace count beads for this purpose.
Getting Around Obstacles
The way we’re doing land navigation requires us to walk in straight lines from one point to the next. What do we do if we come across an obstacle in our path, like a dense patch of scraggly mesquite trees or a pond? We’ll need to walk around it, but how do we do that without losing track of our distance and our bearing?
We’re going to do what’s called “boxing” the obstacle.
Let’s say we’re walking a line on a bearing of 165° and we’ve got 100 meters to go until our destination point. Problem is, there’s a small pond in our direction of travel.
To get around it and back on our original bearing while not losing track of our pace count, we’re going to box it.
Stop walking, but remember the pace count that you stopped at. Set a bearing 90° from your original bearing of 165°. That would be 255°. Walk at that 90° angle of your original bearing until you’ve cleared the pond and can move forward again. Remember that pace count — let’s say it’s 40.
Set your compass back to its original bearing of 165° and start walking again until you pass the obstacle. Let’s say it takes you 40 meters to pass the object. You’ve got 60 meters to go until your destination. Problem is, you’re 90° off of your bearing.
To get back to our bearing, we’re going to subtract 90° from 165 and set our compass to 75°. Walk until you’ve gone 40 paces. Stop.
Now add back 90° to get your original bearing of 165°. Walk forward 60 more meters. Congratulations, you’ve boxed an obstacle.
Conclusion
By following the guides we’ve given in this manual, you should be able to get started with learning the skill of land navigation. Of course, you’ll never get the hang of it just by reading — you need to get out there and practice! So get yourself a compass, map, and protractor and start toying around with them on the weekend. Yes, you’ll make mistakes, but that’s all part of the learning process. And if you’ve already learned the basics of land nav, I highly recommend getting out and practicing regularly. It’s a skill that degrades without use.
Until next time, shoot your bearings straight and stay manly!
I ran across this on Facebook, and decided to clip and paste. I have said the same thing for the past 10+ years. It gives me hope that some of the younger generation does realize it. Unfortunately most of them don’t. They have been conditioned to believe that America is “Evil, Racist and the scrouge of the Earth.” I am hoping that the younger generation realized the gift and luck to be born in this country.
Thoughts from a hipster coffee shop…
My generation is becoming the largest voting bloc in the country. We have an opportunity to continue to propel us forward with the gifts capitalism and democracy has given us. The other option is that we can fall into the trap of entitlement and relapse into restrictive socialist destitution. The choice doesn’t seem too hard, does it?
I’m sitting in a small coffee shop near Nokomis trying to think of what to write about. I scroll through my newsfeed on my phone looking at the latest headlines of Democratic candidates calling for policies to “fix” the so-called injustices of capitalism. I put my phone down and continue to look around. I see people talking freely, working on their MacBook’s, ordering food they get in an instant, seeing cars go by outside, and it dawned on me. We live in the most privileged time in the most prosperous nation and we’ve become completely blind to it. Vehicles, food, technology, freedom to associate with whom we choose. These things are so ingrained in our American way of life we don’t give them a second thought. We are so well off here in the United States that our poverty line begins 31 times above the global average. Thirty. One. Times. Virtually no one in the United States is considered poor by global standards. Yet, in a time where we can order a product off Amazon with one click and have it at our doorstep the next day, we are unappreciative, unsatisfied, and ungrateful.
Our unappreciation is evident as the popularity of socialist policies among my generation continues to grow. Democratic Congresswoman Alexandria Ocasio-Cortez recently said to Newsweek talking about the millennial generation, “An entire generation, which is now becoming one of the largest electorates in America, came of age and never saw American prosperity.”
Never saw American prosperity. Let that sink in. When I first read that statement, I thought to myself, that was quite literally the most entitled and factually illiterate thing I’ve ever heard in my 26 years on this earth. Now, I’m not attributing Miss Ocasio-Cortez’s words to outright dishonesty. I do think she whole-heartedly believes the words she said to be true. Many young people agree with her, which is entirely misguided. My generation is being indoctrinated by a mainstream narrative to actually believe we have never seen prosperity. I know this first hand, I went to college, let’s just say I didn’t have the popular opinion, but I digress.
Let me lay down some universal truths really quick. The United States of America has lifted more people out of abject poverty, spread more freedom and democracy, and has created more innovation in technology and medicine than any other nation in human history. Not only that but our citizenry continually breaks world records with charitable donations, the rags to riches story is not only possible in America but not uncommon, we have the strongest purchasing power on earth, and we encompass 25% of the world’s GDP. The list goes on. However, these universal truths don’t matter. We are told that income inequality is an existential crisis (even though this is not an indicator of prosperity, some of the poorest countries in the world have low-income inequality), we are told that we are oppressed by capitalism (even though it’s brought about more freedom and wealth to the most people than any other system in world history), we are told that the only way we will acquire the benefits of true prosperity is through socialism and centralization of federal power (even though history has proven time and again this only brings tyranny and suffering).
Why then, with all of the overwhelming evidence around us, evidence that I can even see sitting at a coffee shop, do we not view this as prosperity? We have people who are dying to get into our country. People around the world destitute and truly impoverished. Yet, we have a young generation convinced they’ve never seen prosperity, and as a result, elect politicians dead set on taking steps towards abolishing capitalism. Why? The answer is this, my generation has ONLY seen prosperity. We have no contrast. We didn’t live in the great depression, or live through two world wars, or see the rise and fall of socialism and communism. We don’t know what it’s like not to live without the internet, without cars, without smartphones. We don’t have a lack of prosperity problem. We have an entitlement problem, an ungratefulness problem, and it’s spreading like a plague.
With the current political climate giving rise to the misguided idea of a socialist utopia, will we see the light? Or will we have to lose it all to realize that what we have now is true prosperity? Destroying the free market will undo what millions of people have died to achieve.
My generation is becoming the largest voting bloc in the country. We have an opportunity to continue to propel us forward with the gifts capitalism and democracy has given us. The other option is that we can fall into the trap of entitlement and relapse into restrictive socialist destitution. The choice doesn’t seem too hard, does it?
Left to right: Charles Duke (Apollo 16), Buzz Aldrin (Apollo 11), Walter Cunningham (Apollo 7), Al Worden (Apollo 15), Rusty Schweickart (Apollo 9), Harrison Schmitt (Apollo 17), Michael Collins (Apollo 11), Fred Haise (Apollo 13)
We really dropped the Ball on Space Exploration!