| January 11, 2016
“It is hard to over-value the powers of the clever tracker. To him the trail of each animal is not a mere series of similar footprints; it is an accurate account of the creature’s life, habit, changing whims, and emotions during the portion of life whose record is in view.” –Ernest Thompson Seton, Boy Scout Handbook, 1911
The other day while hiking some muddy trails with my family, my son pointed to a set of tracks and asked me what animal had made them. “That’s easy,” I said, “those are the tracks of a whitetail deer.” “What about those?” he asked, pointing to another set of footprints. “Those are, um, hmmm, well, I’m not sure what they are,” I confessed. I realized I needed to brush up on my knowledge of animal tracks.
Learning how to track and identify the footprints of animals is an ancient and largely forgotten art — one that’s not only important for hunters, but also enhances any outdoorsman’s experience in the wild. It’s fascinating to know what creatures are sharing the woods with you, and trying to track them down by following their trail is a lot of fun. Learning how to read tracks allows you to pick up on the little dramas enacted by wildlife that usually go unnoticed by the human eye. It’s thus a skill that both deepens your understanding of nature and heightens your all-important powers of observation.
Becoming an expert tracker takes years of practice. To get you started, today we offer a primer on the basics of identifying the footprints of common animals. We’ve taken as our guides two master woodsmen of yore — Ernest Thompson Seton, one of the founders of the Boy Scouts, and Charles “Ohiyesa” Eastman, who was raised as a Sioux tribesman — as well as drawn on tips from Tom Brown Jr., one of the foremost modern trackers.
Let’s head into the woods and see what we can discover!
“Never lose the chance of the first snow if you wish to become a trailer.” –Ernest Thompson Seton
Winter is primetime for animal tracking, as the prints are easy to find in the snow and can be followed for a long distance. However, as Seton explains:
“the first morning after a night’s snow fall is not so good as the second. Most creatures ‘lie up’ during the storm; the snow hides the tracks of those that do go forth; and some actually go into a ‘cold sleep’ for a day or two after a heavy downfall. But a calm, mild night following a storm is sure to offer abundant and ideal opportunity for beginning the study of the trail.”
The drawback of snow tracking is that in deep, soft snow you may find only the holes made by the animal’s feet and legs. Further accumulation and melting can also easily obscure the trail. And of course, some animals don’t come out at all during the winter because they are hibernating.
For these reasons, mud and fine, wet sand can be an even better medium, as they hold the shape of the footprint well. A mudbank stream is one of the best places to look for tracks, as it’s frequented by shore birds and waterfowl as well as animals like the raccoon and muskrat looking for food. After a rain, sand bars, ditches, and muddy gullies are also fruitful places to find the tracks of deer, possums, and other creatures. Looking over a dewy, open field in the morning can reveal the tracks creatures made in the night as well.
Whether in snow or dirt, a track is best and easiest to follow when it is freshest — before wind, rain, melting (in the case of snow), and debris have obscured the prints.
While it’s surely fun to track animals through the wilderness, it’s also enjoyable to try to find their footprints in your very own backyard (and around the trashcan!). So always be aware of your surroundings wherever you go, and you never know what you’ll see.
In learning which tracks belong to which animals, it can help to know the basic classifications of common animal families. Simply by counting the number of toes in a footprint, you can figure out which family the creature belongs to, and from there work on narrowing down which species you’re looking at.
In this narrowing down process, it’s useful to know which animals are common to your area. As Seton explains, “In studying trails one must always keep probabilities in mind”:
“Sometimes one kind of track looks much like another; then the question is, ‘Which is the likeliest in this place.’
If I saw a jaguar track in India, I should know it was made by a leopard. If I found a leopard in Colorado, I should be sure I had found the mark of a cougar or mountain lion. A wolf track on Broadway would doubtless be the doing of a very large dog, and a St. Bernard’s footmark in the Rockies, twenty miles from anywhere, would most likely turn out to be the happen-so imprint of a gray wolf’s foot. To be sure of the marks, then, one should know all the animals that belong to the neighborhood.”
Below you’ll find illustrations of the footprints of the track classifications for the most common families of animals; they break down not only what the tracks look like when the animal is walking (which is its typical gait), but also hopping/running (which it may do when chased by a predator, or doing some chasing of its own).
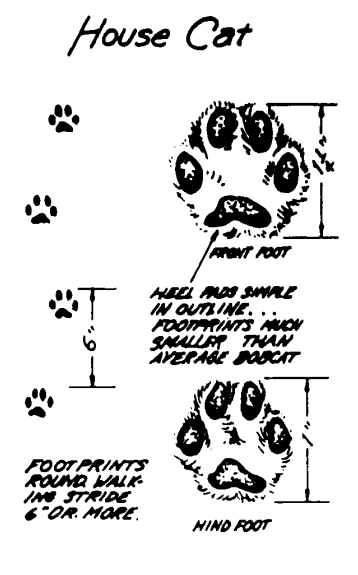
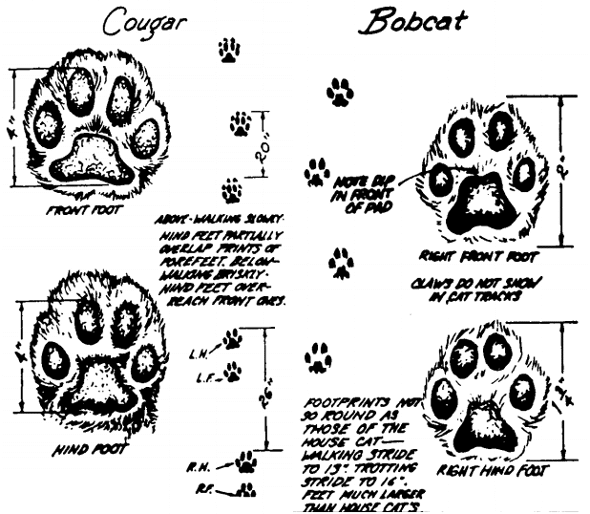
Cats leave rounded prints that show four soft, pliable, spread toes. The prints lack claws, since they’re retractable. A cat also walks in what’s called a “single register” — its hind legs exactly track its front legs, so that it appears to only be walking with two legs, rather than four. This aids in quiet, stealthy stalking.
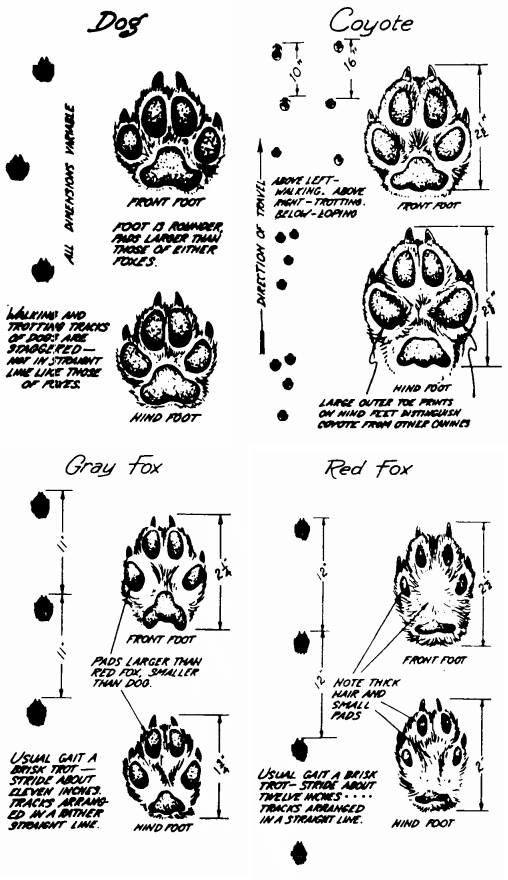
Canines have four toes like cats, but their feet are harder and their claws can be seen as they don’t retract. While the fox walks in a single register, dogs and coyotes walk in an indirect register — their hind legs land a little behind and to the side of the front print, leaving a messier track than that of a cat.

Members of the weasel family have five toes on both their front and hind feet, though all five don’t always show in the track.
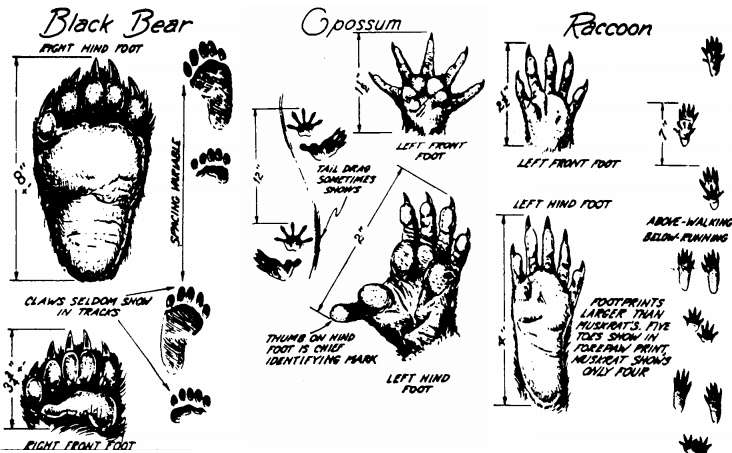
While bears, possums, and beavers don’t belong to the weasel family, their tracks are similar in that they also have five toes in both back and front. However, they differ in the flat, human-like nature of their feet.
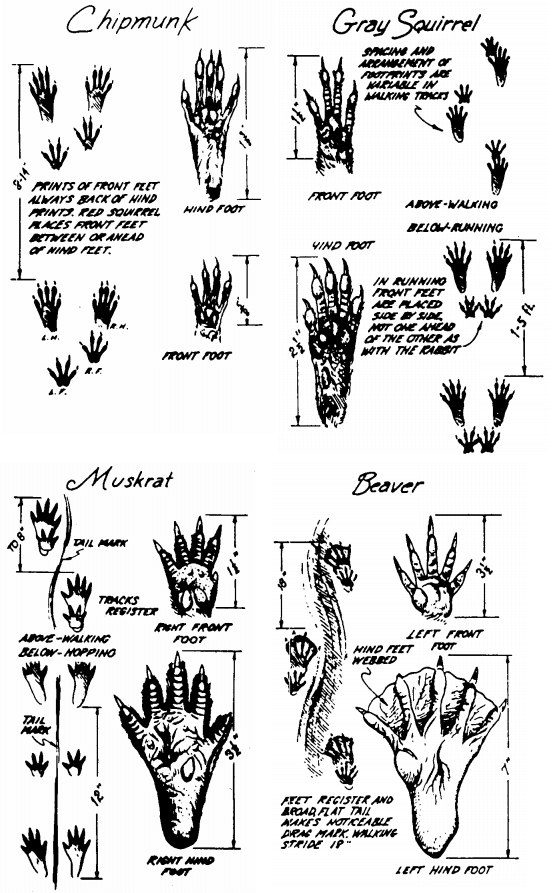
Rodents have four toes on their front feet, and five toes on their hind feet.

Rabbits have four toes on both their front and rear feet, and in almost all species the back feet leave tracks that are at least twice the size of the front.
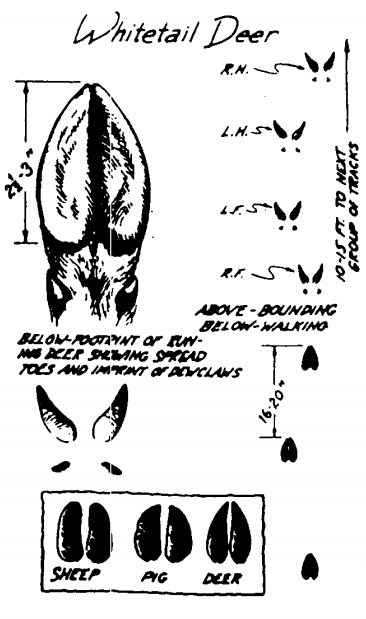
The tracks of hoofed animals are easy to recognize, and deer tracks are some of the most common to find in the woods. You can distinguish a doe from a buck, in that the female has sharper hoofs and a narrower foot than the male.
“I will now ask you to enter the forest with me. First, scan the horizon and look deep into the blue vault above you, to adjust your nerves and the muscles of your eye, just as you do other muscles by stretching them. There is still another point. You have spread a blank upon the retina, and you have cleared the decks of your mind, your soul, for action.
It is a crisp winter morning, and upon the glistening fresh snow we see everywhere the story of the early hours — now clear and plain, now tangled and illegible — where every traveler has left his mark upon the clean, white surface for you to decipher.
The first question is: Who is he? The second: Where is he now? Around these two points you must proceed to construct your story.” –Charles Eastman (Ohiyesa), Indian Scout Talks, 1915
Now that you know what the tracks look like, how do you follow the trail once you’ve identified it?
When following an animal’s footprints, try to track towards the sun if possible, as the shadows will make the impressions stand out more. The sun’s position in the sky during the early morning and late afternoon will particularly enhance the tracks.
As you follow an animal’s tracks, don’t just focus on the discrete sets of prints themselves, but continually take in the trail as a whole — which may in fact be easier than finding individual footprints. For example, by looking ahead, instead of having your nose to the ground, you may see a trail of bent grass through a field. Also look for other disturbances like cracked twigs, or pebbles and leaves that have been overturned to reveal their darker, wetter undersides. If you lose the trail, place a stick by the last set of prints you discovered and then walk around it in an ever widening spiral until you pick up the trail again.
Eastman lays out other considerations for your hunt:
“It is essential to estimate as closely as you can how much of a journey you will undertake if you determine to follow a particular trail. Many factors enter into this. When you come upon the trail, you must if possible ascertain when it was made. Examine the outline; if that is undisturbed, and the loose snow left on the surface has not yet settled, the track is very fresh, as even an inexperienced eye can tell…It will also be necessary to consider the time of year. It is of no use to follow a buck when he starts out on his travels in the autumn, and with the moose or elk it is the same.”
Animal tracks are the alphabet of the wild — an education in their language can help you read more of the nature all around you. As Seton concludes, knowing this language opens books of the woods and its inhabitants that would otherwise be closed to you:
“There is yet another feature of trail study that gives it exceptional value — it is an account of the creature pursuing its ordinary life. If you succeeded in getting a glimpse of a fox or a hare in the woods, the chances are a hundred to one that it was aware of your presence first. They are much cleverer than we are at this sort of thing, and if they do not actually sight or sense us, they observe, and are warned by the action of some other creature that did sense us, and so cease their occupations to steal away or hide. But the snow story will tell of the life that the animal ordinarily leads — its method of searching for food, its kind of food, the help it gets from its friends, or sometimes from its rivals — and thus offers an insight into its home ways that is scarcely to be attained in any other way.
The trailer has the key to a new storehouse of nature’s secrets, another of the Sybilline books is opened to his view; his fairy godmother has indeed conferred on him a wonderful gift in opening his eyes to the foot-writing of the trail. It is like giving sight to the blind man, like the rolling away of fogs from a mountain view, and the trailer comes closer than others to the heart of the woods.
Dowered with a precious power is he,
He drinks where others sipped,
And wild things write their lives for him
In endless manuscript.”


|
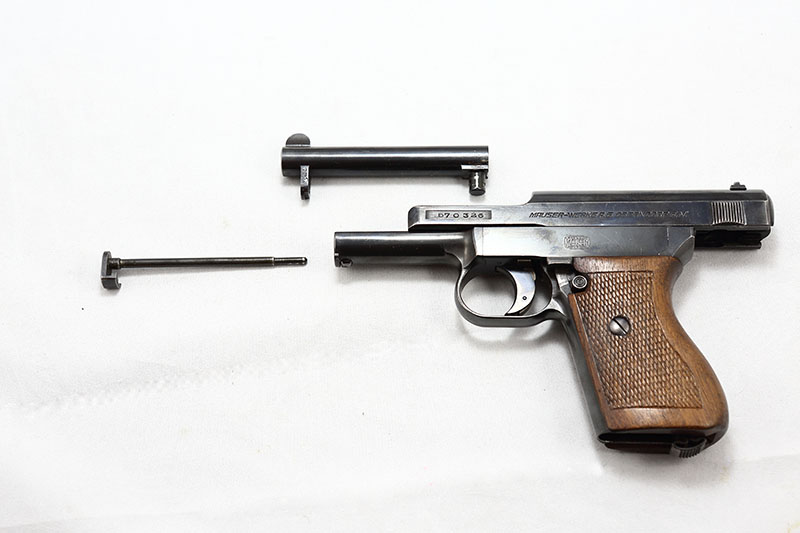
Mauser Pocket Pistols – an Introduction (Revised 14 Feb 2005) |
|
|
|||||||||||||||||||||||||||||||||||||||||||||||||||||||||||||||||||||||||
|
MAUSER POCKET PISTOL TECHNICAL SPECIFICATIONS
MAUSER INFORMATION\REFERENCE MATERIALS AND PARTS BULLETIN BOARDS – INFORMATION EXCHANGE:
MAUSER BOOKS:
|
I could not imagine staying on a horse during a charge.

Bavarian military Pickelhaube

Prussian police leather Pickelhaube
The Pickelhaube (plural Pickelhauben; from the German Pickel, “point” or “pickaxe”, and Haube, “bonnet”, a general word for “headgear”), also Pickelhelm, was a spiked helmet worn in the nineteenth and twentieth centuries by German military, firefighters, and police.
Although typically associated with the Prussian army who adopted it in 1842-43,[1] the helmet was widely imitated by other armies during this period.[2]

Otto von Bismarck wearing a cuirassier officer’s metal Pickelhaube
The Pickelhaube was originally designed in 1842 by King Frederick William IV of Prussia,[3] perhaps as a copy of similar helmets that were adopted at the same time by the Russian military.[4]
It is not clear whether this was a case of imitation, parallel invention, or if both were based on the earlier Napoleonic cuirassier. The early Russian type (known as “The Helmet of Yaroslav Mudry“) was also used by cavalry, which had used the spike as a holder for a horsehair plume in full dress, a practice also followed with some Prussian models (see below).

Prussian infantry Pickelhaube in 1845 (at right)
Frederick William IV introduced the Pickelhaube for use by the majority of Prussian infantry on October 23, 1842 by a royal cabinet order.[5]
The use of the Pickelhaube spread rapidly to other German principalities. Oldenburg adopted it by 1849, Baden by 1870, and in 1887, the Kingdom of Bavaria was the last German state to adopt the Pickelhaube (since the Napoleonic Wars, they had had their own design of helmet, called the Raupenhelm, a Tarleton helmet).
Amongst other European armies, that of Sweden adopted the Prussian version of the spiked helmet in 1845[6] and the Russian Army in 1846[7] (although see above for Russian/Prussian controversy).
From the second half of the 19th century onwards, the armies of a number of nations besides Russia (including Bolivia, Colombia, Chile, Ecuador, Mexico, Portugal, Norway, Sweden, and Venezuela) adopted the Pickelhaube or something very similar.[8]
The popularity of this headdress in Latin America arose from a period during the early 20th century when military missions from Imperial Germany were widely employed to train and organize national armies.
Peru was the first to use the helmet for the Peruvian Army when some helmets were shipped to the country in the 1870s, but during the War of the Pacific the 6th Infantry Regiment “Chacabuco” of the Chilean Army became the first Chilean military unit to use them when its personnel used the helmets—which were seized from the Peruvians—in their red French-inspired uniforms.[9]
These sported the Imperial German eagles but in the 1900s the eagles were replaced by the national emblems of the countries that used them.
.jpg)
Tsarist Russian Pickelhauben, with detachable plumes, mid 19th century
The Russian version initially had a horsehair plume fitted to the end of the spike, but this was later discarded in some units. The Russian spike was topped with a grenade motif. At the beginning of the Crimean War, such helmets were common among infantry and grenadiers, but soon fell out of place in favour of the fatiguecap.
After 1862 the spiked helmet ceased to be generally worn by the Russian Army, although it was retained until 1914 by the Cuirassier regiments of the Imperial Guard and the Gendarmerie.
The Russians prolonged the history of the pointed military headgear with their own cloth Budenovka in the early 20th century.
The Pickelhaube also influenced the design of the British army Home Service helmet, as well as the custodian helmet still worn by police in England and Wales.
The linkage between Pickelhaube and Home Service helmet was however not a direct one, since the British headdress was higher, had only a small spike and was made of stiffened cloth over a cork framework, instead of leather.
Both the United States Army and Marine Corps wore helmets of the British pattern for full dress between 1881 and 1902.
The basic Pickelhaube was made of hardened (boiled) leather, given a glossy-black finish, and reinforced with metal trim (usually plated with gold or silver for officers) that included a metal spike at the crown.
Early versions had a high crown, but the height gradually was reduced and the helmet became more fitted in form, in a continuing process of weight-reduction and cost-saving.
In 1867 a further attempt at weight reduction by removing the metal binding of the front peak, and the metal reinforcing band on the rear of the crown (which also concealed the stitched rear seam of the leather crown), did not prove successful.
Some versions of the Pickelhaube worn by German artillery units employed a ball-shaped finial rather than the pointed spike. Prior to the outbreak of World War I in 1914 detachable black or white plumes were worn with the Pickelhaube in full dress by German generals, staff officers, dragoon regiments, infantry of the Prussian Guard and a number of line infantry regiments as a special distinction.
This was achieved by unscrewing the spike (a feature of all Pickelhauben regardless of whether they bore a plume) and replacing it with a tall metal plume-holder known as a trichter.
For musicians of these units, and also for Bavarian Artillery and an entire cavalry regiment of the Saxon Guard, this plume was red.
Aside from the spike finial, perhaps the most recognizable feature of the Pickelhaube was the ornamental front plate, which denoted the regiment’s province or state.
The most common plate design consisted of a large, spread-winged eagle, the emblem used by Prussia. Different plate designs were used by Bavaria, Württemberg, Baden, and the other German states. The Russians used the traditional double-headed eagle.
German military Pickelhauben also mounted two round, colored cockades behind the chinstraps attached to the sides of the helmet.
The right cockade, the national cockade, was red, black and white. The left cockade was used to denote the state of the soldier (Prussia-black and white; Bavaria-white and blue; etc.).
All-metal versions of the Pickelhaube were worn mainly by cuirassiers, and often appear in portraits of high-ranking military and political figures (such as Otto von Bismarck, pictured above).
These helmets were sometimes referred to as lobster-tail helmets, due to their distinctive articulated neck guard.
The design of these is based on cavalry helmets in common use since the 16th century, but with some features taken from the leather helmets.
The version worn by the Prussian Gardes du Corps was of tombac (copper and zinc alloy) with silver mountings. That worn by the cuirassiers of the line since 1842 was of polished steel with brass mountings,

1892 Überzug on 1895 Pickelhauben

U.S. Marine Corps helmet of similar form, 1881–1902
In 1892, a light brown cloth helmet cover, the M1892 Überzug, became standard issue for all Pickelhauben for manoeuvres and active service.
The Überzug was intended to protect the helmet from dirt and reduce its combat visibility, as the brass and silver fittings on the Pickelhaube proved to be highly reflective.[11] Regimental numbers were sewn or stenciled in red (green from August 1914) onto the front of the cover, other than in units of the Prussian Guards, which never carried regimental numbers or other adornments on the Überzug.
With exposure to the sun, the Überzug faded into a tan shade. In October 1916 the colour was changed to be feldgrau (field grey), although by that date the plain metal Stahlhelm was standard issue for most troops.
All helmets produced for the infantry before and during 1914 were made of leather. As the war progressed, Germany’s leather stockpiles dwindled. After extensive imports from South America, particularly Argentina, the German government began producing ersatz Pickelhauben made of other materials.
In 1915, some Pickelhauben began to be made from thin sheet steel. However, the German high command needed to produce an even greater number of helmets, leading to the usage of pressurized felt and even paper to construct Pickelhauben.
During the early months of World War I, it was soon discovered that the Pickelhaube did not measure up to the demanding conditions of trench warfare.
The leather helmets offered virtually no protection against shell fragments and shrapnel and the conspicuous spike made its wearer a target.
These shortcomings, combined with material shortages, led to the introduction of the simplified model 1915 helmet described above, with a detachable spike.
In September 1915 it was ordered that the new helmets were to be worn without spikes, when in the front line.[12]
Beginning in 1916, the Pickelhaube was slowly replaced by a new German steel helmet (the Stahlhelm) intended to offer greater head protection from shell fragments.
The German steel helmet decreased German head wound fatalities by 70%.
After the adoption of the Stahlhelm the Pickelhaube was reduced to limited ceremonial wear by senior officers away from the war zones; plus the Leibgendarmerie S.M. des Kaisers whose role as an Imperial/Royal escort led them to retain peacetime full dress throughout the war.
With the collapse of the German Empire in 1918, the Pickelhaube ceased to be part of the military uniform, and even the police adopted shakos of a Jäger style.
In modified forms the new Stahlhelm helmet would continue to be worn by German troops into World War II.


The Pickelhaube is still part of the parade/ceremonial uniform of the Life Guards of Sweden, the National Republican Guard (GNR) of Portugal, the military academies of Chile, Colombia, Venezuela and
Ecuador. the Military College of Bolivia, the Army Central Band and Army School Bands of Chile, the Chilean Army‘s 1st Cavalry and 1st Artillery Regiments, and the Presidential Guard Battalion and National Police of Colombia.
Traffic police in the Hashemite Kingdom of Jordan also use a form of the Pickelhaube. The modern Romanian Gendarmerie (Jandarmeria Româna) maintain a mounted detachment who wear a white plumed Pickelhaube of a model dating from the late 19th century, as part of their ceremonial uniform.
As early as in 1844, the poet Heinrich Heine mocked the Pickelhaube as a symbol of reaction and an unsuitable head-dress. He cautioned that the spike could easily “draw modern lightnings down on your romantic head”.[15]
The poem was part of his political satire on the contemporary monarchy, national chauvinism, and militarism entitled Germany. A Winter’s Tale.
In the lead-up to the 2006 FIFA World Cup in Germany, a moulded plastic version of the Pickelhaube was available as a fanware article.
The common model was colored in the black-red-gold of the current German flag, with a variety of other colours also available.
The spiked helmet remained part of a clichéd mental picture of Imperial Germany as late as the inter-war period even after the actual headdress had ceased to be worn.
This was possibly because of the extensive use of the pickelhaube in Allied propaganda during World War I, although the helmet had been a well known icon of Imperial Germany even prior to 1914. Pickelhauben were popular targets for Allied souvenir hunters during the early months of the war.
A World War I German Pickelhaube was used as a prop in the television series Hogan’s Heroes set during the second world war; it was supposedly issued to the prison camp commander during the first war and he kept it atop his desk.
It appeared as one element of the show’s “logo”, shown (with a U.S. Army officer’s service cap hanging from its spike) as background for the show’s end credits.


Here is their address for folks in the neighborhood!
The Crossroads Pawn and Audio in Little River, S.C
As an outdoorsman, I enjoy being afield in all sorts of capacities. While hunting is one of my favorite pastimes, fishing and hiking are a wonderful means of spending time with friends and family and living in close proximity to both the Catskill and Adirondack mountains, there is ample opportunity for both of those activities.
I am also, by trade, a Professional Land Surveyor, so my work hours are often spent in the remote wilderness areas. Here in Upstate New York we have a very healthy black bear population, and highway sightings are quickly becoming a regular occurrence, as are the classic raids on bird feeders and garbage cans alike.
When I head afield, I nearly always carry one form of sidearm or another, and while the truly dangerous encounters are definitely a rarity, I feel better knowing I can protect my loved ones and coworkers should the event unfold.
Now, the black bear is – generally speaking – a rather docile creature, and most of the time it will make every attempt to run away from man.
However, should you have the misfortune of getting between a sow and her cubs, or perhaps meet a cantankerous old boar, the black bear certainly has the equipment to rearrange your anatomy, and even possibly render your birth certificate null and void.
I’ve been privileged enough to take a couple of black bears – in both Quebec and New York – and have seen many more while at work and play.
His cousin, the brown bear, is an entirely different story; when a brown bear means business you need to stop the threat and stop it fast, by any means necessary.
Personally, I’ve only seen a grizzly bear from the comfortable confines of a vehicle, but that boar in Yellowstone Park made a lasting impression. I have yet to set foot in Alaska, but I have many friends and colleagues who either live there, or have significant hunting experience in the 49th state, where encounters with brown bears can honestly represent the hunter becoming the hunted.
With respect to the brownies, I have reached out to the bear guides, residents and hunters for their wisdom and experience on the matter, to find out exactly which sidearms they favor and why.

The author’s well-worn, and well-loved Ruger Blackhawk in .45 Colt is a perfect handgun for bear country.
Now before we take a look at particular models and calibers, let’s get one basic premise out of the way: when the excrement hits the oscillator, any gun is better than no gun. Personally, I do my best to avoid any encounter that could turn ugly, but that’s not always the case.
I remember clearly, back in 2002, while surveying in the foothills of the Berkshires a young employee came running up from the point he was supposed to locate, toward the survey instrument I was running.
His eyes were as wide as saucers, and he was taking strides twice as long as his normal gait would produce. “Phil, I can’t locate that corner; there’s a ****** bear down there!” Now, as surveyors, we carry machetes to cut the brush in between our survey stations, and we are rather proficient with them.
However, the realization that you might have to use one to defend against a couple-hundred pounds of teeth and fangs doesn’t exactly make one feel like Zorro; in fact, I looked down at it and said to myself: This is gonna hurt. I’d have gladly traded it for a snub-nose .38 Special.
This was a glaring example of surprise; this area, while remote, rugged and wooded, wasn’t known for its bear population, very few had ever been seen there, but that one bear had my employee’s undivided attention.
So the point is simple; a wonderful collection of pistols at home won’t do you any good, you’ll have to make do with what you have, Like the Boy Scout motto says, Be Prepared.
The author’s well-worn, and well-loved Ruger Blackhawk in .45 Colt is a perfect handgun for bear country.
Let’s get my own choices out of the way first. If I know ahead of time that I’m heading into black bear country, I like to carry my big handgun: a Ruger Blackhawk, chambered in .45 Colt, stainless finish with a 7 ½-inch barrel.
It was the first handgun I ever purchased, and I put a considerable amount of thought into it. That long pipe makes for a heavier gun, but I’m OK with that because the additional sighting distance and small velocity gain are both appreciated.
The Blackhawk is tough as nails, and while it may not have the prestige of a Colt Single Action Army, it is utterly dependable. Equipped with piano wire springs, the wisely designed transfer bar and adjustable sights, I am very confident with this pistol in hand.
The .45 Colt makes a formidable handgun cartridge, especially in a pistol as strong as the Blackhawk, where the pressures and velocities can be ramped up a bit. My gun will push the strong 300-grain hollow points to just under 1,200 fps, and that’s a formula that can end a confrontation.
My gun likes the Hornady XTPs best, and I feel confident making vital hits out to 40 yards or so with this combination. It’s certainly not the lightest sidearm – weighing in at just over 3 pounds, fully loaded in its holster – but when I’m forced to enter bear country, I have absolutely no worries.

The 7 ½-inch barrel makes for a bit more cumbersome handgun, but the author feels the accuracy is well worth it.
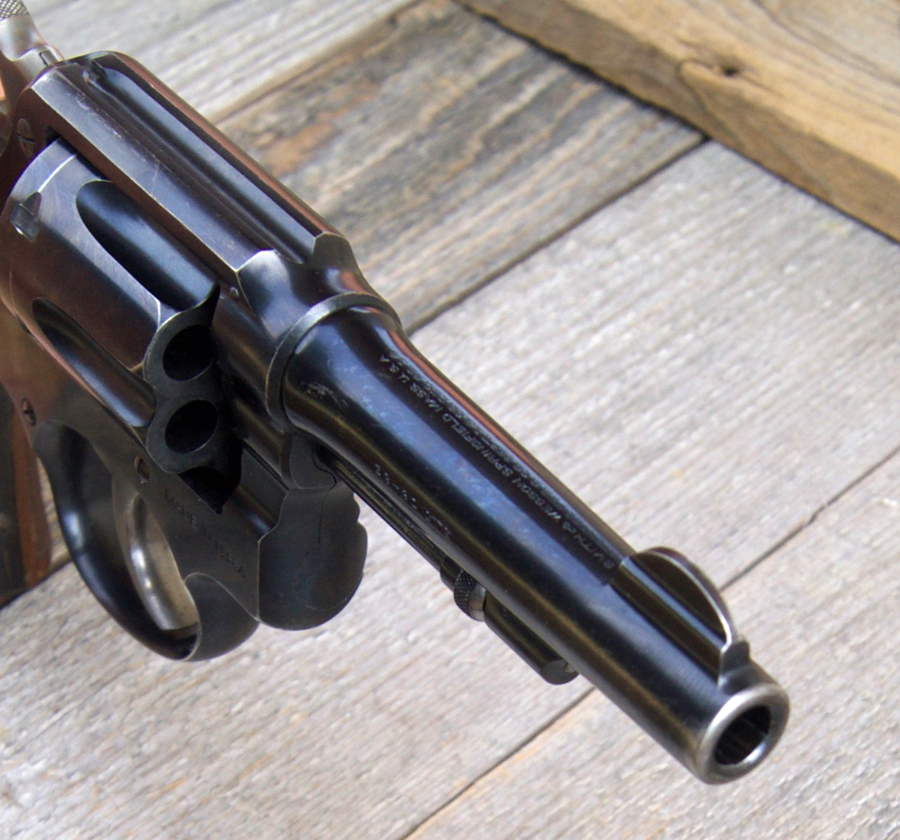
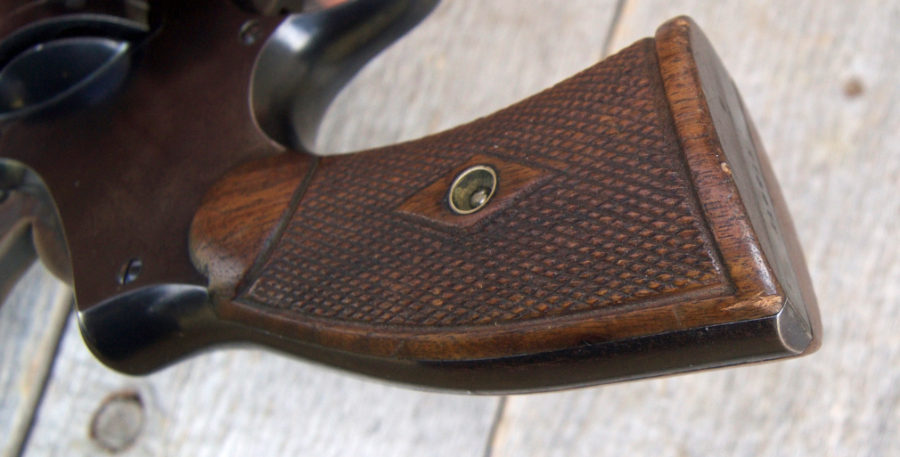
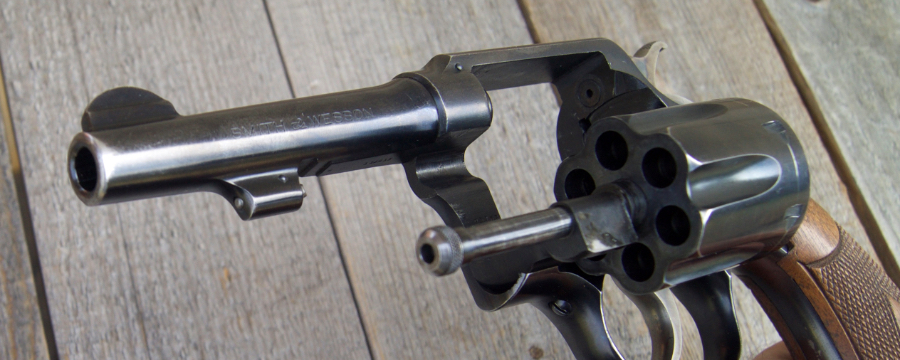
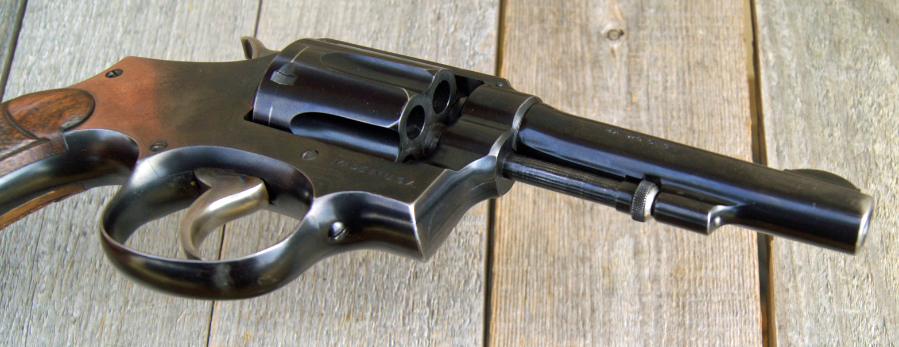
My other handgun, my day-to-day gun, is a well-worn Smith & Wesson Model 36, in .38 Special. It has a 1 7/8-inch barrel and a five-shot cylinder – in the classic snub-nosed configuration – and wears a set of Pachmayr grips, which feel better than the standard J-Frame grips in my hands. Is it a powerhouse, as a bear cartridge?
No, probably not, but I would feel much better with this gun – it’s easily concealable, doesn’t weigh a whole lot, nor take up a lot of room – than with no gun at all. With 158-grain bullets moving at nearly 800 fps, this probably represents – along with the 9mm Luger – the lower end of the spectrum, as far as a defensive bear gun goes.

Although lighter than what one would think of as bear protection, the author’s .38 Special is extremely compact, lightweight and portable.
A good .357 Magnum – and I really like the Kimber K6s – will definitely come in handy. The cartridge will push a 180-grain bullet to a respectable 1,300 fps, and that little Kimber has a lot to offer.
Lightweight and well-balanced, I had a chance to spend a bit of time with this wheelgun at the SHOT Show in Las Vegas.
Its lack of weight had me cringing at first, expecting some wrist-wrenching recoil, but I was pleasantly surprised with the manageability of the K6s. With a 3-inch barrel and a six-shot cylinder combining for a weight of just 25 ounces, this gun was made to be both carried and shot.

A Smith & Wesson Model 29, in .44 Remington Magnum – completely in the vein of Dirty Harry – still makes an excellent choice for the bear woods.
My buddy Marty Groppi – who enjoys the famous trout streams of Upstate New York – carries a Smith & Wesson Model 29 in the classic .44 Magnum, a combination that will most definitely save your bacon.
For those not familiar with this gun, think ‘Dirty Harry.’ The .44 Magnum is definite bear medicine.
Again, please keep in mind that we only have black bears to contend with here in New York. The grizzly and brown bears are a completely different story.

Dick Casull’s brainchild improves the ballistics of the .45 Colt – even in modern handguns – and provides an entirely different performance level for those who can handle it.
A grizzly bear is a formidable foe, having no issue whatsoever proving its dominance over human beings. In Alaska, meat is often removed from a kill site via a frame pack and two strong legs, and all that blood creates a scent trail like a flashing All-you-can-eat buffet advertisement.
In the springtime, when the streams are populated with fishermen, the bears are coming out of hibernation and are ravenous. Young cubs are emerging for the first time, and mothers are ultra-protective. A sidearm is a very smart idea. I’ve reached out for three gentlemen – all of whom I call a friend – for advice and a few experiences regarding their encounters.

Loaded with good ammunition, either of these Smith & Wesson .44 Magnums will make excellent bear medicine.
I’m sure that by now you’ve all heard about famous Alaskan bear guide Phil Shoemaker (grizzlyskinsofalaska.com) , who thwarted a grizzly attack with a Smith & Wesson 9mm automatic, loaded with Buffalo Bore hard cast ammunition. Phil has over three decades of experience guiding hunters and fishermen, and understands their habits as well as anyone else alive.
To recap quickly, Phil and his husband and wife fishing clients were walking through some thick brush to approach the stream they wanted to fish, when they heard a deep ‘woof’ and realized they had a bear close and angry. Long story short, Phil was forced to put the grizzly down.
He normally carries a .44 Magnum but opted for the 9mm that day. When I asked him for his thoughts on carry guns for bear country, Phil related the following: “Phil, I have always said that carrying any handgun for bear protection is similar to wearing a life jacket in a boat, or parachute in a plane. They only work if you have them with you.
In that vein, and considering the real vs. imaginary threat posed by bears, a familiar 9mm loaded with non-expanding bullets is a lot better than a heavy .44 or .500 you left at home or are not completely proficient with.” From one Phil to another, sage advice.
Just as with dangerous game rifles, using a cartridge that is too big to allow for proper shot placement isn’t a wise idea; shot placement is everything.

Cork Graham’s rig. Photo Courtesy: Cork Graham
Cork Graham (corkgraham.com) , a fellow writer, hunter, and Alaska resident – not to mention an actor on the Discovery Channel – had a bit of a different perspective.
“In Alaska, we not only have to deal with the common two-legged variety of vermin found in every place in the world, but also the large, four-legged beasts that can either kill and trample you with their hooves, or rip you apart with their claws and teeth; it’s the latter which draw hunters to the Last Frontier with high-power, large caliber rifles.
Now, my colleague and fellow Alaskan Phil Shoemaker has effectively defended himself with a 9mm against a charging brown bear, but I prefer to carry a .45 ACP with me as my round.
It doesn’t kick as much as my .44 Rem Mag in a JP Sauer six-shooter that I used to carry on remote gold mining operations, and in a M&P Shield and Glock 21, it also serves as my concealed carry. Regarding my loads.
I’m partial to a 230 grain Federal Hydra-Shok jacketed hollow point staggered with 230-grain lead cast bullet, one following the other, the first round out of the magazine a Hydra-Shok.
I carry both in a Blackhawk Alaska Guide Holster in the field, and in a Galco leather CCW holster under my belt in town: since being on TV, I learned that stalkers can be just as dangerous a charging bear.
As a retired, longtime USMC colonel buddy of mine reminded me a few weeks ago, “you should be carrying, always.”
The .45 Colt (L) and .454 Casull (R). The Casull is an updated and slightly elongated version of the .45 Colt, fully capable of firing .45 Colt ammunition. The reverse is not true.
My colleague and friend Bryce Towsley (brycetowsley.com) is a veteran gun writer who has considerable experience with bears of all sorts.
He has spent more than a bit of time in pursuit of bears, hogs, and other game animals with a handgun, in addition to time spent in the Alaskan game fields. When I asked him for his insight, he was kind enough to respond in detail.
“There is a lot of nonsense out on the internet from people who have never seen a bear and have probably never cut up a dead critter to see what a bullet will do.
I have been involved in stopping several black bears intent on doing us damage and have stood two brown bear charges without shooting; although in one of them I probably should have pulled the trigger.
The black bears have been stopped with pistols, rifles, shotguns and once with an ax. (I have killed or watched others kill several with an ax when I was guiding. This one took exception.) I have skinned three browns, two grizzlies and more black bears than I care to remember.
Any bear is a big, tough critter and to stop them you will need to penetrate and break stuff like big bones or skulls.
“A powerful handgun with a tough, deep penetrating bullet is the key. It’s also probably a one or two shot deal, so firepower is irrelevant.
Those who think they can empty their Glock into a charging bear are fools. No matter what anybody says, Shoemaker got lucky with that 9mm on the bear.
I have seen that cartridge fail horribly on black bears and hogs. The result was a dead dog with one of the bears and almost a dead friend with one of the hogs.
If I had not shot the hog with a .44 Magnum I think it would have ended very badly. I know Phil has seen more bears killed than I ever will, but he got lucky. My rule of thumb is the minimum is 4-3-1. At least .40 caliber, 300 grains and 1,000 fps. More is always better and the bullet is the key. No semi-auto makes the grade except perhaps the .50 AE, but most ammo for that fails due to bullets. I have a buddy who guided a hunter with a .50 AE to a brown in the late eighties when it came out and it was a disaster. He saved them both, barely, with his .338 rifle.

The Freedom Arms Model 83, in .454 Casull, in a serious piece of gear. It will drive a 300-grain bullet to over 1,600 fps.
“The 12-year-old in Alaska who just shot the brown with the shotgun is the son of a good friend. His dad stopped a charging brown with a .500 S&W pistol a few years ago. They live off the grid and have lots of bear trouble with their livestock.
He lives every day with brown bears and has guided to dozens if not hundreds of them. He is a hard-core gun guy and he agrees with me on cartridges, guns and bullets.
“That said, here are my picks. The .454 Casull is my usual choice as it provides a good balance of power with manageability. I own several Casulls, but my favorite handgun is a 5-inch, custom Freedom Arms Model 83 that Ken Kelly tricked out for me.
My handloads push a 300-grain hard-cast bullet to 1,614 fps. I usually carry it in a cross-draw holster that allows me to ride a horse or ATV. If I am packing meat, I carry it in a shoulder holster. Both holsters always pack into camp with me. Before any bear country hunt I practice with it a lot.
It is the gun I used in the American Hunter Challenge Video where I make five hits at seven yards in under three seconds. The group was less than four inches and the ammo was full-power Winchester factory loads so it was full recoil.
I have used the Casull to take a lot of game including several black bears so I understand the terminal ballistics of this cartridge pretty well. Sometimes I carry a .44 Magnum with 300-grain cast bullets, but never anything smaller for bear protection. I have a short barrel S&W 629 that Ken Kelly modified. Handloads push a 300-grain to just over 1,000 fps, so it just cracks the code.
It’s very light and handy to carry. I also have a small Freedom Arms in .500 Wyoming Express. It can push a 400-grain bullet to more than 1,500 fps, but I can’t control it. I load them to just over 1,200 fps. It’s often with me in bear country and has made several trips to Alaska. My Ruger Blackhawk in .45 Colt with handloads, 300-grains, 1,200 fps (1,192 to be exact) goes with me on a lot of black bear hunts with hounds. It’s light and easy to carry.”
Dating back to 1873, the .45 Colt will provide very impressive terminal ballistics when loaded in a strong, modern handgun.
Lasting Impressions
Put three or four gun writers in the same room, and you’ll usually get four different answers, but I think you’re seeing a common thread here. With the exception of Mr. Shoemaker – who has more experience than I will ever even hope to have – bigger seems to be better. Let’s hope that we can all avoid the threat of mauling, but if you’re unfortunate enough to have it happen to you, be prepared.
For more information about Federal ammunition, click here.
For more information about Hornady ammunition, click here.
For more information about Smith & Wesson, click here.
To purchase a sidearm for bear country on GunsAmerica, click here.