In December of 2017, I had the pleasure of going through Matt Graham’s “Killhouse” course in Virginia. I was joined by two friends (Clark S. and Cy N.) that have done extensive training with me, and we had high expectations for this course for the months leading up to it. We arrived on a Thursday in preparation for the three day course that would run from Friday through Sunday.
Per the Graham Combat website, the course description is as follows:
The Graham Combat Killhouse is a comprehensive 3-day class designed to give you the fundamentals of defensive shooting, movement, and tactics within a structure.
We spend the bulk of our lives in and around buildings – rooms, hallways, stairs, interior spaces and exterior spaces – and we need to be able to defend ourselves effectively, regardless of the environment.
This 30 hour course combines flat-range firearms fundamentals, live-fire engagements, and force-on-force validation. You will spend Day One refining your combat shooting skills through intensive and focused instruction. Days Two and Three take place in the Killhouse, learning the fundamentals of engagements within spaces.
Additional time will be spent introducing, practicing, and then refining low-light and no-light principles within the same space. This course culminates with multiple force-on-force validations within the Killhouse – bring what you think you believe and put it to work.
Day 1: Weapon Manipulation
We met at the prescribed location a few minutes early and got checked in. We spent a few minutes meeting/greeting other participants who had come from all over the United States. There were representatives from Georgia, Massachusetts, Maryland, California, and several other locations present- and we enjoyed hearing about everyone’s journey into town.
We were joined by Matt, and he began with a safety and medical briefing and an outline of the of the course contents. He also went through an explanation of the locations and facilities that we would use for the different portions of the course, and then rolled right into the course content.
The first part of the course instruction began with Matt asking the rhetorical question of “Why are you here?” This wasn’t necessarily just for our attendance in the course, but “Why are you in whatever situation you find yourself in?” Said differently: “What is your objective for this current situation?” If I am with my family and bad things start to happen- my primary (and only) objective is to deliver my loved ones to safety. I am not there to stop an active shooter. I am not there to put out a hotel fire. I am there to protect my family by helping them escape the danger area. “WHY ARE YOU THERE” would set the tone of the course for every training scenario that we would face.
Transitioning from this key point, Matt would constantly reiterate to us that this course is NOT a course on “building clearing.” “You are NOT clearing anything,” he would remind repeatedly. This course is about YOU actively moving through a structure to perform a task or series of tasks. Some of those tasks include fighting, some include navigating with a person that you are protecting, etc. We are not clearing anything. It goes back to “Why Are You Here?”
Next Matt would segway into the topic of being able to find the danger at hand… If “it” isn’t in front of you (where you are looking), then it is somewhere else. Find it. Seek it out, as it is likely actively seeking you out. Matt emphasized checking behind you more than any instructor that I previously trained with. “Where are your vulnerabilities?” They are everywhere. If they aren’t in front of you, then they’re behind you. Identify them as soon as possible and begin to work through the problems: big to small, near to far.
During this classroom style discussion, Matt would emphasize the importance of making mistakes during training. He drove home the idea that everyone is going to make mistakes, but that victory favors the person making the fewest mistakes. Training allows us the opportunity to make (and eliminate) mistakes without paying the ultimate price. He urged us to not put any negative connotation on failure during training. Matt has a brutally direct sense of humor, which allows him to identify your mistakes and help you laugh through them while learning simultaneously. He constantly cracks jokes about himself and everyone else involved which keeps the mood light and everyone laughing. Honestly, if this whole “gun life” thing doesn’t work out for him, Matt could pursue a career in stand-up comedy. His stories and jokes are worth the price of admission.
 After the classroom discussion was complete, we broke to get our gear together and hit the range. We started with handgun work. Specifically, Matt identified the grip as the most important fundamental of shooting a handgun. (This was refreshing to hear as I constantly stress the importance of gripping the firearm effectively to allow you to shoot accurately with any notable speed.) The first piece of instruction was to grip the handgun the way he wants us to. Luckily, his method was 99% identical to the way that I am used to gripping a handgun, with a minor alteration of the placement of my thumb on my shooting hand. From the grip, we moved into stance/posture and the presentation of the firearm. Matt believes in a “head up, gun up, roll out” method of presentation, and breaks down the process simply with various explanations and demonstrations. We worked on this dry for a few repetitions and then got into the live fire portions of the exercise. We began with what Matt calls “ladder drills” where we would present the firearm and fire one round. The next rep would produce two rounds. Then three… Then start over at one. Rinse and repeat as needed. We worked this drill with reloads as Matt would walk the line and make corrections where needed.
Matt then added in the importance of a safety scan. This process has multiple names to it: after action assessment, safety scan, threat assessment, scan and assess, etc. It’s all trying to accomplish the same goal but with some different ways of teaching it. Matt’s largest change to my current process was to reinforce the concept of not putting my eyes anywhere without my muzzle. “What good is it to see the threat if you can’t engage it?” Matt has an incredible ability to be able to lead you to the correct answers with a simple question… Sometimes that “leading” is humorous and allows you to laugh at yourself at the same time. We worked these drills repeatedly until it was time to break for lunch.
After lunch we returned and began working through a similar process with the carbines. He discussed the similarities between the carbine and the handgun- identifying crossover techniques between the two weapons. We zeroed our rifles and then got to work. After working through similar ladder drills as the handgun, we integrated in the utilization of cover into our manipulations. Matt talked about how to properly work around the cover. This was one of several “nuggets” that I took away from this class… I have a habit of “short stocking” the rifle in order to manipulate it around cover. This is a method of slightly dipping the muzzle and bringing the stock over your shoulder in order to draw it in close to your body so that you can maneuver around cover, obstructions, or within confined spaces. Matt would modify this into “retracting” the firearm instead of short-stocking it, which is a method where you bring the stock under the armpit and the muzzle is slightly elevated. This leaves the muzzle almost perfectly inline with your eyes and the potential threat areas. It offers increased abilities to strike with the muzzle of the firearm, fire from retention, etc. It’s something that I will continue to work on and make it my primary method of moving in confined spaces with a carbine.
The next “nugget” that I took away from this section was shooting at the target from cover. As many times as I’ve heard (and even taught) the phrase “shoot the target center mass as presented” Matt made the idea more applicable for me. In my mind, I’ve generally applied this phrase to shooting at a target where the target was behind cover. I would engage the center of whatever area was exposed. Working it from the other side of the equation, with ME behind cover, is the exact same process but a slightly different mindset. For instance, when shooting from behind cover at an exposed target, I generally would work to find the most appropriate area of the target to neutralize the threat (chest, head, etc.). That’s all well and good, until the target is shooting back at you. As I would work around my cover finding the chest or head, I would be forced to expose more of my body before I engaged. When there is incoming fire, this is obviously bad. Better to start shooting at the elbow and work your way up the arm and into the chest, allowing you to hide behind a wall of bullets as you work your way toward the center of the threat. This was a big “light bulb” for me during this training, and another valuable piece I will be working on continuously.
We then worked into shooting on the move, a technique which Matt simplifies for everyone. We would do “racetrack” drills which was similar to a “musical chairs” exercise where when there was a threat indicated, the appropriate parties would engage the threats in front of them while moving toward cover. It was a great way to combine the skill sets that we had worked up to this point.
As the sun went down, we began working on our low-light techniques with both handguns and rifles, both with weapon mounted lights and freehand techniques. There was an underlying assumption that each participant had previously worked in low-light environments, and everyone seemed to be comfortable and equipped to run their firearms in the dark. Working through this series of exercises would lead us to the end of Day 1.
Day 2: Introduction to CQB
Day 2 began at another location which was basically an apartment complex that was no longer in use. Matt secured this as a fantastic spot for us to work a multitude of different angles, problems, and environments. It worked out great as it provided large, open hallways with a multitude of doors (as would be found in a commercial dwelling) as well as bedrooms, residential hallways, kitchens, etc. (as would be found in residential dwellings). It was a perfect plethora of problems…
As should be obvious, navigating a structure while alone is very different than when you have a partner (or multiple partners) to help you. The most prevalent problem is that of “T” intersections which present themselves in intersecting hallways, opposing doors, or center-fed rooms. While partners can simultaneously dig the deep corners opposite of each other, an individual is forced to choose one direction or the other. The inherent problem is that you temporarily expose your back to one of the corners which you can’t see after immediately crossing the threshold- which is disheartening, to say the least.
Unlike many other courses that I’ve taken, Matt spent virtually no time talking about the common intersections (“T, L, or 4 way”) or much time about doors. Matt takes a very simple approach to this… “You’ve been opening doors for your entire life, let’s not make this more than it is.” Instead he talks about angles… He talks about the danger associated with lingering whether in rooms or connected places and then the need to properly identify your “room” which consists of EVERYTHING you can see or that can see you. He talks about constantly “checking your six” and seeking out threats. If it’s actively searching for you, then it’s important to find it as soon as you possibly can.
Through demonstrations, explanations, question/answers, and dozens of hilarious stories- Matt would address problems that each participant had. Day 2 was all dry fire, but a day where a great deal of the learning process occurred. I can run a gun accurately and efficiently. However, Matt’s method of dealing with problems which arise inside of buildings was slightly different than anything else that I’ve previously encountered. It was very similar to the methods taught by other instructors, but slightly quicker and with fewer interruptions in movement. It offered what I consider to be a happy medium between “limited penetration” and “dynamic entry” methodologies.
During the classroom discussion portions of Day 2, Matt would reiterate that EVERYTHING is our responsibility. Since we don’t have a team, we are responsible for being the breacher, assaulter, medic, and literally everything else. If there are 50 problems that arise, we are responsible for all 50 of them. Work through them: big to small, near to far… Matt would continuously remind us to not outrun our headlights and to avoid becoming our own worst problem. He quoted Sun Tzu in this endeavor as he stated “When your enemy is making mistakes, don’t interrupt him.”
Day 2 was a wealth of knowledge without a single round fired. It was entertaining, enlightening, and produced both answers to questions as well as new questions to accompany the new techniques. Day 3 would be when we put them all to the test…
Day 3: “This isn’t realistic. This is real. You’re standing in it.”
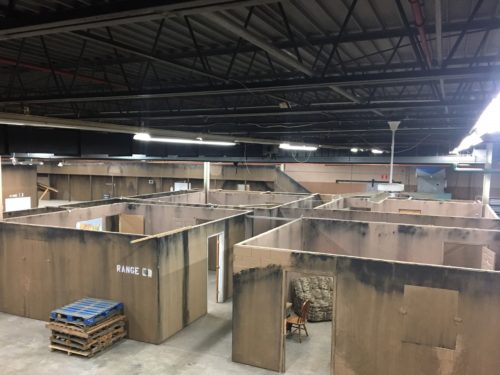 Day 3 began inside the shoothouse. The facility is amazing and offers multiple examples of problems in every form that you would encounter in a home or urban environment. To start off the day, Matt encouraged us to walk around for about 20 minutes and explore the compound. The beauty of the shoothouse is that there are really few ways to “game it” because the opposing forces are also living, thinking people. They are moving, adapting, and changing their methods just as you are. Therefore, Matt ominously told us that we could walk around, ask questions, or whatever we wanted to do.
Matt called us together and we went into one centralized area of the shoothouse for dry runs. From above us on the catwalk, he would observe, instruct, and correct us on our movements and techniques. He demonstrated the process of finding and guiding a loved one that we were separated from, and the most efficient ways of leading them to safety while minimizing the amount of restraint that they placed on our movements. We would partner up and practice dry run after dry run of any number of scenarios and problems as we navigated the house under the watchful eye of Matt. As we would each require correction, Matt would crack a joke and then ask us questions about our decisions until we arrived at the correct conclusion. It was a great way to offer up recommendations and instruction while keeping it light-hearted and fun. This series of instruction would consume the first half of Day 3.
After returning from lunch, the second half of the day would all be with simunitions. The first several runs were with a handgun, and the scenarios would include leading an unarmed partner to safety while engaging (or avoiding) any threats within the house. All of the manipulations from Day 1 would come into direct alignment with the techniques learned on Day 2 while under the stress of return fire. Through a multitude of laughs, bruises, and sweat- mistakes were made, lessons were learned, and negative stimulus was applied.
One of our next runs would include a carbine and would be in more of an open-air, longer range environment. We would have to escort a partner to safety while being engaged by multiple threats. Some of the threats were from elevated positions and virtually all were from longer ranges. This reinforced the need for us to not fall into “tunnel vision” as we worked through our problems. It was a difficult run, to say the least.
Next we would move back into the smaller structure (more “residential” in nature) and would work some more runs with our handguns. However, contrary to the previous runs, these would be done in the dark. The facility allows for low-light environments to be worked through while in the middle of the day. With it completely dark inside the shoothouse, each participant would go and work through our scenario to achieve whatever stated objective was provided. It was a great way to finish the work.
As an added bonus, myself and the two friends who traveled with me were asked to play the opposing force roles for the gentlemen who had been playing the opposing forces all day. We ran them through several low-light runs as they worked through the house, just as we had. It gave them the opportunity to shoot up the same guys that had been hitting them throughout the day. They were great sports about it, and their efforts were an invaluable contribution to each participant’s experience throughout the live-fire portion of the course.
THE GOOD, THE BAD, THE UGLY
Per my usual format, I will end this AAR with my take-aways from the course. I include a section of things that I took away as positives (The Good), things I would prefer to have been done differently (The Bad), and things that are important to consider when planning to attend this course (The Ugly). Note that these are always my interpretations of my experiences from the course, and are mainly here for the consideration of future students who are contemplating this course and for feedback for the instructors from the perspective of a student.
THE GOOD:
I originally scheduled this course more than a year ago. I was registered to take this course in March of 2017, but due to a family emergency I had to reschedule for Decemeber. I waited for more than a year to take this class, and it was one for which I had high expectations. Arguably unreasonably high expectations… I’ve watched Matt’s videos online and always admired his logical approach to problem solving and the demeanor with which he seems to teach. Add in the fact that two close friends and I have talked about this course for months on end, and you can begin to understand the level of excitement that we had going into this course. It delivered in every way. Matt truly hit a homerun with this one.
Facilities:
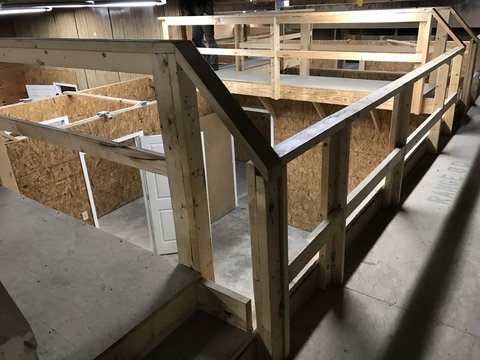 The facilities that Matt has arranged for this training are perfect. They are laid out in such a way that Matt can maximize the amount of time instructing and learning and minimize the down time. The shoothouse allows for low-light runs to happen during mid-day, and the house is inside so weather is not a factor. The live-fire happens in a very large action bay with plenty of room for shots out to 50 yards. There is a covered area for gear and equipment that also has lighting under it. All in all- this course is run out of fantastic facilities that strongly contribute in countless positive ways.
Instruction:
Matt Graham is not your average instructor. He’s in a league where few people ever get to play and his real-world experiences and years as an instructor both readily shine through. He has five simple rules for CQB:
- Nobody is coming to save you.
- Everything is your responsibility.
- Save who needs to be saved.
- Kill who needs to be killed.
- Always be working.
The largest “take-away nuggets” that I had from this course are as follows:
- Retracting the carbine when moving in confined spaces as opposed to short-stocking it
- Shooting your target as it is presented to you and working your way in to its center mass
- Avoiding “the flinch” when encountering a threat
To sum up this section, I will be registering for this course again in either March or October of 2018. I feel as though I could take this course a dozen times and learn something new each time. I’ll test this theory given enough time and money.
THE BAD:
The only way that I think this course could be improved for me would be with more runs in the house. I think there are a few ways to accomplish this… First, I completely understand the necessity of Day 1 for this course. Matt was making sure that we were all on the same page and that everyone was working from a minimum skill set for both manipulations and safety. I also understand that simunition rounds are pretty expensive, so the cost of the course is going to increase if the number of sim-rounds increases. With this course already being pretty expensive, it would likely be cost-prohibitive to increase the number of runs (and therefore number of required sim-rounds). However, if there was any way to do so, I think I would personally benefit from more runs in the house. Instead of having a half-day of runs, I’d like to see a full day- even if that meant the cost of the course went up by another $150. This could be done by either extending this course into a fourth day, or decreasing the first day of manipulations into a half day. This would also alleviate the cost of ammunition to the student so it might not be “more expensive” given the total costs associated with the training.
Understand that again- this is just my perspective. I performed at my best during manipulations and live fire- but I don’t travel to instructors of Matt’s caliber to practice what I’m good at. Instead, I’m seeking out instruction in what I’m not as strong at… I feel like the majority of the lessons that I was learning were from inside the house during the force-on-force, and therefore I would like to spend as much time there as possible.
As a disclaimer- other individuals in the class might have a completely different perspective. Some of the participants might have preferred to do the complete opposite of what I’m mentioning. This section of the AAR is designed to allow the instructor to get constructive criticism from a student’s perspective, and this is just my individual perspective. In order for me to achieve more runs in the house, I plan on taking this course again!
THE UGLY:
This section contains the aspects of the course that aren’t necessarily “bad things” but are rather just things to consider for students who are contemplating taking this course in the future. First and foremost- this is not a beginner’s class. It would be my personal advice that anyone who is contemplating this course to already be able to run their gun at a mostly sub-consious level. For me, courses of this caliber are more about problem-solving and thinking than they are about running the gun. You should already have very competent and safe gun handling skills and manipulations prior to arrival at this course. That will allow you to make the most of your time by consciously focusing on the problem-solving piece, and not worrying about how to clear a double-feed. If you’ve ever worked with simunitions before, you know that the guns run very dirty. You’re going to do malfunction correction. You’re going to do reloads under stress. If you’re having to mentally walk yourself through those tasks, then you might want to shore that up prior to enrolling in this course.
The next consideration for this section is the price. The tuition of this course is expensive (albeit completely worth it). If you’re not in the immediate area, then you will also have travel and lodging expenses in addition to the tuition and ammunition. The breakdown for my personal costs (not including food/drinks) were as follows:
- Tuition = $850
- Range Fee = $100
- Ammunition = $350
- Hotel (4 nights) = $450
- Flight / Gas = $250
- TOTAL: $2,000
The location for 2 of the 3 days is fairly remote and in a small town in Virginia. There weren’t any hotels there, so I would recommend that future participants consider AirBNB to find a local place to stay. It’s worth noting that this would also cut down on commute time (about 45 minutes each way) for 2 of the 3 days. Some of the participants in the course did this and I believe they actually came out about the same as our hotel costs- but with the additional convenience of having an entire house plus decreased commute times.
In short- buy once, cry once. This class is worth three other classes. Skip some others and save your money for this class. You won’t regret it.
CONCLUSION:
To finish out this AAR, I want to reiterate that the intentions of my reports are to share what we did and why we did it but to purposely omit how we did it. The tactics, techniques, and procedures associated with the new skill sets are not mine to give out. In conclusion- I highly recommend that anyone of the requisite skill level who is able to take this course to strongly consider it. If you don’t feel comfortable jumping into a force-on-force class, then I’m sure Matt’s other courses are just as good as this one.
We are going to try to schedule Matt at our facilities in 2018 which will hopefully allow for people in the southeast to train with him more conveniently/affordably. His instruction is among the highest in the industry and people serious about defending themselves or others with a firearm should jump at the opportunity to train with him. He’s truly a master of his craft.


